Location of elements
Model SVX (60th anniversary)
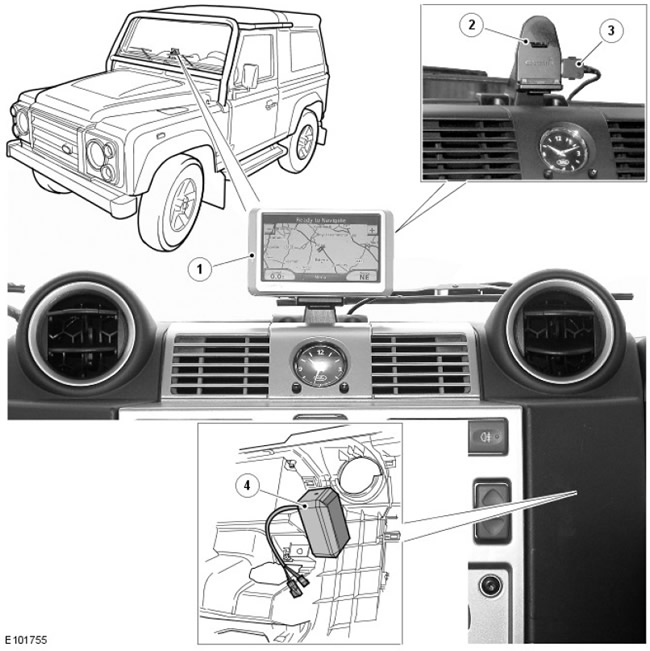
| Pos. | spare part no | Name |
| 1 | - | Navigation box Personal Travel Assistant |
| 2 | - | Holder |
| 3 | - | electrical connector |
| 4 | - | External speaker (located behind the instrument panel) |
Review
The satellite navigation system is standard on the SVX and optional on other models. This block is known as "Land Rover Personal Travel Assistant" and its use and operation are covered in a separate manual supplied with the vehicle.
The Personal Travel Assistant navigation system is a comprehensive navigation system that assists the driver by suggesting directions to the selected destination. The map and turn information displayed on the touch screen are complemented by voice prompts.
The Personal Travel Assistant is also equipped with additional features that can be accessed via the menu "Tools" (Tools):
- media player
- image viewing function
- calculator
- language guide
- currency converter
- unit converter
WARNING: In the interest of road safety, use the system, change settings, and view messages only when it is safe to do so.
The Personal Travel Assistant system must be able to find satellite signals in order to function. The strength of these signals may vary depending on the location. The signal strength can be affected by the presence of tall buildings or trees. When a strong signal is received, the bars in the upper left corner of the main menu are green; when the signal quality deteriorates, the bars turn red or transparent with a red letter "X" on the columns.
Description
The SVX is equipped with a 'Garmin™' satellite navigation box with Land Rover specific software. The unit is self-contained with its own internal battery. Vehicle wiring harness connections provide connection to an external speaker and provide power to charge the internal battery and power the unit when connected to the vehicle.
The unit uses a separate external speaker for voice commands and sound output. The speaker is located under the center air vent behind the instrument panel on the driver's side. However, the unit also has its own internal speaker, allowing the unit to be used outside the vehicle.
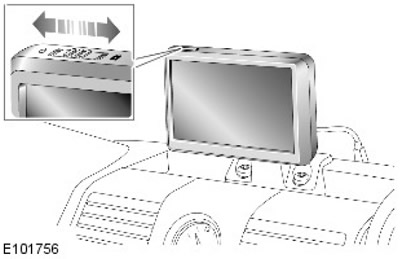
The unit can be turned on with a spring-loaded switch on top of the unit. To turn on the unit, push the switch to the left. To turn the unit off again, push the switch to the left again. The unit can be locked to prevent unauthorized operation by moving the switch on the top of the unit to the right.
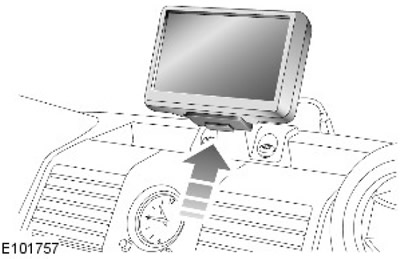
The satellite navigation box is mounted on a bracket, which is attached to the top of the instrument panel with two bolts. The bracket has a holder with a connector that allows you to fix the unit, as well as connect it to the car's electrical system and to the speaker of the navigation system. The holder is mounted on a ball head, which allows you to adjust the position of the unit vertically and horizontally so that it can be deployed to the passenger or driver seats. The unit is fixed on the bracket and can be released by pressing the latch on the bottom of the holder, tilting the top of the unit forward and removing the unit from the support.
Garmin™ Nuvi 750 Block Details
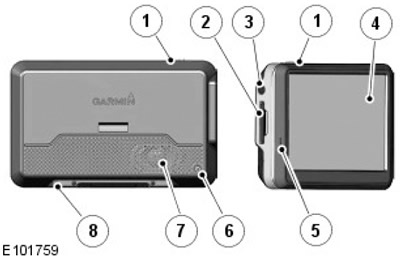
| Pos. | spare part no | Name |
| 1 | - | Switch "Enable/Disable/Lock" (On/Off/Lock) |
| 2 | - | SD card slot |
| 3 | - | Headphone/audio output jack |
| 4 | - | liquid crystal display (LCD) |
| 5 | - | Microphone (not used) |
| 6 | - | External antenna connector |
| 7 | - | Internal speaker |
| 8 | - | - connector (USB) |
The Personal Travel Assistant uses a widescreen LCD with a white background and a touch screen. The display has a resolution of 480 X 272 pixels.
On the left () The end of the block has a 3.5 mm jack for connecting headphones. Below the slot is a slot for an SD memory card. The card can be used to store music files and images that can be played back and displayed on the unit. The unit can play MP3, MP3U and MP3U8 files, display JPEG images and play AA audio books.
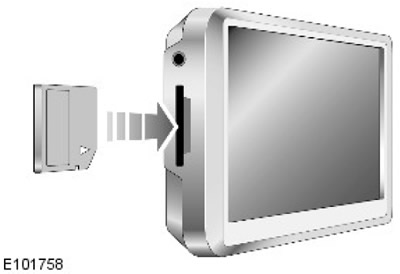
There are two connectors on the underside of the unit. The larger center connector mates with a similar connector in the holder and connects the unit to the vehicle's electrical system. The smaller connector provides a USB cable connection so that the unit can be connected to a computer to perform a software update.
The unit contains a built-in lithium ion battery that cannot be replaced. The battery symbol is displayed on the LCD and indicates the battery status. If the unit is to be rejected, it must be disposed of in accordance with local codes and regulations. A fully charged battery has a charging time of 3 to 7 hours, depending on how the unit is used.
Troubleshooting
| Problem | Resolution method |
| Unable to receive satellite signals | Make sure that the vehicle with the block is not in a closed garage or covered parking, and is also located away from tall buildings and trees. Stop the vehicle for a few seconds to allow the unit to connect to the satellite. |
| The unit does not charge on the car | The unit will be charged if the temperature is between 0 and 45°. If the temperature is above or below this range, if the unit is exposed to direct sunlight, or if it is in a high temperature environment, the unit's battery will not be charged. |
| How to erase all user data | Hold your finger on the bottom corner of the touch screen and turn on the unit. Keep pressing the corner of the touch screen until a message appears. Click on 'Yes' (Yes), to erase all user data. |
| Block blocked or frozen | If the touch screen stops working, turn the unit off and then on again. If this does not solve the problem, slide the power on/off switch to the left for 8 seconds. The block will turn off. Turn the unit back on and it will work normally. |
| The touch screen does not respond to touch | Turn the unit off and then on again. Slide the on/off switch to the right (lock position). Hold your finger on the touch screen for approximately 30 seconds until the calibration screen appears. Follow the on-screen instructions. |
| Battery charging indication seems inaccurate | Let the unit fully discharge. Then fully charge the unit without interrupting the charge cycle. |
Comments on this article