Contents: Removal ⇩ Installation ⇩
Removal
1. Remove the rear seat cushion.
For more information, see the chapter: Rear Seat Backrest (501-10 Seating, Removal and Installation) / Backrest of the rear seat (501-10 Seat, Removal and installation).
2. Remove the rear side trim panel.
For more information, refer to the chapter: Rear Side Trim Panel (501-05 Interior trim, Removal and installation).
3. Remove the cover from the front seat belt upper guide mounting bolt.
4. Remove the bolt and remove the seat belt from the B-pillar.
5. Carefully remove the decorative pin from the 'B' pillar.
6. Remove the four bolts securing the side trim panel to the body side.
7. Release the top edge of the side trim panel by tapping upward with your hand to disengage the three spring clips.
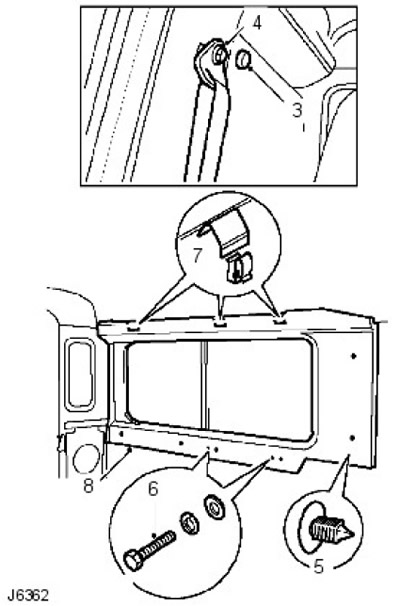
8. Remove the trim panel from the window frame and remove from the vehicle.
Installation
1. Install new spring clips onto the three brackets on the top edge of the side trim panel.
2. Check the position of the trim panel, ensuring that it is correctly positioned relative to the side window.
3. Position the trim panel spring clips on the inside edge of the headliner and press firmly to secure the top edge of the trim panel.
4. Align the trim panel tabs with the body side retaining holes and secure with four bolts and washers. Do not tighten completely at this stage.
5. Install a decorative pin to secure the bottom edge of the trim panel to the 'B' pillar.
6. Secure the seat belt guide to the B-pillar, tighten the bolt to 32 Nm and install the cover on the bolt.
7. Install the rear side trim panel.
For more information, refer to the chapter: Rear Side Trim Panel (501-05 Interior trim, Removal and installation).
8. Install the rear seat cushion.
For more information, see the chapter: Rear Seat Backrest (501-10 Seating, Removal and Installation) / Backrest of the rear seat (501-10 Seat, Removal and installation).
Comments on this article