English
Русский
Български
Беларускі
Український
Српски
Hrvatski
Română
Polski
Slovenský
Magyar
Main
Freelander
Discovery
Range Rover
Defender
Contacts
Articles
Applying sealant to the inside of the side panel
(Range Rover 3)
Main
Range Rover
Range Rover 3
Body and coating
Corrosion protection
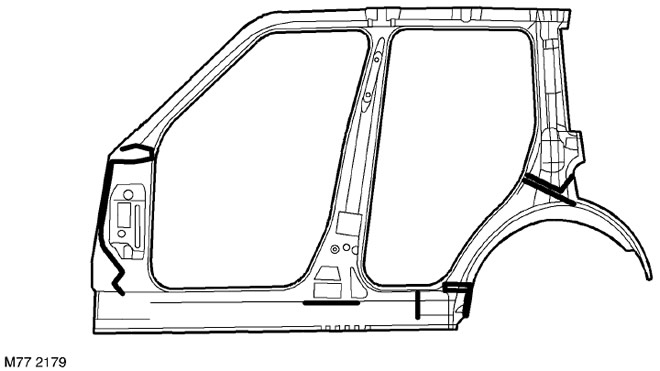
Applying sealant to the inside of the side panel
0
Welding seams located symmetrically as shown in the figure are also subject to processing. Apply a bead of mastic with a diameter of 3mm to all marked panel joints. Do not block the drain holes in the threshold with mastic.
This article is available at
russian
,
bulgarian
,
belarusian
,
ukrainian
,
serbian
,
croatian
,
romanian
,
polish
,
slovak
,
hungarian
Previous articles
Types of hermetic connections
Body sealing materials
Equipment for applying sealants and primers
Body cavity treatment equipment and treatment methods
Applying sealant to the front side members
Applying sealant to the wheel arch and side panel of the body
Current article
Applying sealant to the inside of the side panel
Next articles
Acoustic insulation with foam material
Sealing the front seams
Sealing the rear seams
Sealing the welding seams of the lower part of the car
Sealing door welds
Sealing and underbody materials
Treatment of closed cavities for injection of the composition
Sealants for filling cavities
Water intrusion into the body
Preparing the panel for primer
Preparation for painting
Similar articles from Land Rover repair manuals:
• Rear side panel molding
Freelander 2 (2006-2014)
• Rear side trim panel 3-door car
Freelander 1 (1997-2006)
• Rear side panel molding
Discovery 3 (2004-2009)
• Trim panel of the rear side of the body
Defender 2007+ (2007-2016)
Comments on this article
No comments yet
How much will 46 + 28 =
Range Rover 3
General information
Using the manual
Precautionary measures
Repair techniques
Identification codes
Specifications
Tightening torques
Materials
Maintenance
Power unit
Diesel engine TD6
Petrol engine V8
Emission reduction TD6
Emission reduction V8
Engine management TD6
Engine management V8
Fuel supply TD6 engine
Fuel supply V8 engine
Engine cooling TD6
Engine cooling V8
Exhaust system TD6
Exhaust system V8
Transfer case
Automatic gearbox GM-5L40-E
Automatic gearbox ZF 5HP24
Chassis
Drive shafts
Main gear
Front axle gear
Steering
Front suspension
Rear suspension
Brake system
Body and coating
Passenger safety
Doors and windows
Exterior details
Interior details
Glasses
Seats
Sunroof
Body geometry
Body repair
Corrosion protection
Electrical equipment
Heating and ventilation
Conditioning
Windshield wipers and washers
Starting and charging system
Lighting and headlights
Electronic blocks
Entertainment system
Wiring harnesses
LRman.ru © 2013-2024
|
Mobile version
|
Free Lander
|
Discovery
|
Range Rover
|
Defender
|
Contacts
|
Sitemap
|
Car repair and service instructions Land Rover: Freelander, Discovery, Range Rover, Defender
Comments on this article