Contents: Dismantling ⇩ Assembly ⇩
Before disconnecting the battery, make sure that all requirements and conditions contained in the section on disconnecting the battery are met.
GENERAL INFORMATION, Precautions when working with electrical equipment.
Dismantling
1. Vehicles with sunroof: Open the sunroof.
2. Follow all safety rules when working with passive safety systems.
GENERAL INFORMATION, Safety precautions when working with the airbag system (SRS).
3. Remove the right rear seat.
SEATS, REPAIR WORK, Rear seat.
4. Remove the upper A-pillar covers.
CAR INTERIOR PARTS, REPAIR WORK, Trim - pillar "A" - upper.
5. Remove the upper trims of the middle B-pillars of the body.
CAR INTERIOR PARTS, REPAIR WORK, Trim - pillar "B" - upper.
6. Remove the upper trims of the rear D-pillars of the body.
CAR INTERIOR PARTS, REPAIR WORK, Trim - "D" pillar - upper.
7. Remove the E-pillar trims from the body.
CAR INTERIOR PARTS, REPAIR WORK, Decorative trim - rear E-pillar of the body.
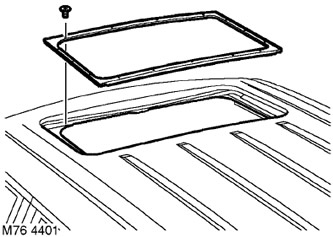
8. Vehicles with sunroof: Remove the 15 Torx screws securing the headliner to the sunroof and remove the sunroof frame.
9. Remove the sun visors.
CAR INTERIOR PARTS, REPAIR WORK, Sun visor.
10. Remove the front upper console from the ceiling.
CAR INTERIOR PARTS, REPAIR WORK, Front overhead console.
11. Remove the rear console from the ceiling.
CAR INTERIOR PARTS, REPAIR WORK, Rear overhead console.
12. Remove the handrails.
CAR INTERIOR PARTS, REPAIR WORK, Interior grab bar.
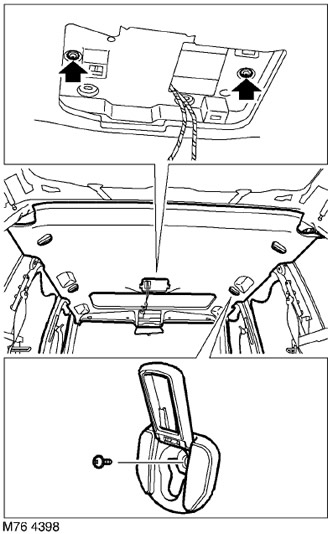
13. Open the shield, unscrew the 4 screws securing the upper covers of the luggage net hooks and remove the covers.
14. Remove the seals from the edges of the door openings to expose the ceiling panel.
15. Unscrew the 2 screws securing the ceiling trim.
16. Vehicles with sunroof: Remove the 4 screws securing the roof panel.
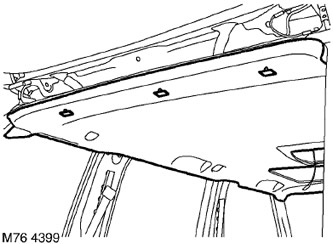
17. Carefully release the 3 fasteners securing the rear edge of the ceiling panel.
18. With the help of an assistant, carefully lower the headliner panel and remove it through the tailgate.
Assembly
1. Install the ceiling panel and secure it with screws.
2. Secure the rear edge clips of the ceiling panel.
3. Install the luggage net hook covers and secure them with screws.
4. Replace the door seals.
5. Install handrails.
CAR INTERIOR PARTS, REPAIR WORK, Interior grab bar.
6. Reinstall the rear console.
CAR INTERIOR PARTS, REPAIR WORK, Rear overhead console.
7. Reinstall the upper front console.
CAR INTERIOR PARTS, REPAIR WORK, Front overhead console.
8. Install sun visors.
CAR INTERIOR PARTS, REPAIR WORK, Sun visor.
9. Vehicles with sunroof: Position and align the sunroof frame with the roof and tighten the roof panel-to-sunroof screws to 2.5 N·m.
10. Reinstall the E-pillar linings of the body.
CAR INTERIOR PARTS, REPAIR WORK, Decorative trim - rear E-pillar of the body.
11. Reinstall the upper D-pillar trims.
CAR INTERIOR PARTS, REPAIR WORK, Trim - "D" pillar - upper.
12. Install the upper trims of the middle B-pillars of the body into place.
CAR INTERIOR PARTS, REPAIR WORK, Trim - "B" pillar - upper.
13. Install the upper A-pillar covers.
CAR INTERIOR PARTS, REPAIR WORK, Trim - pillar "A" - upper.
14. Replace the rear seat.
SEATS, REPAIR WORK, Rear seat.
15. Vehicles with sunroof: Close the sunroof.
[The original article is located on the website: lrman.ru]
16. Connect the negative battery terminal.
Comments on this article