Dismantling
1. Disconnect the negative battery terminal.
2. Disconnect the generator.
3. Remove the rear wheel.
4. Remove the rear door.
5. Remove the rear door and trunk door seals.
6. Remove the rear door and trunk door bumpers.
7. Remove the threshold trim.
EXTERIOR PARTS, REPAIR WORK, Front bumper extension - spoiler.
8. Remove the rear bumper beam.
EXTERIOR PARTS, REPAIR WORK, Bumper beam - rear.
9. Remove the rear wheel arch liner.
10. Remove the exhaust system assembly.
EXHAUST MANIFOLD AND EXHAUST SYSTEM: Td6 engine, REPAIR WORK, Exhaust system and suspension of system components.
11. Remove the rear E-pillar trim.
EXTERIOR PARTS, REPAIR WORK, Decorative trim - rear E-pillar of the body.
12. Remove the rear side glass.
GLASS, REPAIR WORK, Side window of the luggage compartment.
13. Remove the tail light assembly.
LIGHTING, REPAIR WORK, Rear combination light.
14. Right side: Remove all fuel from the fuel tank.
FUEL SUPPLY SYSTEM OF THE Td6 ENGINE, ADJUSTMENTS, Removing fuel from the fuel tank.
15. Right side: Remove the fuel tank filler neck.
16. Right side: Remove the filler cap together with the release mechanism.
The article is based on information from the website [LRMAN.ru]
17. Remove the air suspension cross link valve.
REAR SUSPENSION, REPAIR WORK, Bypass valve.
18. Remove the rear seat belt.
19. Remove the rear E-pillar inner trim.
CAR INTERIOR PARTS, REPAIR WORK, Decorative trim - rear E-pillar of the body.
20. Remove the lower decorative trim from the rear of the side panel.
CAR INTERIOR PARTS, REPAIR WORK, Rear side decorative panel - lower.
21. Remove all audio, video and navigation system components located in the rear of the vehicle.
NAVIGATION AND ON-BOARD ENTERTAINMENT SYSTEM, REPAIR WORKS, Amplifier.
22. Release the rear carpet and move it to the side.
23. Remove the luggage compartment carpet.
24. Remove the sealing elements from the rear of the side panel.
25. Separate the wiring harnesses from the rear pillar and the rear of the quarter panel.
Repair works
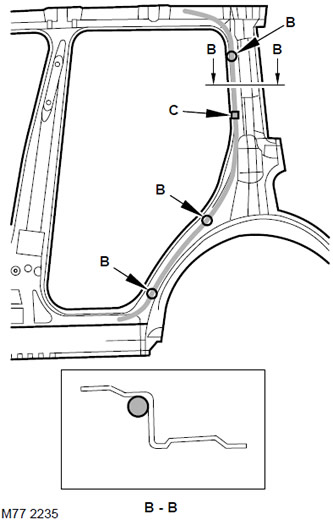
1. Before removing the pillar reinforcement panel, read the following warning.
CAUTION: When cutting a section of the body side panel, do not cut through the reinforcement panel, as there is a drain tube behind it. The approximate position of the drain tube is shown in the figure.
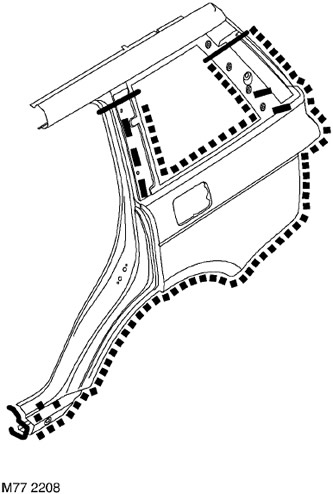
2. Remove damaged panels, prepare joint edges and install new panels in accordance with the Body Panel Repair Rules. Punch or drill holes in the panel to be installed for the plug weld, as shown in the figure.
Assembly
1. Restore the sealing elements of the rear part of the side panel.
2. Secure the wire harnesses to the rear D-pillar and to the rear of the quarter panel.
3. Lay down the luggage compartment carpet.
4. Install all components of the audio, video and navigation systems located in the rear of the passenger compartment.
NAVIGATION AND ON-BOARD ENTERTAINMENT SYSTEM, REPAIR WORKS, Amplifier.
5. Install the lower decorative trim on the rear of the side panel.
CAR INTERIOR PARTS, REPAIR WORK, Rear side decorative panel - lower.
6. Place and secure the rear floor carpet in place.
7. Install the rear E-pillar inner trim.
CAR INTERIOR PARTS, REPAIR WORK, Decorative trim - rear E-pillar of the body.
8. Install the air suspension cross link valve.
REAR SUSPENSION, REPAIR WORK, Bypass valve.
9. Reinstall the rear wheel arch liner.
10. Install the rear seat belt.
11. Install the rear E-pillar trim.
EXTERIOR PARTS, REPAIR WORK, Decorative trim - rear E-pillar of the body.
12. Install the rear side glass.
GLASS, REPAIR WORK, Side window of the luggage compartment.
13. Install the rear light assembly.
LIGHTING, REPAIR WORK, Rear combination light.
14. Right side: Install the fuel tank filler neck.
15. Right side: Install the filler cap with the release mechanism.
16. Install the threshold trim.
EXTERIOR PARTS, REPAIR WORK, Front bumper extension - spoiler.
17. Install the exhaust system assembly into place.
EXHAUST MANIFOLD AND EXHAUST SYSTEM: Td6 engine, REPAIR WORK, Exhaust system and suspension of system components.
18. Install the rear bumper beam.
EXTERIOR PARTS, REPAIR WORK, Bumper beam - rear.
19. Install the rear door and trunk door bumpers.
20. Install the rear door and luggage compartment door seals.
21. Hang the rear door.
22. Install the rear wheel.
23. Right side: Fill the fuel tank.
FUEL SUPPLY SYSTEM OF THE Td6 ENGINE, ADJUSTMENTS, Removing fuel from the fuel tank.
24. Connect the generator.
25. Connect the negative battery terminal.
Comments on this article