Contents: Dismantling ⇩ Assembly ⇩
Before disconnecting the battery, make sure that all requirements and conditions contained in the section on disconnecting the battery are met.
GENERAL INFORMATION, Precautions when working with electrical equipment.
Dismantling
1. Disconnect the negative battery terminal.
2. Remove the turbocharger air inlet hose.
ENGINE MANAGEMENT SYSTEM Td6:, REPAIR WORK, Turbocharger air intake duct.
3. Remove the exhaust gas recirculation (EGR) heat exchanger.
EMISSION CONTROL SYSTEMS - Td6, REPAIR WORK, Exhaust Gas Recirculation (EGR) Cooler.
4. Remove the accessory drive belt.
ENGINE STARTING AND BATTERY CHARGING SYSTEM, REPAIR WORK, Attachment drive belt - Td6 engine.
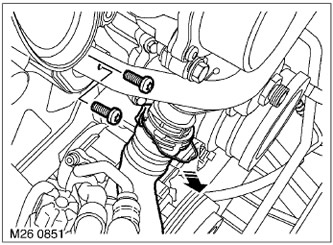
5. Disconnect the lower radiator hose from the thermostat housing. Move the hose to the side for easier access.
6. Remove the 2 bolts securing the heat shield and the exhaust gas recirculation (EGR) pipe to the exhaust manifold.
7. Pull the heat shield completely away from the tube flange (EGR).
8. Remove the exhaust gas recirculation (EGR) pipe.
9. Disconnect the expansion tank hose from the cooling system distribution pipe.
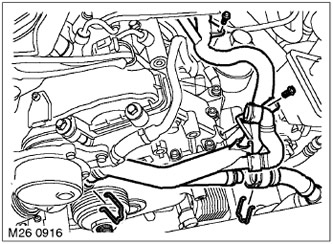
10. Unscrew the 2 bolts securing the cooling system distribution pipe.
11. Unscrew the clamp, disconnect the distribution tube from the thermostat housing and move it to the side.
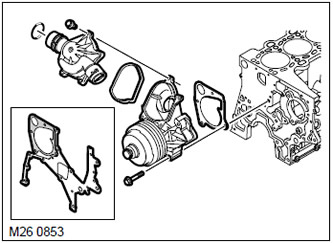
12. Unscrew the 4 bolts of the cooling system pump and remove the pump.
13. Cut the tags off the coolant pump gasket. (applies to factory installed gaskets only)
14. Remove and discard the coolant pump gasket.
15. Remove the 4 bolts and the thermostat housing from the coolant pump. Discard the gasket.
Assembly
1. Wipe the mating surfaces of the thermostat housing and the coolant pump.
2. Install a new gasket on the thermostat housing.
3. Install the thermostat housing onto the coolant pump. Tighten the bolts to 8 N·m.
4. Wipe the coolant pump, mating surfaces on the engine and on the upper distribution pipe.
5. Install a new seal on the distributor pipe, install the pipe on the thermostat housing and tighten the bolts to 8 N·m.
6. Install the coolant pump with a new gasket on the engine. Tighten the bolts. Tightening torque 10 N·m.
7. Attach the lower radiator hose to the thermostat housing and secure it with a clamp.
8. Connect the expansion tank hose to the distribution pipe and secure it with a clamp.
9. Wipe the exhaust gas recirculation (EGR) tube flange and the mating surface on the exhaust manifold.
10. Install the exhaust gas bypass pipe, heat shield, and Torx bolts, but do not tighten them yet. The bolts are tightened after installing the exhaust gas bypass heat exchanger. The tightening torque is 25 Nm.
11. Install the exhaust gas recirculation (EGR) heat exchanger.
EMISSION CONTROL SYSTEMS - Td6, REPAIR WORK, Exhaust Gas Recirculation (EGR) Cooler.
12. Install the accessory drive belt.
ENGINE STARTING AND BATTERY CHARGING SYSTEM, REPAIR WORK, Attachment drive belt - Td6 engine.
13. Install the turbocharger air inlet hose.
ENGINE MANAGEMENT SYSTEM Td6:, REPAIR WORK, Turbocharger air intake duct.
14. Connect the negative battery terminal.
Comments on this article