car logo Ford
car logo Volkswagen
car logo BMW
car logo Opel
car logo Audi
car logo Toyota
car logo Peugeot
English Русский
Български
Беларускі
Український
Српски
Hrvatski
Română
Polski
Slovenský
Magyar


Main
Freelander
Discovery
Range Rover
Defender
Contacts
Articles

Heated oxygen sensor before the neutralizer (Range Rover 3)

 
  • Main
  • Range Rover
  • Range Rover 3
  • Power unit
  • Emission reduction V8
  • Heated oxygen sensor before the neutralizer
 
        0  
Contents: Removal ⇩ Installation ⇩

Removal


1. Raise the car on a lift.
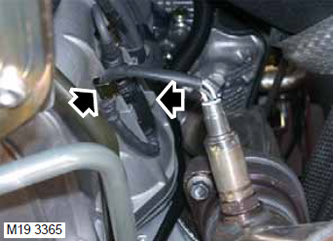
2. Disconnect the heated oxygen sensor wiring harness from the mounting bracket.


2. Disconnect the heated oxygen sensor wiring harness from the mounting bracket.

3. Disconnect the heated oxygen sensor connector from the mounting bracket.

4. Disconnect the oxygen sensor connector from the mating connector on the wiring harness.

5. Remove the oxygen sensor.

6. When reinstalling, replace the old oxygen sensor seal with a new one.

Installation


1. Clean the mating surfaces of the oxygen sensor and the exhaust system.

2. Install a new sealing ring onto the heated oxygen sensor. Coat the sensor threads with anti-seize paste. Install the heated oxygen sensor in place and tighten it to 50 N·m.

CAUTION: Do not allow non-stick paste to come into contact with the sensor's sensitive element.


(The original was published on the portal: lrman.ru)

3. Connect the heated sensor connector to the mating connector and secure it (the connector) with the mounting bracket.

4. Secure the oxygen sensor wiring harness with a clamp.


This article is available at russian, bulgarian, belarusian, ukrainian, serbian, croatian, romanian, polish, slovak, hungarian
Article review: Platon Fedorov


Previous articles
Fuel vapor canister purge solenoid valve
Fuel vapor absorber
Secondary Air Injection (SAI) Valve
Secondary Air Injection (SAI) Pump Relay
Supplementary Air Injection (SAI) Pump
Fuel Tank Leakage Monitoring Unit (DMTL Unit)
Catalytic converter

Current article
Heated oxygen sensor before the neutralizer

Next article
Heated oxygen sensor after the neutralizer


Similar articles from Land Rover repair manuals:
• Heated Oxygen Sensor (HO2S) Freelander 2 (2006-2014)
• Front Oxygen Sensor Freelander 1 (1997-2006)
• Left Heated Oxygen Sensor (HO2S) 4.0L Discovery 3 (2004-2009)
• Rear wheel speed sensor Defender 2007+ (2007-2016)

Comments on this article


No comments yet


How much will 31 + 26 =


Range Rover 3 
  • General information
  • Using the manual
  • Precautionary measures
  • Repair techniques
  • Identification codes
  • Specifications
  • Tightening torques
  • Materials
  • Maintenance
  • Power unit
  • Diesel engine TD6
  • Petrol engine V8
  • Emission reduction TD6
  • Emission reduction V8
  • Engine management TD6
  • Engine management V8
  • Fuel supply TD6 engine
  • Fuel supply V8 engine
  • Engine cooling TD6
  • Engine cooling V8
  • Exhaust system TD6
  • Exhaust system V8
  • Transfer case
  • Automatic gearbox GM-5L40-E
  • Automatic gearbox ZF 5HP24
  • Chassis
  • Drive shafts
  • Main gear
  • Front axle gear
  • Steering
  • Front suspension
  • Rear suspension
  • Brake system
  • Body and coating
  • Passenger safety
  • Doors and windows
  • Exterior details
  • Interior details
  • Glasses
  • Seats
  • Sunroof
  • Body geometry
  • Body repair
  • Corrosion protection
  • Electrical equipment
  • Heating and ventilation
  • Conditioning
  • Windshield wipers and washers
  • Starting and charging system
  • Lighting and headlights
  • Electronic blocks
  • Entertainment system
  • Wiring harnesses


LRman.ru © 2013-2026 | Mobile version | Free Lander | Discovery | Range Rover | Defender | Contacts | | Sitemap |
Car repair and service instructions Land Rover: Freelander, Discovery, Range Rover, Defender
We use cookies to make pages load faster and provide a more user-friendly experience 🍪