Contents: Removal ⇩ Installation ⇩
Before disconnecting the battery, carefully read the "Disconnecting the Battery" section and follow all instructions therein.
GENERAL INFORMATION, Precautions when working with electrical equipment.
Removal
1. Disconnect the ground cable from the battery.
WARNING: Fuel vapors are highly flammable and in a confined space they are also toxic and explosive. A fire extinguisher must be available in the room where fuel is removed from the fuel tank. (foam, carbon dioxide, gas or powder).
2. Remove the lower D-pillar trim.
CAR INTERIOR PARTS, REPAIR WORK, Trim - "D" pillar - lower.
3. Remove the interior trim opposite the "D" pillar.
4. Remove the 2 Allen bolts securing the spare wheel mounting bars to the crossmember and remove the bars.
5. Lift the carpet, bend it forward and fix it in this position.
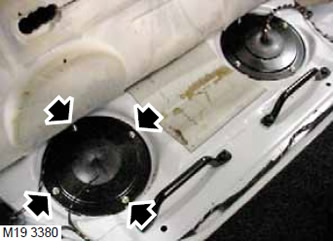
6. Unscrew 4 nuts and remove the left body cover to access the fuel tank.
7. Clean the surface of the lock ring from dirt and dust.
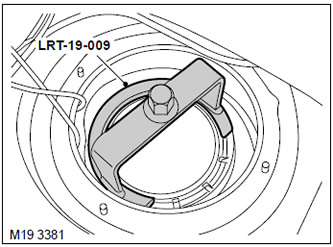
8. Using the LRT-19-009 tool, remove the lock ring from the fuel tank body.
9. Remove the inspection hole plug. When reinstalling, replace the old plug seal with a new one.
CAUTION: Before disconnecting any system components, make sure that the areas immediately adjacent to the components to be disconnected are free of dirt. Close open ends of pipes with plugs immediately after disconnection to prevent foreign particles from entering the system.
Installation
1. Clean the surface around the fuel tank inspection hole from dirt and dust.
2. Clean the inspection hole plug. Install a new plug seal.
3. Insert the plug into the fuel tank hole, press it until it stops. The plug is installed in a certain position. Make sure that the seal is in the correct position after installing the plug.
4. Using tool LRT-19-009, install the lock ring and tighten it to 35 N·m (26 ft·lbs).
5. Lower the mat.
6. Install the spare tire bar mounting bolts and tighten them to 25 N·m (18 lb ft).
7. Reinstall the lower D-pillar trims.
CAR INTERIOR PARTS, REPAIR WORK, Trim - "D" pillar - lower.
8. Connect the ground cable of the battery.
Comments on this article