car logo Ford
car logo Volkswagen
car logo BMW
car logo Opel
car logo Audi
car logo Toyota
car logo Peugeot
English Русский
Български
Беларускі
Український
Српски
Hrvatski
Română
Polski
Slovenský
Magyar


Main
Freelander
Discovery
Range Rover
Defender
Contacts
Articles

Removal fuel from the fuel tank (Range Rover 3)

 
  • Main
  • Range Rover
  • Range Rover 3
  • Power unit
  • Fuel supply TD6 engine
  • Removal fuel from the fuel tank
 
        0  
Contents: Performing the procedure ⇩ Filling the fuel tank ⇩
Before disconnecting the battery, carefully read the "Disconnecting the Battery" section and follow all instructions therein.

GENERAL INFORMATION, Precautions when working with electrical equipment.

Performing the procedure


1. Open the filler cap and unscrew the filler cap.

WARNING: Fuel vapors are highly flammable and in a confined space they are also toxic and explosive. A fire extinguisher must be available in the room where fuel is removed from the fuel tank. (foam, carbon dioxide, gas or powder).


2. Connect the ground wire of the fuel tank removal tool to the vehicle ground.

WARNING: Never drain the fuel from the fuel tank of a vehicle that is on an inspection pit. Draining or removing fuel from the fuel tank should only be done in well-ventilated areas.


3. Prepare the suction hose of the fuel tank removal device, insert it into the fuel tank filler neck, bend the hose slightly if necessary. Cut the end of the suction hose at an angle of approximately 30° to the longitudinal axis to facilitate the passage of the hose.

4. Attach the exhaust gas suction hose to the exhaust pipe.

5. Start the engine.

6. Using the device, pump the fuel from the fuel tank into a hermetically sealed container. For detailed instructions on using the device, read the device operating instructions.

7. When the low fuel indicator lights up, turn off the engine.

CAUTION: Do not operate the fuel pump without fuel in the tank.


8. Disconnect the ground cable from the battery.


9. Remove the plug of the left inspection hole of the fuel tank.

ENGINE FUEL SUPPLY SYSTEM Td6, Fuel filter, Left inspection hole of the fuel tank.


10. Remove the suction hose from the filler neck and screw the plug back into place.
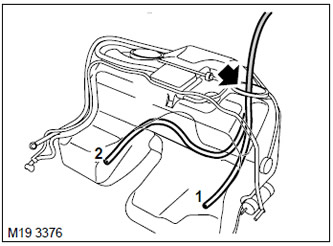
11. Insert the suction hose into the left inspection hole of the fuel tank and remove the remaining…


11. Insert the suction hose into the left inspection hole of the fuel tank and remove the remaining fuel. (in the picture the hose is in position 1). With the hose in the position shown in the figure by number 2, repeat the operation to remove the remaining fuel.

12. Remove the suction hose from the fuel tank, disconnect the ground wire of the device from the vehicle body.

Filling the fuel tank


1. Replace the left fuel tank inspection hole cover.

FUEL SUPPLY SYSTEM OF THE Td6 ENGINE, REPAIR WORK, Left inspection hole of the fuel tank.


2. Fill the fuel tank with the required amount of fuel.

3. Connect the ground cable of the battery.

4. Turn the ignition key to position 1 and hold it in this position for the time required to prime the fuel pump.

5. Start the engine.

6. Turn off the engine and remove the exhaust suction hose.


This article is available at russian, bulgarian, belarusian, ukrainian, serbian, croatian, romanian, polish, slovak, hungarian
Article review: Platon Fedorov


Previous article
Checking the pressure in the low pressure line

Current article
Removal fuel from the fuel tank

Next articles
Fuel filter
Replacing the heat transfer element of the fuel cooler
Fuel pump located in the fuel tank
Auxiliary fuel transfer pump
Removal and installation the fuel tank
Left fuel tank inspection hole


Similar articles from Land Rover repair manuals:
• Fuel Tank Leak Collection System Pump Filter Freelander 2 (2006-2014)
• Fuel Tank Leak Detection System (EVAPS) Freelander 1 (1997-2006)
• Fuel tank assembly 4.0l Discovery 3 (2004-2009)
• Fuel tank Discovery 1 (1989-1998)
• Fuel tank specifications Defender 2007+ (2007-2016)

Comments on this article


No comments yet


How much will 31 + 10 =


Range Rover 3 
  • General information
  • Using the manual
  • Precautionary measures
  • Repair techniques
  • Identification codes
  • Specifications
  • Tightening torques
  • Materials
  • Maintenance
  • Power unit
  • Diesel engine TD6
  • Petrol engine V8
  • Emission reduction TD6
  • Emission reduction V8
  • Engine management TD6
  • Engine management V8
  • Fuel supply TD6 engine
  • Fuel supply V8 engine
  • Engine cooling TD6
  • Engine cooling V8
  • Exhaust system TD6
  • Exhaust system V8
  • Transfer case
  • Automatic gearbox GM-5L40-E
  • Automatic gearbox ZF 5HP24
  • Chassis
  • Drive shafts
  • Main gear
  • Front axle gear
  • Steering
  • Front suspension
  • Rear suspension
  • Brake system
  • Body and coating
  • Passenger safety
  • Doors and windows
  • Exterior details
  • Interior details
  • Glasses
  • Seats
  • Sunroof
  • Body geometry
  • Body repair
  • Corrosion protection
  • Electrical equipment
  • Heating and ventilation
  • Conditioning
  • Windshield wipers and washers
  • Starting and charging system
  • Lighting and headlights
  • Electronic blocks
  • Entertainment system
  • Wiring harnesses


LRman.ru © 2013-2026 | Mobile version | Free Lander | Discovery | Range Rover | Defender | Contacts | | Sitemap |
Car repair and service instructions Land Rover: Freelander, Discovery, Range Rover, Defender
We use cookies to make pages load faster and provide a more user-friendly experience 🍪