GENERAL INFORMATION, Precautions when working with electrical equipment.
Removing
1. Disconnect "mass" battery wire.
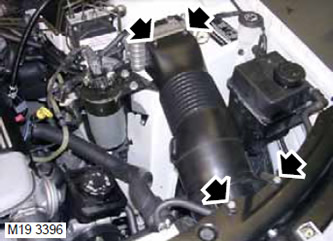
2. Remove the 2 bolts securing the fuel cooler air duct to the hood latch mounting bracket.
3. Remove the 2 bolts securing the fuel cooler air duct to the fuel cooler.
4. Remove the fuel cooler air duct from the vehicle.
5. Take a piece of clean rag and place it in the engine compartment so that it can absorb the fuel spilled during the disconnection of the pipelines.
WARNING: Fuel vapors are highly flammable, and in an enclosed area they are also toxic and explosive. There must be a fire extinguisher in the room where fuel is removed from the fuel tank (foam, carbon dioxide, gas or powder).
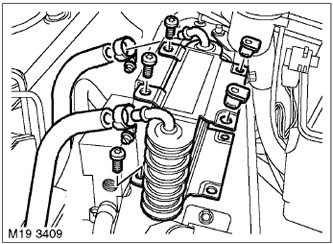
6. Loosen the 2 clamps securing the fuel hoses to the fuel cooler.
CAUTION: Before disconnecting any system elements, make sure that the places immediately adjacent to the disconnected elements are free of dirt. Immediately after disconnection, close the open ends of the pipelines with plugs to prevent foreign particles from entering the system.
7. Disconnect the fuel hoses from the cooler.
8. Remove the 3 Torx bolts securing the fuel cooler to the body and remove the cooler.
NOTE: If the cooler is removed only to provide access to other system components, then further disassembly operations should not be performed.
9. Take out from the case of a cooler of fuel 2 carving pistons.
Installation
1. Insert 2 threaded caps into the fuel cooler housing.
2. Install the fuel cooler on the bracket and tighten the mounting bolts to a torque of 10 Nm (7 lb ft).
3. Make sure that the surface of the fittings is clean, connect fuel hoses to them and tighten the fastening clamps.
4. Replace the air duct and secure it to the cooler body with bolts.
5. Fix the fuel cooler air duct to the hood lock bracket with bolts. Tighten the bolts to 3 Nm (2.2 lb ft).
6. Connect "mass" battery wire.
Comments on this article