Contents: Transporting a car using a trailer ⇩ Towing with a tow truck using the…⇩ Jump starting using jumper cables ⇩
CAUTION: The vehicle has permanent four-wheel drive. The following towing instructions must be strictly adhered to:
Towing a vehicle on all four wheels with a driver in control of the steering and brakes.
- Turn the ignition switch to position '1' to release the steering column lock.
- Select neutral position in the gearbox and transfer case.
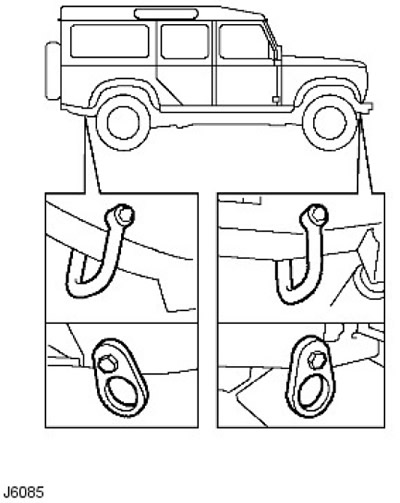
- Attach a towing rope or chain to the front towing eye (options shown).
- Release the parking brake.
CAUTION: The brake booster and power steering will not operate when the engine is switched off. More pedal force will be required to apply the brakes. More steering force will be required to turn the front wheels. The vehicle towing device should only be used on normal road surfaces and should be avoided in situations where increased pulling force is required on the vehicle.
Transporting a car using a trailer
The front and rear chassis side members are fitted with tie-down/towing eyes, see J6085, to facilitate securing the vehicle to a trailer or other means of transport.
CAUTION: Do not use underbody components as fastening elements.
Place the vehicle on the trailer and apply the parking brake. Select neutral gear in the gearbox.
Towing with a tow truck using the method of partially loading the rear of the vehicle
- If the front axle wheels must remain in contact with the road, turn the ignition switch to position '1' to release the steering column lock.
- Select neutral position in the gearbox and transfer case.
- The steering wheel and/or steering gear must be locked in the straight ahead position. DO NOT use the steering column lock mechanism for this purpose.
Jump starting using jumper cables
WARNING: During normal battery operation, hydrogen and oxygen gases are produced. This gas mixture may explode if there is an open flame, sparks, or lit cigarette near the battery. Always provide adequate ventilation and wear eye protection when charging or using the battery in an enclosed area.
Keep away from children. Batteries contain sulfuric acid. Avoid contact with skin, eyes, and clothing. Also, use eye protection when working near batteries to completely eliminate the risk of acid solution coming into contact with your eyes. If acid comes into contact with your skin, eyes, or clothing, rinse the affected area immediately with water for at least 15 minutes. If acid is swallowed, drink plenty of milk or water, then magnesium hydroxide, beaten eggs, or vegetable oil.
SEEK MEDICAL ATTENTION IMMEDIATELY.
To start from an external battery by connecting the negative terminal of the battery to the body ground.
WARNING: To avoid injury, use extreme caution when connecting a booster battery to a dead battery.
- Position the vehicles so that the jumper cables are long enough, but the vehicles DO NOT touch each other. You can place a charged booster battery on the floor next to the vehicle.
- Turn off the ignition and all electrical devices, apply the parking brake and select neutral position. Connect the connecting wires as follows;
A. Connect one end of the first jumper cable to the positive (+) terminal of the booster battery. B. Connect the other end of the first jumper cable to the positive (+) terminal of the dead battery. C. Connect one end of the second jumper cable to the ground (-) terminal of the booster battery. D. Connect the other end of the second jumper cable to a good ground point on the vehicle with the dead battery (eg to the front engine lift eye as shown in J6086), BUT NOT TO THE GROUND TERMINAL OF A DEAD BATTERY. Route the jumper wires away from moving parts, pulleys, drive belts and fan blades.
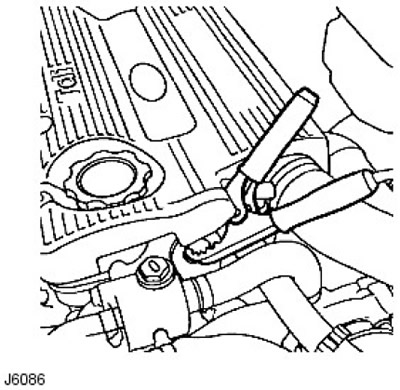
WARNING: When making the final connection, an electrical arc may occur which, if the connection is made near the battery, could cause an explosion.
- If the booster battery is in another vehicle, start the engine and allow it to idle.
- Start the engine of the vehicle with a discharged battery by following the engine starting procedure specified in the Owner's Manual.
CAUTION: If the vehicle does not start within 12 seconds, turn off the ignition and investigate the cause. Failure to follow this instruction may result in permanent damage to the catalytic converter (if available).
- Remove the negative jumper cable from the engine and then disconnect it from the booster battery terminal.
- Remove the positive jumper cable from the positive terminals of the booster battery and the dead battery.
Comments on this article