Contents: Towing eyes ⇩ Four wheel towing ⇩ All cars ⇩ After completing four-wheel towing ⇩ Transportation by trailer ⇩
Towing eyes
WARNING: The single towing eyes on the front of the vehicle are intended for towing the vehicle in the event of a breakdown and MUST NOT be used for towing a trailer or motorhome.
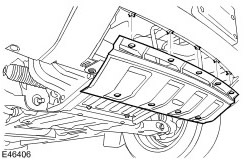
To gain access to the front towing eye, you must open the 9 lever latches that secure the towing eye panel and remove the panel itself.
CAUTION: When towing, make sure that the towing device does not touch the bumper.
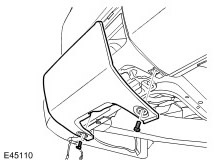
To gain access to the rear towing eye "A", you must open the two latches that secure the towing eye panel to the bumper and remove the panel itself.
Attention: Towing eyes should only be used for towing another vehicle or for placing the vehicle in a position where the front towing eye can be used to tow it.
Four wheel towing
WARNING: DO NOT tow the vehicle with one axle raised. If towing the vehicle on four wheels is not possible, the vehicle must be transported on a trailer designed for this purpose.
WARNING: Vehicles may be towed for a maximum of 3 hours or 90 miles (150 km) at a maximum speed of 30 mph (50 km/h). DO NOT exceed these restrictions.
CAUTION: Perform the following procedures to ensure that the vehicle is towed safely and there is no risk of damage to the transmission.
1. Remove the front towing eye panel.
2. Attach the towing hitch of the tractor to the towing eye.
CAUTION: When towing, make sure that the towing device does not touch the bumper.
3. Apply the parking brake.
4. Insert the ignition key and turn the ignition switch to position II.
5. Manual transmission: Press the brake pedal and move the gear lever to the "N" (NEUTRAL) position.
ATTENTION: If it is not possible to engage "N" - neutral gear, then before towing the vehicle it is necessary to remove the front and rear propeller shafts.
6. Automatic transmission: Press the brake pedal and move the selector lever to the "N" (NEUTRAL) position.
NOTE: If the electrical system does not work, use to move the selector lever to the "N" position. (neutral gear) manual release handle.
All cars
7. Place the transfer case in "H" mode. (upper range).
ATTENTION: If the electrical system does not work and the transfer case cannot be switched to the "H" mode, the vehicle must be towed not on wheels but on a trailer. However, if the transfer case was in the "H" mode at the time of the power failure, towing the vehicle is permitted.
8. Release the parking brake.
NOTE: If there is no power supply, the following steps must be taken to release the parking brake manually:
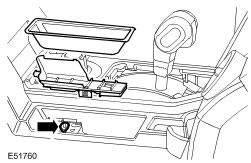
NOTE: Left hand drive vehicle shown; on a right-hand drive vehicle, a similar device is located on the opposite side of the center console.
9. Remove the small storage compartment from the center console
10. Remove the access panel from the center console.
11. Locate the parking brake release rod, insert a suitable tool into the eye and pull the rod towards you to release the parking brake.
CAUTION: The electric parking brake will not operate until the power supply is restored, so it will be necessary to block the vehicle's wheels from rolling when the vehicle is parked.
CAUTION: Do not release the parking brake before towing. Do not attempt to remove the ignition key or turn it to any position other than II while towing. When the engine is off, the power steering and brake booster do not operate, requiring additional effort to turn the steering wheel and press the brake pedal.
WARNING: Use the vehicle towing device only in normal road conditions. Do not use the vehicle towing device to tow the vehicle "by jerking".
The original was published on the portal: www.lrman.ru
After completing four-wheel towing
1. Set the parking brake; if there is no power, securely block the wheels from rolling.
2. Disconnect the towing device from the towing eye.
3. Replace the panel and close the two lever locks.
Transportation by trailer
CAUTION: Use only the front and rear towing eyes, DO NOT attach the fastening elements to any other parts of the vehicle.
After parking the vehicle, apply the parking brake and move the manual or automatic transmission gear selector lever to the "N" position. (neutral gear).
ATTENTION: If there is no power supply and the parking brake has been released, it will not be possible to re-engage it. Therefore, to prevent the vehicle from moving, it is necessary to lock the vehicle wheels from rolling, for which the first gear should be engaged on a manual transmission, and the "P" (parking) mode should be selected on an automatic transmission.
Comments on this article