Contents: General information ⇩ Standard jack ⇩ Hydraulic jack ⇩ Lifting the car and installing stands ⇩ Lifting the front of the car ⇩ Lifting the rear of the car ⇩ Car lift - one wheel/one side ⇩
General information
CAUTION: When lifting the vehicle, the following instructions must be followed:
- The car must be parked on a level and solid surface.
- Apply the parking brake.
- Move the automatic transmission selector to the "P" (park) position, or engage first gear of a manual transmission and select the "H" mode. (upper range) transfer case.
CAUTION: If it is necessary to disconnect the drive shaft(s), the vehicle must be raised until all four wheels are off the ground to allow the shaft(s) to be turned. DO NOT use a customer jack and ensure the vehicle is supported securely on axle stands. Once the vehicle is raised, the automatic transmission selector will need to be in "N" (neutral) to allow the drive shaft(s) to be turned.
CAUTION: To avoid damage to parts located on the bottom, the following requirements must be observed:
CAUTION: Do not place jacks or stands under the following parts:
- Any body parts except for permitted jacking or lifting points
- Bumpers
- Fuel lines
- Fuel tank
- Brake pipes
- Front or rear suspension arms
- Steering rods
- Transfer case
- Front or rear differential
- Transmission
- Engine Oil Pan - See Note Below
NOTE: Some repairs may require the engine oil pan to be supported. In this case, a wooden or rubber block should be placed on the jack rod to protect the oil pan.
Standard jack
The jack supplied with the vehicle is intended for emergency use only to change a flat tire. DO NOT use this jack for any other purpose. The jack installation locations and procedure are provided in the vehicle Operating Instructions.
CAUTION: Do not perform any work on a vehicle supported only by a jack.
Hydraulic jack
Only hydraulic jacks with a permitted load of at least 1500 kg are suitable for use. (3300 pounds).
CAUTION: Do not work from underneath a jacked vehicle unless axle stands have been installed in the designated areas.
CAUTION: When jacking up the vehicle, place wheel chocks under the wheels. Do not rely on the parking brake - it may not work if the rear wheels come off the ground.
Lifting the car and installing stands
To make lifting the vehicle easier, the jacking points are shown in the illustrations below.
Lifting the front of the car
Apply the parking brake. Move the automatic transmission selector to the "P" (Park) position.
CAUTION: When jacking up the front of the vehicle, always place wheel chocks under the rear wheels of the vehicle.
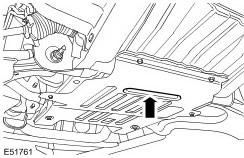
Position the hydraulic lift rod in the center of the recess in the lower engine shield.
NOTE: If the engine undershield is removed, install the hydraulic lift rod in the center of the front subframe crossmember.
Once the vehicle is raised to the required height, place jack stands under the axles as shown in the figure.
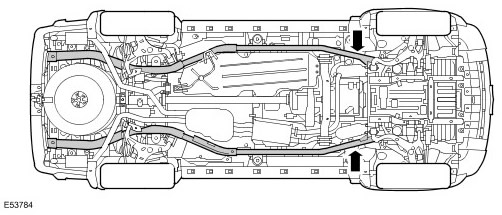
CAUTION: To prevent damage to the longitudinal beams, place blocks of suitable material between them and the supports.
Carefully lower the jack rod - the car should smoothly lower onto the stands.
CAUTION: Before starting work underneath the vehicle, make sure once again that the stands are installed correctly and that the vehicle is securely fastened to the stands.
To remove the vehicle from the stands, perform the above operations in reverse order.
Lifting the rear of the car
Move the automatic transmission selector to the "P" (park) position.
CAUTION: When jacking up the front of the vehicle, always place wheel chocks under the front wheels.
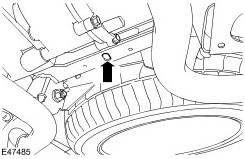
Install the hydraulic lift rod to the center of the rear subframe crossmember as shown in the illustration.
CAUTION: To avoid damage to the heat shield, make sure the jack rod is the correct size. It is not recommended to use a spacer between the jack rod and the rear subframe crossmember, as this may compromise the stability of the vehicle.
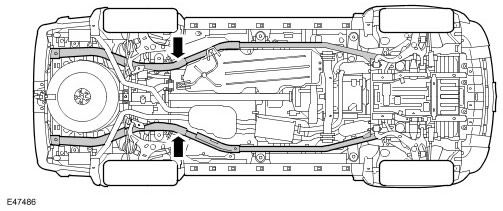
Once the vehicle is raised to the desired height, place jack stands under the axles as shown in the figure.
CAUTION: To prevent damage to the longitudinal beams, place blocks of suitable material between them and the supports.
Carefully lower the jack rod - the car should smoothly lower onto the stands.
CAUTION: Before starting work underneath the vehicle, make sure once again that the stands are installed correctly and that the vehicle is securely fastened to the stands.
To remove the vehicle from the stands, perform the above operations in reverse order.
(The full version is available on the website www.lrman.ru)
Car lift - one wheel/one side
Apply the parking brake. Move the automatic transmission selector to the "P" (Park) position.
CAUTION: Always chock the wheels so that they do not come off the ground.
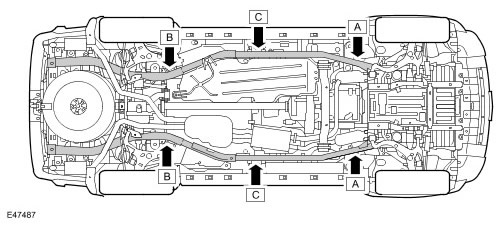
- One front wheel - install the hydraulic jack rod under the longitudinal beam on the side being lifted at point "A"
- One rear wheel - install the hydraulic jack rod under the longitudinal beam on the side being lifted at point "B"
- Front and rear wheel - ONE SIDE - install the hydraulic jack rod under the longitudinal beam on the side being lifted at point "C"
NOTE: Point "C" is in line with body support #3.
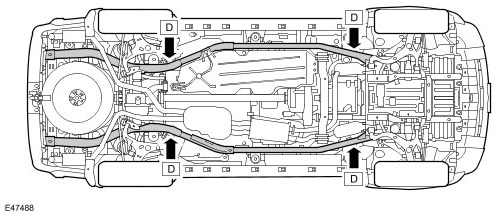
Once the vehicle is raised to the desired height, place the jack stand(s) under the crossmember and next to the jack rod at the appropriate point(s) D.
CAUTION: To prevent damage to the longitudinal beams, place blocks of suitable material between them and the supports.
Carefully lower the jack rod - the car should smoothly lower onto the stands.
CAUTION: Before starting work underneath the vehicle, make sure once again that the stands are installed correctly and that the vehicle is securely fastened to the stands.
To remove the vehicle from the stands, perform the above operations in reverse order.
Comments on this article