


Contents: Dismantling ⇩ Assembly ⇩
Dismantling
1. Place the vehicle on a lift.
2. Remove the exhaust system.
EXHAUST MANIFOLD AND EXHAUST SYSTEM: Td6 engine, REPAIR WORK, Exhaust system and suspension of system components.
EXHAUST MANIFOLD AND DUCT SYSTEM: V-8 Engine, REPAIR WORK, Exhaust system and suspension components.
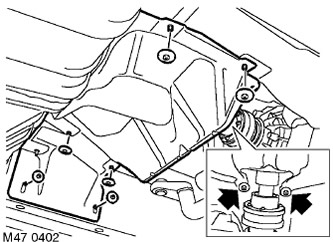
3. Remove the 8 nuts securing the center heat shield and remove the shield.
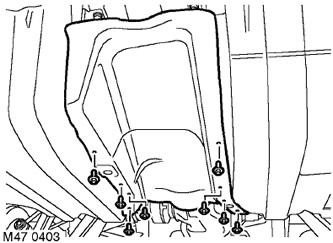
4. Remove the 8 hex head screws securing the fuel tank heat shield and remove the shield.
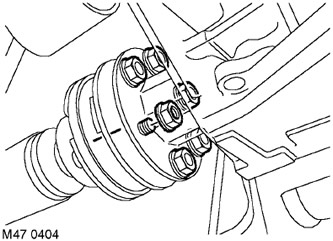
5. Apply mounting marks to the flanges of the cardan shaft and the final drive tailpiece for subsequent assembly.
6. Remove the 6 nuts and bolts securing the propeller shaft to the final drive tail flange.
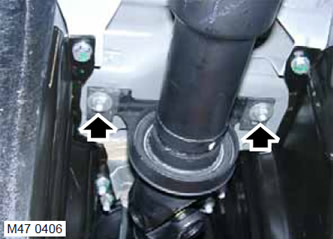
7. Unscrew the two nuts securing the intermediate support of the cardan shaft, lower the cardan shaft, separate the flange of the cardan shaft from the flange of the tailpiece, then temporarily install the intermediate support and secure it with nuts.
8. Raise the rear of the vehicle and install stands.
CAUTION: Do not work under a vehicle supported solely by a jack or lift. Always support the vehicle with safety stands.
9. Remove the rear wheels.
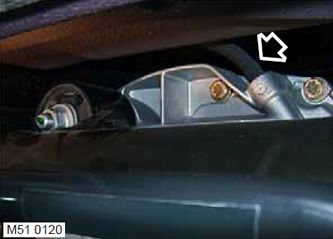
10. Disconnect the ventilation hose from the final drive housing.
11. Drain the oil from the final drive housing.
MAIN TRANSMISSION AND DIFFERENTIAL, ADJUSTMENTS, Rear main transmission and differential housing - oil drain and filling.
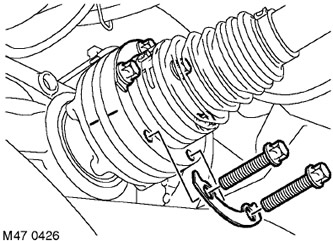
12. Apply mounting marks to the flanges of the drive shaft and differential output shaft for subsequent assembly.
13. Remove the 6 screws securing the drive shaft to the differential output shaft flange and remove the three bolt plates. Discard the bolts.
14. Install the jack, resting it against the lower suspension arm.
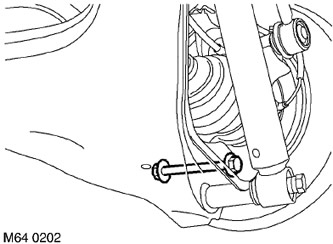
15. Remove the nut and bolt securing the lower arm to the wheel bearing support.
16. Remove the jack from under the lower suspension arm.
17. Separate the lower arm from the wheel bearing support and separate the drive shaft from the differential output shaft flange.
18. Repeat the operation for the wheel on the other side.
19. Install the jack, resting it against the final drive housing.
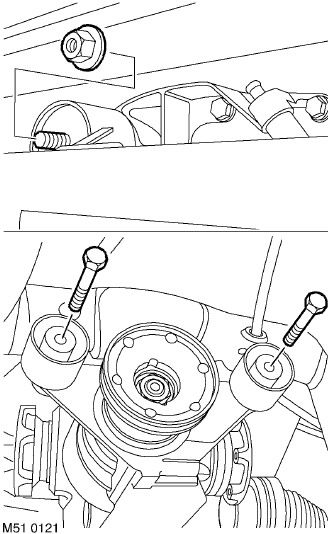
20. Remove and discard the 2 screws and 1 bolt with nut securing the final drive housing to the subframe. Remove the final drive with differential assembly.
Assembly
1. Install the jack and raise the final drive with differential assembly to the required position.
2. Install new screws and bolt with nut securing the final drive housing to the subframe and tighten the two front screws to 100 Nm and the nut with bolt to 165 Nm.
3. Wipe the drive shaft and differential output shaft flanges.
4. Connect the drive shaft to the differential.
5. Wipe the lower arm and the mating surface of the wheel bearing support.
6. Align the wheel bearing support with the lower suspension arm, insert the mounting bolt, screw on and lightly tighten the nut.
7. Wipe the screw plates, install the plates, tighten the new screws securing the drive shaft flange to the differential output shaft flange and tighten them to 40 Nm, then tighten them a further 60°.
8. Repeat the operation for the wheel on the other side.
9. Connect the ventilation hose to the final drive housing.
10. Reinstall the wheels and tighten the nuts to a torque of 140 Nm.
11. Remove the supports and lower the vehicle.
12. Tighten the screws securing the lower suspension arms to the wheel bearing supports to a torque of 250 N·m.
13. Wipe the mating surfaces of the cardan shaft flanges and the final drive tailpiece.
14. Remove the nuts securing the intermediate support of the cardan shaft, attach the cardan shaft to the flange of the final drive tailpiece and install the intermediate support in place. Tighten the nuts securing the intermediate support, but do not tighten them completely at this stage.
(The text of the article was taken from the website: «LRMAN.ru»)
15. Tighten the nuts securing the propeller shaft to the final drive tail flange and tighten them to a torque of 70 Nm.
16. Tighten the intermediate support nuts of the propeller shaft to a torque of 21 N·m.
17. Install the fuel tank heat shield and tighten its mounting screws.
18. Install the central heat shield and tighten its mounting nuts.
19. Fill the final drive housing with oil to the required level.
MAIN TRANSMISSION AND DIFFERENTIAL, ADJUSTMENTS, Rear main transmission and differential housing - oil drain and filling.
20. Reinstall the exhaust system.
EXHAUST MANIFOLD AND EXHAUST SYSTEM: Td6 engine, REPAIR WORK, Exhaust system and suspension of system components.
EXHAUST MANIFOLD AND DUCT SYSTEM: V-8 Engine, REPAIR WORK, Exhaust system and suspension components.
Comments on this article