


Contents: Dismantling ⇩ Assembly ⇩
Dismantling
1. Raise the car on a lift.
2. Disconnect the negative terminal from the battery.
3. Remove the rear propeller shaft.
DRIVE SHAFTS, REPAIR WORK, Cardan shaft - rear.
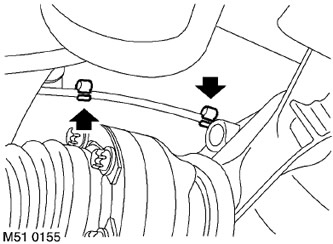
4. Release the fasteners securing the crankcase ventilation hose to the body.
5. Support the final drive housing with a jack.
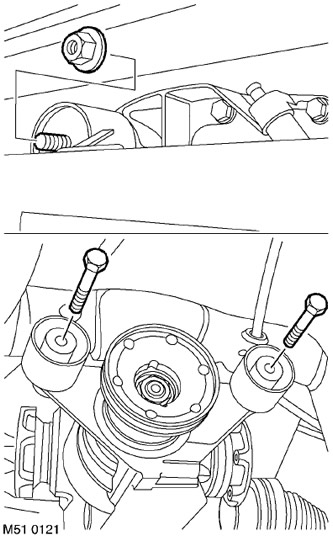
6. Remove and discard the 2 screws and 1 bolt with nut securing the final drive housing to the subframe.
7. Carefully lower the jack so that the final drive with drive shafts rests on the lower suspension arms.
8. Rotate the final drive housing 90o to gain access.
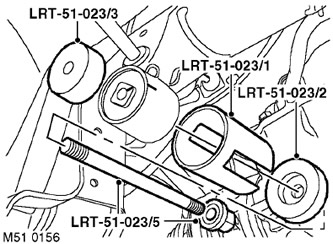
9. Install the LRT-51-023/3 tool onto the LRT-51-023/5 tool. Screw on the nut and tighten it by hand.
10. Install fixture LRT-51-023/1.
CAUTION: The slots must be facing away from the rubber bushing.
11. Install the LRT-51-023/2 tool onto the LRT-51-023/1 tool, install the nut onto the rod and tighten it by hand.
12. Mark the installation position of the rubber bushing relative to the mark on the subframe.
13. Remove the rubber bushing from the subframe.
14. Disassemble the devices and send the rubber bushing for disposal.
Assembly
1. Clean the subframe slot for the rubber bushing and the mating surfaces.
2. Apply rubber lubricant to the new rubber bushing and to the inside surface of the socket.
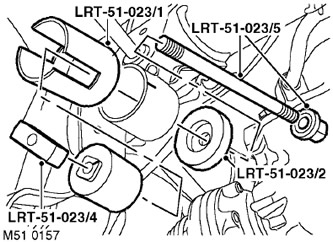
3. Install the new rubber bushing into LRT-51-023/1.
The full version is available on the website [www.LRman.ru]
4. Place the LRT-51-023/4 tool into the slots of the LRT-51-023/1 tool to secure the rubber bushing.
5. Pass the rod of the LRT-51-023-/5 tool through the socket in the subframe and screw it into the LRT-51-023/4.
6. Install the LRT-51-023/2 tool onto the LRT-51-023/5 tool. Screw on the nut and tighten it by hand.
7. Install the rubber bushing into the subframe socket.
CAUTION: The rubber bushing must be pressed flush with the final drive housing mating surface.
8. Remove and disassemble all accessories.
9. Install the jack and raise the final drive to the required position.
10. Install the new differential mounts to the subframe and tighten the bolts to 100 Nm and the new rear bolt and nut to 165 Nm.
11. Remove the jack from under the final drive housing.
12. Secure the crankcase ventilation hose of the main gear to the clamps on the body.
13. Install the rear propeller shaft.
DRIVE SHAFTS, REPAIR WORK, Cardan shaft - rear.
14. Connect the negative terminal to the battery.
Comments on this article