Contents: Jack included in the vehicle spare…⇩ Hydraulic jack ⇩ Lifting the car and installing stands ⇩ Lifting the front of the car ⇩ Lifting the rear of the car ⇩ Lifting a car on stationary lifts ⇩
When lifting a vehicle, the following instructions must be followed.
- Raise the vehicle only on a level and firm surface.
- Apply the parking brake.
- Move the automatic transmission selector to position "P".
To avoid damage to components underneath the vehicle, strictly follow these instructions.
DO NOT PLACE JACKS OR LIFT BRACKETS UNDER THE FOLLOWING COMPONENTS:
- Body panels, except for specially provided support areas
- Bumpers
- Fuel pipelines
- Fuel tank
- Brake pipes
- Front or rear suspension arms
- Transfer case
- Steering rods
- Front or rear axle gearboxes
- Engine oil pan
- Automatic transmission
NOTE: Some operations may require that the oil pan be supported. In this case, place a block of wood or rubber between the engine pan and the support portion of the lifting device.
Jack included in the vehicle spare parts kit
The jack supplied with the vehicle is intended for emergency use only when changing a wheel. DO NOT use this jack for any other purpose. The installation locations of this jack and the sequence of actions are provided in the vehicle Operating Instructions. It is prohibited to carry out any work on the vehicle supported only by the jack.
Hydraulic jack
Only hydraulic jacks with a permitted load of at least 1500 kg are suitable for use. (3300 pounds).
WARNING: Before starting work on the vehicle, which is supported by a jack, it is necessary to install supports under the body in the designated places.
When lifting the car, place wheel chocks under the wheels. Do not rely on the parking brake - after the rear axle wheels come off, it does not work.
Lifting the car and installing stands
The illustrations below show the jacking points.
Lifting the front of the car
Apply the parking brake, move the automatic transmission selector to the "P" position and place wheel chocks under the rear wheels.
WARNING: When raising the front of the vehicle, always place wheel chocks under the rear wheels.
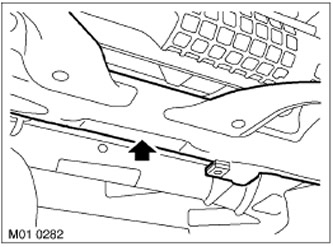
Install the hydraulic lift rod under the front subframe crossmember as shown in the illustration.
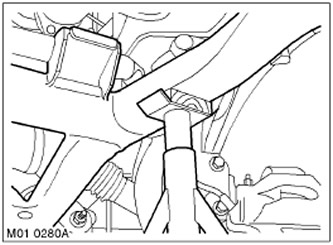
Places for installing supports under the front of the car.
Raise the vehicle so that jack stands can be installed either under the front subframe or under the recommended body platforms for using the standard lift.
CAUTION: To prevent damage to the body, place wooden blocks or pieces of rubber between the body support plate and the stand.
Carefully lower the jack rod - the car should smoothly lower onto the stands.
WARNING: After jacking up the vehicle, it must be supported on safety stands.
Before starting work underneath the vehicle, make sure once again that the vehicle is securely supported on the stands.
To remove the vehicle from the stands, perform the above operations in reverse order.
Lifting the rear of the car
Move the automatic transmission selector to the "P" position and place wheel chocks under the front wheels.
WARNING: When raising the rear of the vehicle, always place chocks under the front wheels.
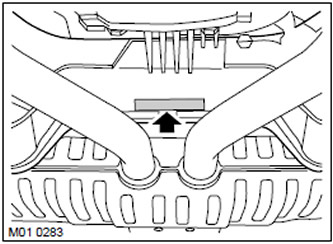
Position the hydraulic lift rod in the center of the rear subframe crossmember as shown in the illustration. The vehicle can also be lifted from the center of the towing device, if equipped.
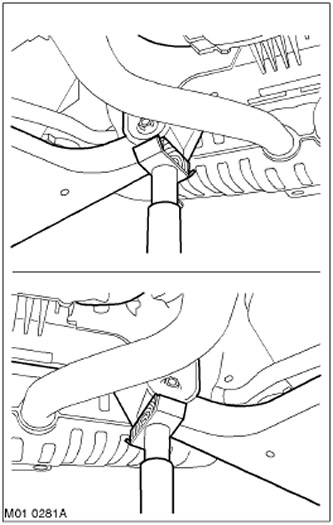
Places for installing stands under the rear of the car.
Raise the rear of the vehicle so that jack stands can be placed under the rear subframe. Jack stands can also be placed under the body platforms designed for use with the standard jack or under the front mounting points of the rear subframe.
CAUTION: To prevent damage to the body, place wooden blocks or pieces of rubber between the body support plate and the stand.
CAUTION: If the washers of the front mounting points of the rear subframe are damaged during the process of lifting the body, they must be replaced.
Carefully lower the jack rod - the car should smoothly lower onto the stands.
WARNING: After jacking up the vehicle, it must be supported on safety stands.
Before starting work underneath the vehicle, make sure once again that the vehicle is securely supported on the stands.
To remove the vehicle from the stands, perform the above operations in reverse order.
Lifting a car on stationary lifts
The following instructions must be read before lifting a vehicle on a fixed lift.
WARNING: The jack included with the four-post lift, designed to support the vehicle by its body, does not provide reliable support for the vehicle when raised.
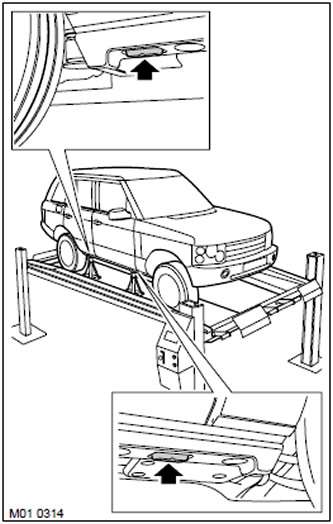
To lift a car by its body on a four-post lift, you should lift the front and rear parts of the car in turn and install supports under them. The supports should be installed under the body platforms intended for installing a standard jack.
CAUTION: To prevent damage to the body, place wooden blocks or pieces of rubber between the body support plate and the stand.
WARNING: Do not use the upper or lower control arms to lift the vehicle.
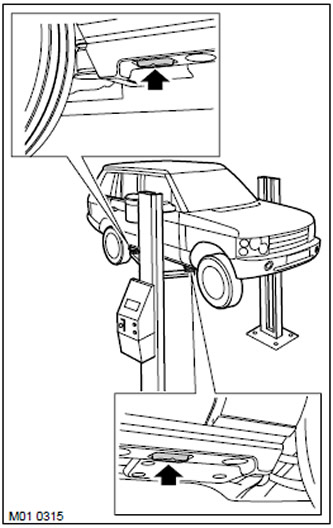
You can also use a two-post lift to lift the car. Place the support brackets (paws) of the lift under the platforms intended for installing the standard jack.
CAUTION: To prevent damage to the body, place wooden blocks or pieces of rubber between the body support platform and the lift bracket.
Comments on this article