Contents: General remarks ⇩ Engine fuel system hoses ⇩ Connecting clamps of hoses of the…⇩ Engine cooling system hoses ⇩ Relative position of the hose and…⇩ Clamps ⇩ Protection against overheating of…⇩
General remarks
When removing and installing flexible pipes and hoses, follow the instructions listed below. This is a guarantee of reliable and long-lasting operation.
- Before removing brake or power steering hoses, thoroughly clean the hose connections and surrounding area.
- Before disconnecting the hoses, obtain suitable plugs or caps. After disconnecting the hose, immediately plug the openings in the housing or fitting to prevent dirt from entering the system.
- Clean the removed hoses from the outside and blow them out with compressed air from the inside. Carefully inspect the pipeline. Pay attention to the presence of cracks, cord delamination, and the reliability of the sealing of the tips. All hoses that are damaged cannot be reinstalled.
- When installing the hose, avoid sharp bends. After tightening the fastening nuts, the hose should not be twisted.
- After removing the hose, seal the connecting nipple with a cap.; if the hose has a connection with a compression nut, then plug the corresponding hole in the housing with a plug.
- When working with hydraulic system components, absolute cleanliness must be maintained at all times.
- After any work on hydraulic systems, check for leaks. To do this, one person should be under the car and carefully inspect the connection points, and the other, while driving the car, should press the brake pedal as hard as possible or turn the steering wheel with the engine running.
Engine fuel system hoses
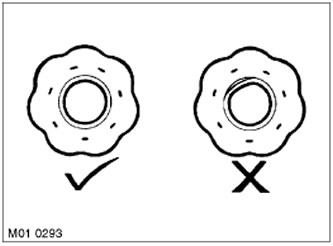
All fuel hoses are designed with two layers: an outer layer of reinforced rubber and an inner layer of special rubber. When removing any fuel hose, carefully inspect its inner layer. The inner layer should not have any delaminations from the outer shell of reinforced rubber. If delamination is detected, the hose should be replaced with a new one.
Connecting clamps of hoses of the engine fuel system
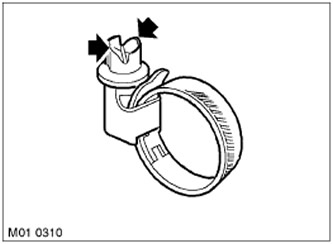
Some fuel hoses have clamps with controlled tightening force. The screw head of these clamps has a special slot, the edges of which are crushed when the set tightening torque is reached, preventing the tightening force from increasing more than the set limit. Such clamps can be unscrewed using an ordinary screwdriver. When reassembling, these clamps must be replaced with new clamps with automatic tightening force regulation. Clamps with automatic tightening force regulation must be tightened to the point at which the slot edges are cut off. Such clamps should not be tightened in any other way, for example, with a socket wrench.
Engine cooling system hoses
It is ESSENTIAL to follow the instructions below to avoid damage to the cooling system hoses and the fittings connected to them.
Relative position of the hose and the branch pipe
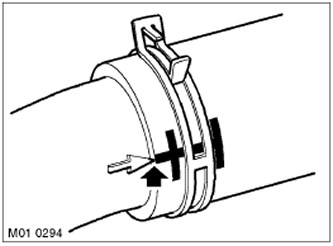
To avoid damage or fatigue failure of the hose, the hose should be connected to the connecting branch correctly. If the hose and branch have pairing marks, they should be connected only in this position. During installation, the hose should be completely placed on the connecting branch. Usually, there is a special shaped boss on the branch that allows the connection to be assembled correctly.
[The article is based on information from the website: www.lrman.ru]
Clamps
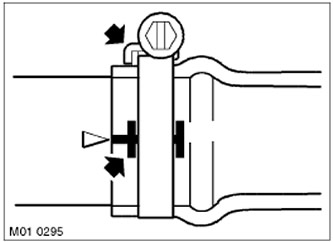
The hose will usually have marks on it to indicate the correct position of the clamp. If there are no marks, the clamp should be positioned directly behind the flange at the end of the connecting pipe, as shown in the figure. The flange of the worm clamp should be directed towards the near end of the hose. Otherwise, the hose may be pinched between the clamp and the flange of the pipe. Worm clamps should be tightened to a torque of 3 Nm, unless otherwise specified. After tightening the clamp, make sure that the clamp does not touch adjacent parts.
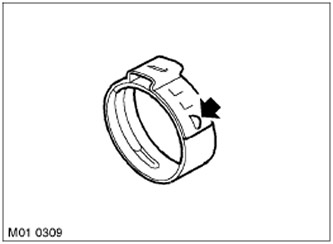
The Oetiker type clamps are disassembled after the tongue is unbent. (indicated by an arrow in the figure) and release the outer branch of the clamp. Clamps of this type are not subject to further use. When installing a new clamp, ensure the correct position of the clamp on the hose, when tightening the clamp, align the tongue with the longitudinal slot on the outer branch of the clamp (shown in the figure by an arrow).
Protection against overheating of parts
All required heat shields and protections must be installed and in good condition. If damage to these components is visible, they must be replaced. Pay attention to the installation of hoses adjacent to very hot engine parts, such as the exhaust manifold and exhaust gas recirculation (EGR) lines. When heated, the hoses will deform. This must be taken into account when laying and securing the hoses.
Comments on this article