car logo Ford
car logo Volkswagen
car logo BMW
car logo Opel
car logo Audi
car logo Toyota
car logo Peugeot
English Русский
Български
Беларускі
Український
Српски
Hrvatski
Română
Polski
Slovenský
Magyar


Main
Freelander
Discovery
Range Rover
Defender
Contacts
Articles

Oil seals (Range Rover 3)

 
  • Main
  • Range Rover
  • Range Rover 3
  • General information
  • Repair techniques
  • Oil seals
 
        0  

General remarks


Always replace oil seals (cuffs) with new ones if the seal is removed. (when only the seal was removed and when the seal was removed as part of an assembly unit). NEVER install seals that have been improperly stored or show signs of abuse, such as hanging from a hook or nail.
  • Before installation, carefully inspect the seal to ensure that it is intact and free of foreign particles.
  • The surface on which the working edge of the cuff will operate must be smooth, without scratches and burrs. The part mating with the cuff (shaft) must be replaced if its surface on which the sealing occurs does not meet this requirement.
  • During installation, protect the cuff from damage by sharp edges. Insulate the surface that may damage the cuff during installation using a process sleeve or wrap it with tape.
  • To avoid damage to the working edge of the cuff during start-up, lubricate it with the recommended grade of grease. If the cuff has two working edges, fill the space between them with grease as well.
  • If the seal has a spring, make sure that it is installed correctly. Install the seal so that its working edge is directed towards the liquid being sealed. Then carefully move it on the shaft towards the working journal. Use technological bushings to protect the working edge of the seal from damage by sharp edges, threads or splines. If there is no technological bushing, use insulating tape to protect the edge of the seal from damage.
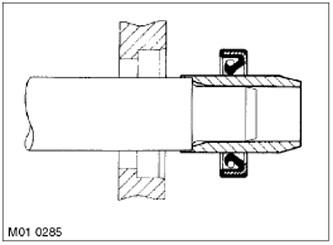
Lubricate the outer diameter of the seal with grease, direct the end of the seal into the housing…
  • Lubricate the outer diameter of the seal with grease, direct the end of the seal into the housing bore and press the seal into its seat. Use a suitable mandrel to press it in to prevent the seal from skewing. In some cases, it is advisable to first press the seal into the housing and then install the shaft. Do not allow the weight of the shaft to be supported by the seal.
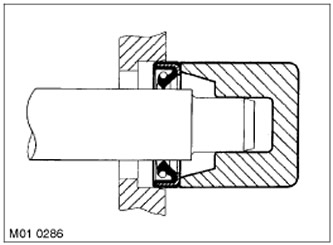
Use the recommended tool and accessories to install the cuffs. If you do not have the recommended…
  • Use the recommended tool and accessories to install the cuffs. If you do not have the recommended accessory, you can use a piece of suitable pipe, its outer diameter should be approximately 0.4 mm smaller than the outer diameter of the cuff. If a hammer is used to press the cuff, work with it VERY CAREFULLY.
  • Press the cuff to its full depth until it stops against the ledge of the housing; if the bore for the cuff is made without a ledge, then press the cuff flush with the housing. When pressing the cuff, make sure that it is not skewed.


This article is available at russian, bulgarian, belarusian, ukrainian, serbian, croatian, romanian, polish, slovak, hungarian
Article review: Platon Fedorov


Previous articles
General recommendations when performing plumbing work
Ball and roller bearings

Current article
Oil seals

Next articles
Joints and butt surfaces
Parts that protect threaded connections from loosening
Parts with cylindrical threads
Designations of bolts and nuts
Flexible pipes and hoses
Using roller stands to determine braking forces
Replacing SRS components after deployment
Body repair


Similar articles from Land Rover repair manuals:
• Oil seals Freelander 2 (2006-2014)
• Oil seals Freelander 1 (1997-2006)
• Oil seals Discovery 3 (2004-2009)

Comments on this article


No comments yet


How much will 36 + 26 =


Range Rover 3 
  • General information
  • Using the manual
  • Precautionary measures
  • Repair techniques
  • Identification codes
  • Specifications
  • Tightening torques
  • Materials
  • Maintenance
  • Power unit
  • Diesel engine TD6
  • Petrol engine V8
  • Emission reduction TD6
  • Emission reduction V8
  • Engine management TD6
  • Engine management V8
  • Fuel supply TD6 engine
  • Fuel supply V8 engine
  • Engine cooling TD6
  • Engine cooling V8
  • Exhaust system TD6
  • Exhaust system V8
  • Transfer case
  • Automatic gearbox GM-5L40-E
  • Automatic gearbox ZF 5HP24
  • Chassis
  • Drive shafts
  • Main gear
  • Front axle gear
  • Steering
  • Front suspension
  • Rear suspension
  • Brake system
  • Body and coating
  • Passenger safety
  • Doors and windows
  • Exterior details
  • Interior details
  • Glasses
  • Seats
  • Sunroof
  • Body geometry
  • Body repair
  • Corrosion protection
  • Electrical equipment
  • Heating and ventilation
  • Conditioning
  • Windshield wipers and washers
  • Starting and charging system
  • Lighting and headlights
  • Electronic blocks
  • Entertainment system
  • Wiring harnesses


LRman.ru © 2013-2026 | Mobile version | Free Lander | Discovery | Range Rover | Defender | Contacts | | Sitemap |
Car repair and service instructions Land Rover: Freelander, Discovery, Range Rover, Defender
We use cookies to make pages load faster and provide a more user-friendly experience 🍪