car logo Ford
car logo Volkswagen
car logo BMW
car logo Opel
car logo Audi
car logo Toyota
car logo Peugeot
English Русский
Български
Беларускі
Український
Српски
Hrvatski
Română
Polski
Slovenský
Magyar


Main
Freelander
Discovery
Range Rover
Defender
Contacts
Articles

Ball and roller bearings (Range Rover 3)

 
  • Main
  • Range Rover
  • Range Rover 3
  • General information
  • Repair techniques
  • Ball and roller bearings
 
        0  

General remarks


When removing and installing rolling bearings, follow the instructions listed below. This is a guarantee of reliable and long-lasting operation.
  • Wash the bearing thoroughly. All traces of grease must be removed. Use special compounds for washing. During assembly/disassembly operations, maintain absolute cleanliness in the workplace.
  • Carefully inspect the rolling elements, raceways, outer cylindrical surface of the outer ring and inner cylindrical surface of the inner ring. The appearance of tempering colors indicates the beginning of bearing destruction. In this case, the bearing must be replaced.
  • Clamp the inner bearing race between the index finger and thumb of one hand. Rotate the outer race with the other hand. The rotation should not be accompanied by any sticking or extraneous sounds. Now clamp the outer race and rotate the inner race.
  • Gently rotate the outer ring alternately in the forward and reverse directions, holding the inner ring from turning. Note the freedom with which the ring rotates. The bearing must be replaced if the ring does not rotate smoothly enough.
  • Before installation, lubricate the bearing generously with the recommended grease or oil.
  • Inspect the shaft journal and the seat in the housing. Tempered colors or other traces indicate a weakening of the bearing seat.
  • Before installing the bearing, clean the shaft journal and the housing bore for the bearing from dirt and burrs.
  • If one of the bearings in a pair is subject to replacement, it is recommended to replace both bearings. An exception is the case when one of the bearings is replaced at a low resource and the other bearing in the pair does not have any signs of damage.
  • Never install a ball or roller bearing without first checking that it is in good condition.
  • If for some reason you have removed the wheel bearings, always install new bearings when reassembling the unit. Do not install used wheel bearings.
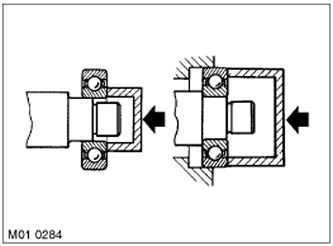
  • When mounting a bearing on a shaft, apply force to the inner ring. When mounting a bearing in a housing bore, apply force to the outer ring.
  • If the bearings are lubricated with grease (for example, wheel bearings), then before installing the seal, fill the space between the bearing and the seal with the recommended grade of grease.
  • Details of disassemblable bearings (for example tapered bearings) always mark with paint to avoid confusion during assembly. Do not replace bearing parts individually. (for example, do not try to replace the rollers without changing the outer race.). The entire bearing must be replaced.

The article was copied from this resource: LRman.ru
Ball and roller bearings


This article is available at russian, bulgarian, belarusian, ukrainian, serbian, croatian, romanian, polish, slovak, hungarian
Article review: Platon Fedorov


Previous article
General recommendations when performing plumbing work

Current article
Ball and roller bearings

Next articles
Oil seals
Joints and butt surfaces
Parts that protect threaded connections from loosening
Parts with cylindrical threads
Designations of bolts and nuts
Flexible pipes and hoses
Using roller stands to determine braking forces
Replacing SRS components after deployment


Similar articles from Land Rover repair manuals:
• Ball and roller bearings Freelander 2 (2006-2014)
• Ball and roller bearings Freelander 1 (1997-2006)
• Ballpoint And roller bearings Discovery 3 (2004-2009)
• Winch cable roller assembly Defender 2007+ (2007-2016)

Comments on this article


No comments yet


How much will 22 + 16 =


Range Rover 3 
  • General information
  • Using the manual
  • Precautionary measures
  • Repair techniques
  • Identification codes
  • Specifications
  • Tightening torques
  • Materials
  • Maintenance
  • Power unit
  • Diesel engine TD6
  • Petrol engine V8
  • Emission reduction TD6
  • Emission reduction V8
  • Engine management TD6
  • Engine management V8
  • Fuel supply TD6 engine
  • Fuel supply V8 engine
  • Engine cooling TD6
  • Engine cooling V8
  • Exhaust system TD6
  • Exhaust system V8
  • Transfer case
  • Automatic gearbox GM-5L40-E
  • Automatic gearbox ZF 5HP24
  • Chassis
  • Drive shafts
  • Main gear
  • Front axle gear
  • Steering
  • Front suspension
  • Rear suspension
  • Brake system
  • Body and coating
  • Passenger safety
  • Doors and windows
  • Exterior details
  • Interior details
  • Glasses
  • Seats
  • Sunroof
  • Body geometry
  • Body repair
  • Corrosion protection
  • Electrical equipment
  • Heating and ventilation
  • Conditioning
  • Windshield wipers and washers
  • Starting and charging system
  • Lighting and headlights
  • Electronic blocks
  • Entertainment system
  • Wiring harnesses


LRman.ru © 2013-2026 | Mobile version | Free Lander | Discovery | Range Rover | Defender | Contacts | | Sitemap |
Car repair and service instructions Land Rover: Freelander, Discovery, Range Rover, Defender
We use cookies to make pages load faster and provide a more user-friendly experience 🍪