Dismantling
1. Disconnect the negative terminal from the battery.
2. Disconnect the generator.
3. Remove the lower engine protection shield.
EXTERIOR PARTS, REPAIR WORK, Engine protection - front.
4. Remove the front bumper assembly.
EXTERIOR PARTS, REPAIR WORK, Front bumper assembly.
5. Remove the front bumper beam.
EXTERIOR PARTS, REPAIR WORK, Front bumper assembly.
6. Remove the radiator.
COOLING SYSTEM: Td6, REPAIR WORK, Radiator.
7. Left side: Remove the coolant expansion tank.
COOLING SYSTEM: Td6, REPAIR WORK, Radiator.
8. Drain the air conditioning system and collect the refrigerant.
AIR CONDITIONING SYSTEM, AIR CONDITIONER DRAINING, REFRIGERANT RECOVERY AND CHARGING, Air conditioner draining - refrigerant recovery and charging.
NOTE: The receiver/dryer separator should be replaced if the following occurs: There is dirt in the air conditioning system (the compressor jammed). The system's seal is broken and the refrigerant is released into the atmosphere.
As a result of the repair, the air conditioning system remained open for more than 24 hours.
9. Remove the air conditioning lines from the side member.
10. Right side: Remove the automatic transmission cooler.
AUTOMATIC TRANSMISSION - GM 5L40-E, REPAIR WORK, Automatic transmission cooler.
11. For diesel vehicles: Loosen and remove the intercooler pipes.
12. Left side: Remove the windshield washer reservoir.
WINDSHIELD WIPERS AND WASHERS, REPAIR WORK, Combined windshield/headlamp washer reservoir.
13. Left side: Remove the generator.
ENGINE STARTING AND BATTERY CHARGING SYSTEM, REPAIR WORK, Generator - Td6 engine.
14. Remove the front wheel arch liner.
EXTERIOR PARTS, REPAIR WORK, Mudguard - front wheel arch.
15. Remove the power steering lines to gain access to the side member.
Repair works
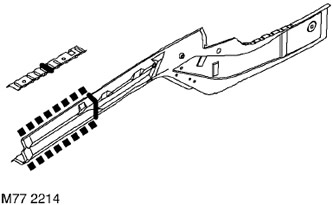
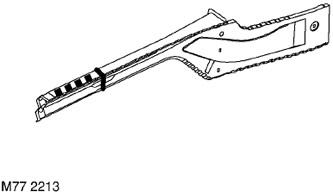
1. Remove damaged panels, prepare joint edges and install new panels in accordance with the Body Panel Repair Rules. Punch or drill holes in the panel to be installed for the plug weld, as shown in the figure.
Assembly
1. Reinstall the power steering lines.
2. Reinstall the front wheel arch liner.
EXTERIOR PARTS, REPAIR WORK, Mudguard - front wheel arch.
3. Left side: Install the generator in place.
ENGINE STARTING AND BATTERY CHARGING SYSTEM, REPAIR WORK, Generator - Td6 engine.
4. Left side Install the windshield washer reservoir.
WINDSHIELD WIPERS AND WASHERS, REPAIR WORK, Combined windshield/headlamp washer reservoir.
5. For diesel vehicles: Connect and secure the intercooler pipes.
6. Secure the air conditioning lines to the side member.
7. Right side: Install the automatic transmission cooler.
AUTOMATIC TRANSMISSION - GM 5L40-E, REPAIR WORK, Automatic transmission cooler.
8. Left side: Reinstall the coolant expansion tank.
COOLING SYSTEM: Td6, REPAIR WORK, Radiator.
9. Install the radiator.
COOLING SYSTEM: Td6, REPAIR WORK, Radiator.
10. Install the front bumper beam in place.
EXTERIOR PARTS, REPAIR WORK, Front bumper assembly.
11. Reinstall the front bumper assembly.
EXTERIOR PARTS, REPAIR WORK, Front bumper assembly.
12. Fill the air conditioning system.
AIR CONDITIONING SYSTEM, AIR CONDITIONER DRAINING, REFRIGERANT RECOVERY AND CHARGING, Air conditioner draining - refrigerant recovery and refilling.
13. Remove air from the system and add working fluid to the power steering reservoir.
STEERING, ADJUSTMENTS, Power assisted steering (PAS) - bleeding.
14. Reinstall the lower engine protection shield.
EXTERIOR PARTS, REPAIR WORK, Engine protection - front.
15. Connect the generator.
16. Connect the negative terminal to the battery.
Comments on this article