Airbag Deployment
WARNING: Before working on passive safety systems, carefully read the relevant technical documentation.
1. Follow all safety rules when working with passive safety systems.
GENERAL INFORMATION, Safety Precautions When Working on the Airbag System (SRS).
2. Remove the front seat belt pretensioner from the vehicle.
RESTRAINT SYSTEMS FOR DRIVER AND PASSENGERS, REPAIR WORK, Front seat belt pretensioner.
3. Check the condition of the LRT-86-003 fixture and cables supplied with it.
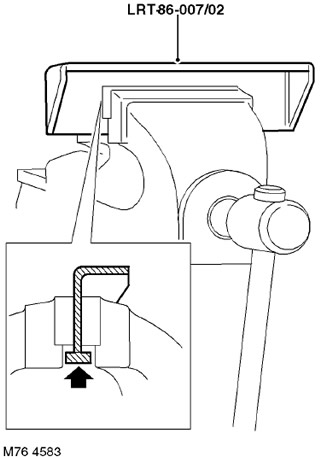
4. Clamp the bracket LRT-86-007/02 in a vise. The vise should clamp the bracket above the bottom flange to prevent the bracket from moving upwards due to detonation. Tighten the vise.
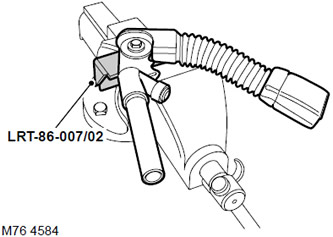
5. Install and secure the seat belt pretensioner to the LRT-86-007/02 bracket.
6. Connect cable LRT-86-003/08 of the attachment to the seat belt pretensioner.
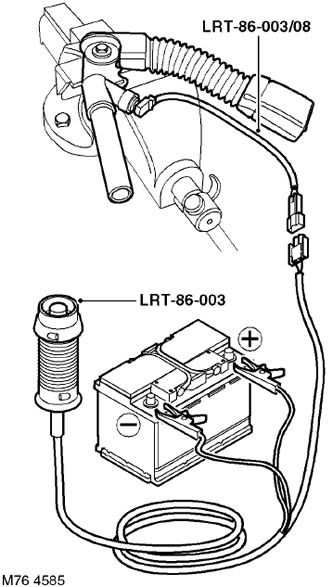
7. Attach the LRT-86-003 tool to the end of the LRT-86-003/08 cable.
8. Attach tool LRT-86-003 to battery.
WARNING: Ensure that all persons are at least 15m away from the airbag module.
9. To activate the seat belt pretensioner, press the power button on the tool body.
10. Disconnect the tool from the battery.
WARNING: When deployed, parts of the airbag become hot and may cause burns. Wait 30 minutes after deployment before touching the airbag module.
11. Disconnect the accessory cable from the seat belt pretensioner.
12. Remove the pretensioner from the bracket and place it in a sealed bag for later disposal.
13. Wipe the bracket with a damp cloth and remove from the vise.
14. Dispose of the used pretensioner to a designated incineration area.
ATTENTION: It is forbidden to reuse any parts of the passive safety systems.
NOTE: Do not transport parts of deployed restraint systems in the vehicle interior.
Comments on this article