GENERAL INFORMATION, Precautions when working with electrical equipment.
WARNING: Always remove both battery terminals before working on the restraint systems (SRS). Disconnect first "negative " terminal. Never mix up the wires when connecting to the battery.
Dismantling
1. Follow all safety rules when working with passive safety systems.
GENERAL INFORMATION, Safety Precautions When Working on the Airbag System (SRS).
2. Remove the front seat.
SEATS, REPAIRS, Front seat.
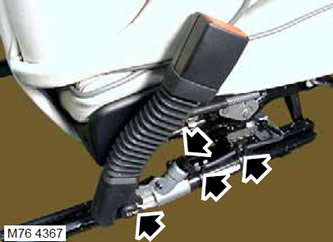
3. Remove the 2 clamps securing the harness to the pretensioner.
4. Disconnect the connector block from the pretensioner.
5. Remove the Torx screw holding the pretensioner to the seat and remove the pretensioner.
WARNING: Store the air bag module or seat belt pretensioner with the deployment side facing up. If the airbag is stored deployed side down, it will be thrown up with sufficient force if it is accidentally deployed to cause serious injury.
WARNING: Store airbags or pretensioners in a designated location. If there is no such place, then store these items in the trunk or luggage compartment of the car, informing the master about it.
Assembly
NOTE: If a SRS component needs to be replaced, note down the barcode of the new component.
1. Install the pretensioner and tighten the Torx screw to 48 Nm.
2. Attach the block to the pretensioner connector and secure the cable harness with the clamps.
3. Install the front seat.
SEATS, REPAIRS, Front seat.
4. Connect the battery terminals, first "positive" terminal.
Comments on this article