GENERAL INFORMATION, Precautions when working with electrical equipment.
WARNING: Before working on passive safety systems, carefully read the relevant technical documentation.
WARNING: Always remove both battery terminals before working on the restraint systems (SRS). Disconnect first "negative " terminal. Never mix up the wires when connecting to the battery.
Dismantling
1. Follow all safety rules when working with passive safety systems.
GENERAL INFORMATION, Safety Precautions When Working on the Airbag System (SRS).
2. Remove the control panel cross member.
CAR INTERIOR PARTS, REPAIR WORKS, Control panel - support.
3. Remove the sun visor.
CAR INTERIOR PARTS, REPAIR WORKS, Sun visor.
4. Remove the handrails.
CAR INTERIOR PARTS, REPAIR WORKS, Interior handrail.
5. Remove the doorway seals to release the headlining.
6. Remove the top trim of the middle pillar "IN" body.
CAR INTERIOR PARTS, REPAIR WORKS, Overlay - rack "IN" - top.
7. Remove the top rack trim "D" body.
CAR INTERIOR PARTS, REPAIR WORKS, Overlay - rack "D" - top.
8. Remove the rack trim "E" body.
CAR INTERIOR PARTS, REPAIR WORKS, Decorative trim - rear pillar "E" body.
9. Remove the rear console from the ceiling.
CAR INTERIOR PARTS, REPAIR WORKS, Rear overhead console.

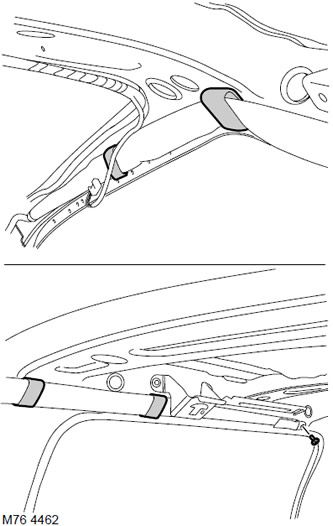
10. Turn away 2 screws of fastening of an upholstery of a ceiling.
11. Gently lower the edge of the headlining to access the cushion mount (curtains) security.
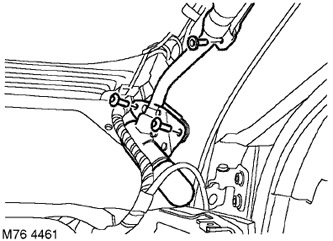
12. Remove the 2 Torx screws securing the airbag module (curtains) security rack "A".
13. Loosen the Torx screw securing the cushion material (curtains) security rack "A".
14. Loosen the Torx screw securing the cushion material (curtains) security to the upper belt of the body.
15. Release 4 clamps of fastening of the module of an airbag.
16. Remove the airbag module.
WARNING: Store the airbag model deployed side up. If the airbag is stored deployed side down, it will be thrown up with sufficient force if it is accidentally deployed to cause serious injury.
WARNING: Store airbags or pretensioners in a designated location. If there is no such place, then store these items in the trunk or luggage compartment of the car, informing the master about it.
Assembly
NOTE: If a SRS component needs to be replaced, note down the barcode of the new component.
1. Carefully install the airbag and secure the clips.
2. Fix the pillow (curtain) security to the upper belt of the body and to the pillar "A", by tightening the fastening screws with a torque of 10 Nm.
3. Wrap and tighten screws of fastening of an upholstery of a ceiling.
4. Replace the rear console.
CAR INTERIOR PARTS, REPAIR WORKS, Rear overhead console.
5. Install the upper trim of the middle pillar "IN" body.
CAR INTERIOR PARTS, REPAIR WORKS, Overlay - rack "IN" - top.
6. Reinstall the top trim of the rack "D" body.
CAR INTERIOR PARTS, REPAIR WORKS, Overlay - rack "D" - top.
7. Replace the rack trim "E" body.
CAR INTERIOR PARTS, REPAIR WORKS, Decorative trim - rear pillar "E" body.
8. Install handrails.
CAR INTERIOR PARTS, REPAIR WORKS, Interior handrail.
9. Install the sun visor.
CAR INTERIOR PARTS, REPAIR WORKS, Sun visor.
10. Replace the control panel cross member.
CAR INTERIOR PARTS, REPAIR WORKS, Control panel - support.
11. Install door seals.
12. Connect the battery terminals, first "positive" terminal.
Comments on this article