GENERAL INFORMATION, Precautions when working with electrical equipment.
WARNING: Always remove both battery terminals before working on the restraint systems (SRS). Disconnect first "negative " terminal. Never mix up the wires when connecting to the battery.
Dismantling
1. Follow all safety rules when working with the passive safety system.
GENERAL INFORMATION, Safety Precautions When Working on the Airbag System (SRS).
2. Remove the steering wheel.
STEERING, REPAIR WORKS, Steering wheel.
3. Remove the top and bottom overlays of a steering column.
STEERING, REPAIR WORKS, Upper lining of the steering column assembly with the column.
ATTENTION: Turn the steering wheel to the position corresponding to the position of the wheels for straight driving. This will ensure that the slip ring is locked when the steering wheel is removed.
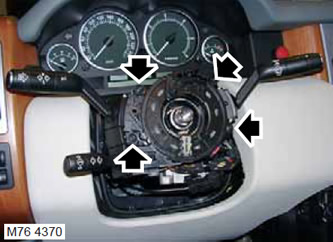
4. Remove the 4 Torx screws securing the rotary current collector assembly to the steering column. Remove the current collector assembly.
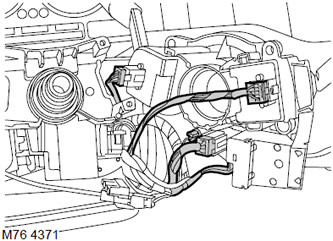
5. Disconnect the 5 grommets from the connectors on the Rotary Current Collector Assembly.
6. Remove the current collector assembly.
NOTE: If disassembly was carried out only to provide access to other elements of the system, then further disassembly operations should not be performed.
7. Loosen the latches and disconnect the switches from the current collector assembly.
Assembly
1. Install the breakers on the current collector assembly.
2. Attach the pads to the current collector assembly connectors.
3. Install the current collector assembly on the steering column, wrap and tighten the Torx screws.
4. Establish the top and bottom overlays of a steering column.
STEERING, REPAIR WORKS, Upper lining of the steering column assembly with the column.
5. Install the steering wheel.
STEERING, REPAIR WORKS, Steering wheel.
6. Connect the battery terminals, first "positive" terminal.
Comments on this article