Contents: Removal ⇩ Installation ⇩
Special tool(s)
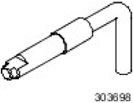 | Torque Setting Tool, Crankshaft 303-698 |
Removal
All cars
1.
WARNING: Never work on a vehicle supported only by a jack. Always support the vehicle with special stands.
Raise the vehicle and place supports underneath it.
2. Disconnect the ground wire from the battery.
For more information, refer to the chapter: Disconnecting and connecting the battery (414-01 Battery, Battery Mounting and Cables, General Procedures).
3. Remove the cylinder head cover.
For more information, refer to the chapter: Cylinder Head Cover (303-01 Engine - Diesel engine ID4 2.4L, On-car repair).
4. Remove the timing belt cover.
For more information, refer to the chapter: Timing Cover (30301 Engine - Diesel engine ID4 2.4L, On-car repair).
5. Disconnect the generator.
For more information, please refer to the chapter: Generator (414-02 Generator and voltage regulator - Diesel engine ID4 2.4L, Removal and installation).
6. Remove the crankshaft position sensor (CSP).
For more information, refer to the chapter: Crankshaft Position Sensor (CPS) (303-14 Electronic controls - Diesel engine ID4 2.4L, Removal and installation).
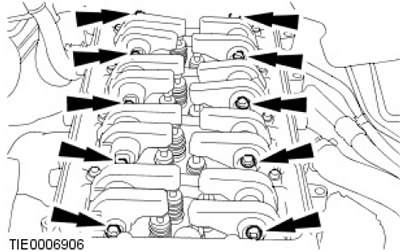
7. Remove the 2 rocker shafts. Unscrew and discard the 10 bolts.
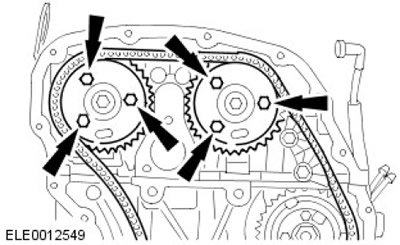
8. Loosen the 6 camshaft sprocket bolts.
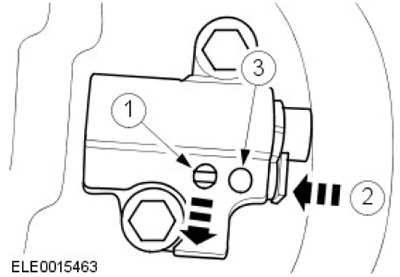
9. Loosen and secure the timing chain tensioner.
- 1. Take the dog away.
- 2. Press in the latch.
- 3. Insert the appropriate pin.
10. Remove the timing chain tensioner and the right timing chain guide.
- Remove two bolts.
- Remove the nut.
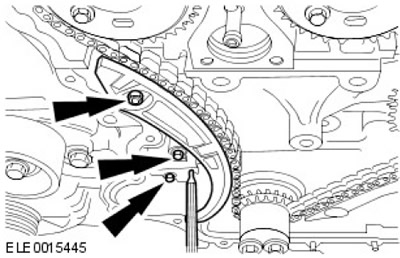
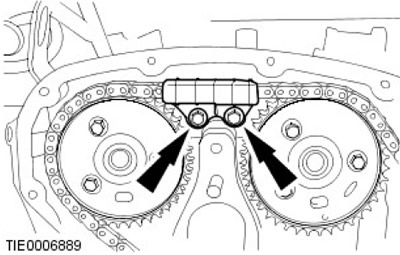
11. Remove the upper timing chain guide. Remove the two bolts.
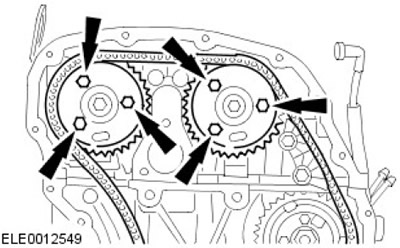
12. Remove the camshaft sprockets and timing chain. Remove 6 bolts.
The article was copied from a resource LRMAN.RU
Cars with air conditioning
13. Remove the air conditioning compressor.
For more information, refer to the chapter: Air Conditioning Compressor (412-03 Air conditioning - Diesel engine ID4 2.4L, Removal and installation).
All cars
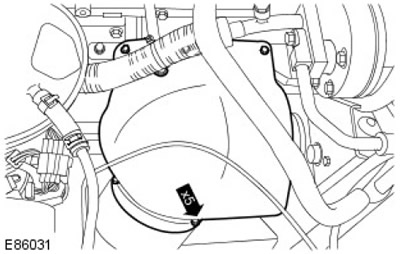
14. Remove the turbocharger heat shield. Remove 5 bolts.
15. Release the turbocharger heat shield bracket. Remove the bolt.
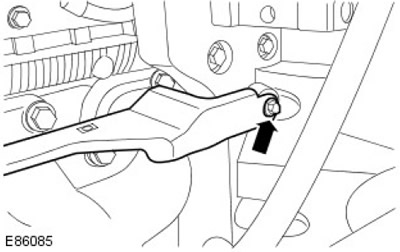
16. Remove the turbocharger heat shield bracket. Remove the bolt.
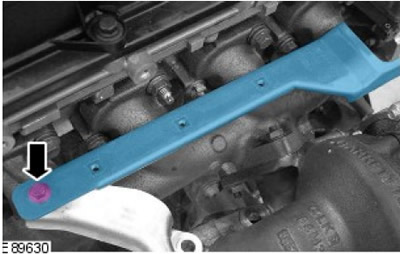
17. Remove the generator support bracket. Unscrew the 8 bolts.
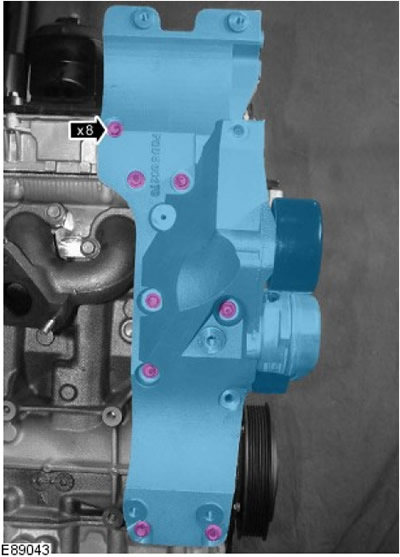
18. Disconnect the camshaft position (CMP) sensor.
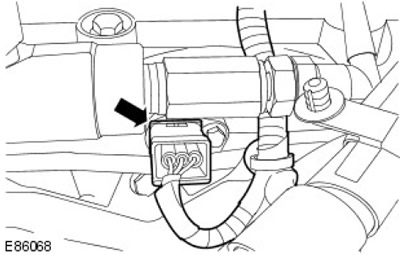
19. Release the engine wiring harness. Release the 3 clamps.
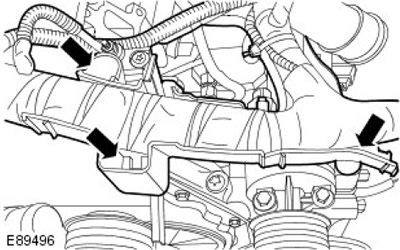
20. Install the engine wiring harness support bracket.
- Remove the bolt.
- Remove the nut.
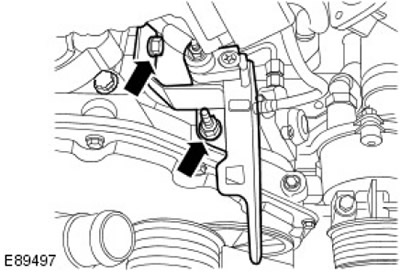
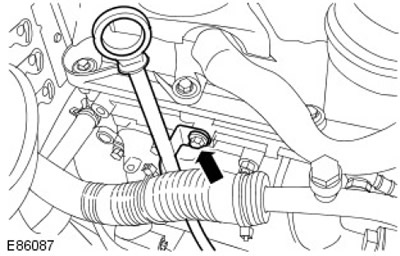
21. Release the oil level indicator dipstick tube. Remove the bolt.
22.
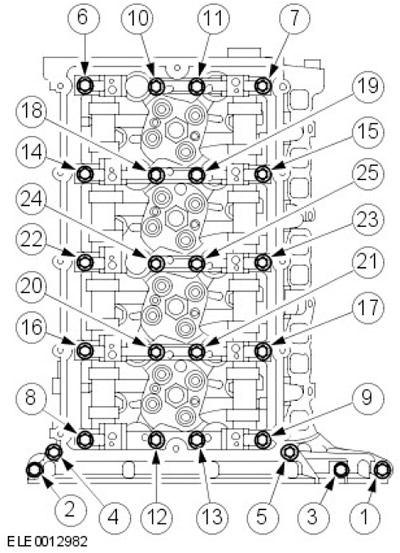
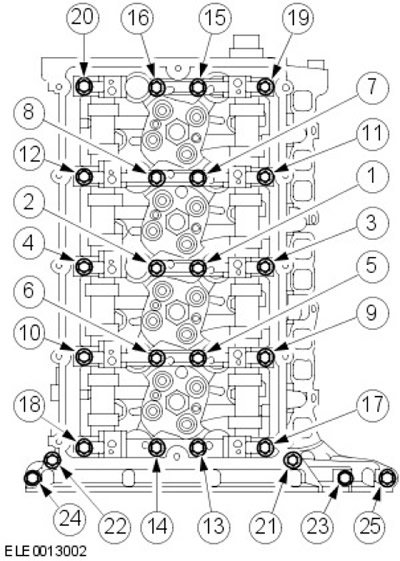
CAUTION: Remove the bolts in the order shown. Failure to do so may result in damage to the vehicle.
Remove the camshaft housing. Remove 25 bolts.
23. Remove both camshafts.
Installation
All cars
1.
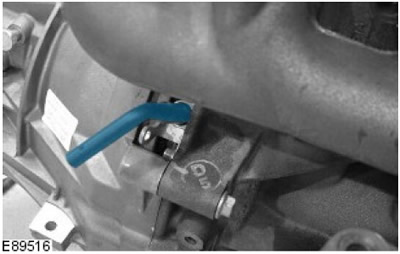
CAUTION: Do not turn the crankshaft when the special tool is fully inserted into the flywheel. Failure to do so may result in damage to the vehicle.
Turn the crankshaft to 50 degrees before TDC. Insert the special tool through the CKP sensor hole.
2.
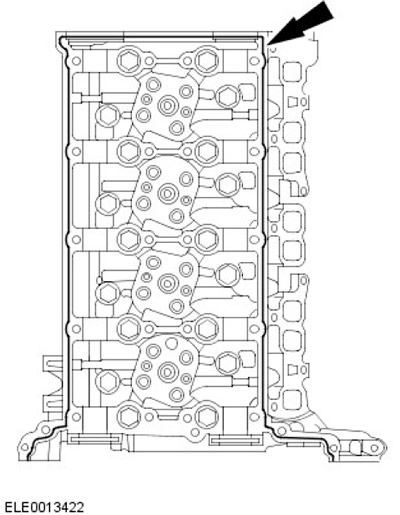
NOTE: Clean the mating surface of the element.
Apply a 2.5mm bead of recommended sealant to the cylinder head.
3.
NOTE: Clean the contact surfaces of the parts.
Install both camshafts. Lubricate the camshaft journals and camshaft lobes with clean engine oil.
4.
CAUTION: Tighten the bolts in the sequence shown. Failure to do so may result in damage to the vehicle.
NOTE: Clean the mating surface of the element.
Install the camshaft housing.
- Step 1: Tighten bolts 1 through 22 to 23 Nm.
- Step 2: Tighten bolts 23 to 25 to 10 Nm.
5. Secure the oil level indicator dipstick tube. Tighten the bolt to 10 Nm.
6. Secure the engine wiring harness support bracket.
- Tighten the nut (tightening torque 10 Nm).
- Tighten the bolt to 10 Nm.
7. Secure the engine wiring harness. Secure with clamps.
8. Install the generator support bracket. Tighten the bolts (tightening torque 25 Nm).
9. Install the turbocharger heat shield bracket.
- Tighten the M6 bolt to 10 Nm.
- Tighten the M8 bolts (tightening torque 20 Nm).
10. Install the turbocharger heat shield. Tighten to 7 Nm.
Cars with air conditioning
11. Install the air conditioning compressor.
For more information, refer to the chapter: Air Conditioning Compressor (412-03 Air conditioning - Diesel engine ID4 2.4L, Removal and installation).
All cars
12.
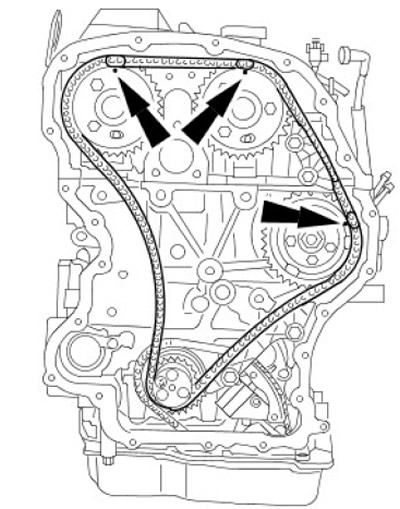
CAUTION: Make sure the painted links are aligned with the timing marks. Failure to do so may result in damage to the vehicle.
Install the timing sprockets and chains onto the camshafts.
13.
CAUTION: Make sure the timing chain tensioner is fully retracted before installation. Failure to do so may result in vehicle damage.
Install the timing chain guides and tensioner.
- Tighten the bolts (tightening torque 15 Nm).
- Tighten the nut (tightening torque 15 Nm).
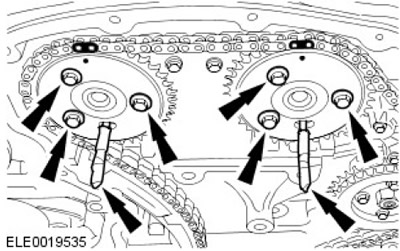
14. Using a suitable 6 mm diameter rod, lock the camshaft sprockets. Tighten the camshaft sprocket bolts.
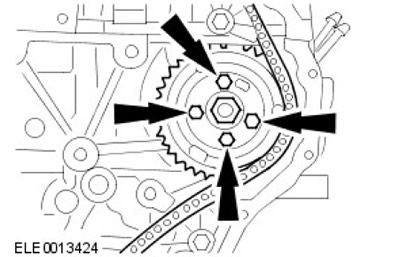
15. Tighten the 4 bolts of the fuel injection pump sprocket.
16.
NOTE: Make sure the timing chain tensioner is completely released.
Unlock the timing chain tensioner. Remove the stud.
17. Secure the camshaft sprockets and the fuel injection pump sprocket.
- Tighten the intake camshaft sprocket mounting bolt to 35 Nm.
- Tighten the fuel injection pump sprocket bolts to 33 Nm.
18. Remove the special tools.
19. Remove the 6mm rods.
20.
Warnings:
- Use new bolts.
- Make sure the oil feed holes in the rocker shafts are facing downwards. Failure to do so may result in damage to the vehicle.
NOTE: Tighten the bolts in the order shown in the illustration.
Install the rocker shafts.
- Step 1: Tighten the bolts (tightening torque 13 Nm).
- Step 2: Tighten the bolts another 45 degrees.
21. Turn the crankshaft clockwise 2 full turns.
22.
CAUTION: Make sure the special tool is properly installed on the flywheel.
Check the valve timing by inserting a special tool into the CKP sensor hole.
23. Check the camshaft timing by inserting a suitable 6mm diameter rod into the holes in the camshaft sprockets.
24. Remove the special tools.
25. Remove the 6mm rods.
26. Install the CKP sensor.
For more information, refer to the chapter: Crankshaft Position Sensor (CPS) (303-14 Electronic controls - Diesel engine ID4 2.4L, Removal and installation).
27. Install the timing cover.
For more information, refer to the chapter: Timing Cover (30301 Engine - Diesel engine ID4 2.4L, On-car repair).
28. Install the cylinder head cover.
For more information, refer to the chapter: Cylinder Head Cover (303-01 Engine - Diesel engine ID4 2.4L, On-car repair).
29. Connect the ground wire to the battery.
For more information, refer to the chapter: Connecting the Battery (414-01 Battery, Battery Mounting and Cables, General Procedures).
Comments on this article