Contents: Dismantling ⇩ Assembly ⇩
Do not bleed the air suspension system until the vehicle has been raised.
When disconnecting a Voss type nipple from any air suspension component, do not remove it from the air hose being disconnected. Do not remove the nipple from the air hose. When removing the nipple from the hose, there is a high probability of scratching the nipple, which may later lead to air leakage from the system.
Dismantling
1. Raise the rear of the vehicle and install stands.
2. Bleed the air from the rear air suspension circuit.
REAR SUSPENSION, ADJUSTMENTS, Air suspension - releasing air and filling the system with air.
3. Remove the rear right wheel arch liner.
EXTERIOR PARTS, REPAIR WORK, Rear wheel arch liner.
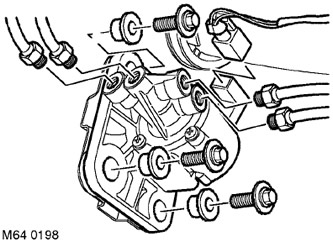
4. Disconnect 4 hoses from the bypass valve, having first marked their location.
CAUTION: Before disconnecting or removing air suspension system components, make sure that the adjacent surfaces are free of dirt. Install plugs in the openings of the fittings and pipes to protect the system from dirt ingress.
5. Disconnect the multi-pin electrical connector from the bypass valve.
6. Unscrew the 3 bolts securing the bypass valve to the body.
7. Remove the bypass valve.
Assembly
1. If you are installing a new bypass valve, remove the air hose fittings from it.
2. Install the bypass valve and tighten the bolts to 8 N·m (6 lb ft).
3. Connect the multi-pin electrical connector to the bypass valve.
4. Connect the hoses to the bypass valve and tighten their connections to 3.5 N·m (2.6 lb ft).
CAUTION: Clean the air hose connection areas.
5. Reinstall the rear wheel arch liner.
EXTERIOR PARTS, REPAIR WORK, Rear wheel arch liner.
6. Bring the pressure in the air suspension system to the nominal value.
REAR SUSPENSION, ADJUSTMENTS, Air suspension - releasing air and filling the system with air.
7. Remove the supports and lower the vehicle.
Comments on this article