Logo samochodu Ford
Logo samochodu Volkswagen
Logo samochodu BMW
Logo samochodu Opel
Logo samochodu Audi
Logo samochodu Toyota
Logo samochodu Peugeot
Polski Русский
English
Български
Беларускі
Український
Српски
Hrvatski
Română
Slovenský
Magyar


Główna
Freelander
Discovery
Range Rover
Defender
Łączność
Artykuły

Oznaczenia śruby I orzechy (Discovery 3)

 
  • Główna
  • Discovery
  • Discovery 3
  • Informacje ogólne
  • Techniki naprawy
  • Oznaczenia śruby I orzechy
 
        0  
Spis treści: Encapsulated ('Patched') bolts and…⇩ Self-locking bolts and screws ⇩ Nut identification ⇩ Self-locking nuts ⇩
Oznaczenia śruby I orzechy
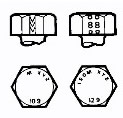
An ISO metric bolt or screw made of steel and larger than 6 mm in diameter can be identified by either of the symbols ISO M or M embossed or indented on top of the bolt head.

In addition to marks identifying the manufacturer, the top of the bolt head is also marked with symbols indicating the strength grade e.g. 8.8, 10.9, 12.9, 14.9. Alternatively, some bolts and screws have the M and strength grade symbol stamped on the flats of the hexagon.

Encapsulated ('Patched') bolts and screws


Encapsulated ('patched') bolts and screws have a thread locking agent applied to the threads during manufacture. Most thread locking agents are colored, the band of color extending for 360° around the thread. Some locking agents however, are neutral in color and may not be so easily identified apart from a slightly darker area of thread where the locking agent has been applied. The locking agent is released and activated by the tightening process and is then chemically cured to provide the locking action.


Self-locking bolts and screws


Self-locking bolts and screws
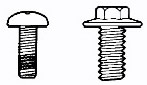
Unless stated in a specific repair procedure, self-locking bolts and screws i.e. nylon patched or trilobular thread can be re-used provided that resistance is felt when the locking portion enters the female thread.

Nylon patched bolts and screws have a locking agent either applied to, or inserted in the threaded portion. They are identified by the presence of a colored section of thread extending approximately 180° around the thread or by a colored plug inserted into the bolt.

Trilobular bolts have a special thread form which creates a slight interference with the thread of the hole or nut into which it is screwed.

OSTRZEŻENIE: Nie należy ponownie używać elementów złącznych samozabezpieczających w krytycznych miejscach, np. w płytach napędowych/koło zamachowe lub łożyskach silnika. Nie należy montować elementów złącznych innych niż samoblokujące, jeśli określono mocowanie samoblokujące.


Trilobular bolts should not be used as a substitute for patched bolts.

Nut identification

Nut identification
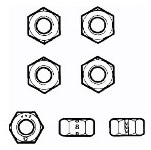
A nut with an ISO metric thread is marked on one face or one of the hexagonal flats with the strength grade symbol 8, 12, 14. Some nuts with the strength grade 4, 5 or 6 are also marked and some have the metric symbol M on the hexagonal flat opposite the strength grade marking.

A clock face system is sometimes used as an alternative method of indicating the strength grade. The external chamfers or a face of the nut is marked in a position relative to the appropriate hour mark on a clock face to indicate the strength grade.


A dot is used to locate the 12 o'clock position and a dash to indicate the strength grade. If the grade is above 12, two dots identify the 12 o'clock position.

When tightening a slotted or castellated nut, never loosen it to insert a split pin except where specified as part of an adjustment procedure. If difficulty is experienced in correctly positioning the slot, alternative washers or nuts should be selected.

Where a nut is tightened to adjust or maintain bearing pre-load, the tightening procedure must be adhered to.

Self-locking nuts


Unless stated in a specific repair procedure, self-locking nuts i.e. those with a nylon insert or deformed thread nuts can be re-used provided that resistance can be felt when the locking portion of the nut passes over the thread of the bolt or stud.

Unless stated otherwise, self-locking nuts once removed must be discarded and new nuts of the same type and strength grade fitted.


Ten artykuł jest dostępny na rosyjski, angielski, bułgarski, białoruski, ukraiński, serbski, chorwacki, rumuński, słowacki, węgierski
Recenzja artykułu: Saveliy Uszakow


Poprzednie artykuły
Samochód V warsztat
Możliwość ładowania bateria
Początek silnik samochód
Holowniczy samochód
Ogólne instrukcje instalacji
Ogólny kontrola komponenty
Korek urządzenia

Aktualny artykuł
Oznaczenia śruby I orzechy

Kolejne artykuły
Piłka I wałek namiar
Hydrauliczny układ hamulcowy
Elastyczne rurociągi i węże
Węże i obejmy układu paliwowego
Orientacja i podłączenie węży
Środki ostrożności podczas pracy z urządzeniami elektrycznymi
Środki ostrożności podczas pracy z paliwem
Uszczelki olejowe


Podobne artykuły z instrukcji naprawy Land Rovera:
• Oznaczenia śrub i nakrętek Freelander 2 (2006-2014)
• Oznaczenia śrub Freelander 1 (1997-2006)
• Oznaczenia śrub i nakrętek Range Rovera 3 (2001-2012)

Komentarze do tego artykułu


Brak komentarzy


Ile będzie 22 + 34 =


Discovery 3 
  • Informacje ogólne
  • Korzystanie z instrukcji
  • Środki ostrożności
  • Informacje serwisowe
  • Techniki naprawy
  • Ochrona zdrowia
  • Test drogowy
  • Kody identyfikacyjne
  • Podnoszenie
  • Konserwacja - diesla
  • Konserwacja - benzyna
  • Podwozie
  • Zawieszenie samochodu
  • Przednie zawieszenie
  • Tylne zawieszenie
  • Koła i opony
  • Dynamiczne zawieszenie
  • Wał kardana
  • Tylna oś napędowa
  • Przednia oś napędowa
  • Osie przedniej osi
  • Wałki tylnej osi
  • Układ hamulcowy
  • Hamulec postojowy
  • Hamulec hydrauliczny
  • Próżniowy wzmacniacz hamulca
  • System antywłamaniowy
  • Układ kierowniczy
  • Kolumna kierownicy
  • Silnik i systemy
  • Silnik benzynowy 4,0 l
  • Silnik benzynowy 4,4 l
  • Silnik wysokoprężny 2,7 l
  • Chłodzenie silnika
  • Zapas paliwa
  • Jednostki napędowe
  • Uruchom system
  • Sytem zapłonu
  • Redukcja emisji
  • Filtracja powietrza
  • Kontrola oparów paliwa
  • Elektroniczna część sterująca
  • Skrzynia biegów
  • Sprzęgło
  • Układy napędu na wszystkie koła
  • Sprawa transferu
  • Układ wydechowy
  • Zbiornik paliwa i przewody
  • Kontrola przyspieszenia
  • Sprzęt elektryczny
  • Kontrola klimatu
  • Instrumenty i lampki kontrolne
  • Akumulator i system ładowania
  • System informacyjny
  • Oświetlenie i reflektory
  • Dystrybucja mocy
  • Elektroniczna grupa funkcyjna
  • Ciało i powłoka
  • Elementy karoserii
  • Wykończenie wnętrza i karoserii
  • Lustra i okulary
  • Siedzenia
  • Tablica przyrządów i konsola
  • Uchwyty i zamki
  • Wycieraczki i spryskiwacze
  • Szyberdach i zderzaki
  • System bezpieczeństwa
  • Naprawy karoserii
  • Naprawa elementów przednich
  • Naprawa tylnych elementów
  • Naprawa panelu bocznego
  • Mocowanie ramy i karoserii

Discovery 1 
  • Informacje ogólne
  • Dane techniczne
  • Wprowadzenie do podręcznika
  • Rozwiązywanie problemów
  • Silnik i systemy
  • Silnik diesla Tdi
  • Silnik benzynowy V8i (3,9 l)
  • Silnik benzynowy V8i (4,0 l)
  • Silnik benzynowy Mpi
  • Ograniczanie szkodliwych emisji
  • Układ paliwowy Tdi
  • Układ paliwowy MFi
  • Układ paliwowy SFi
  • Układ paliwowy MPi (MEMS)
  • Tempomat
  • Układ chłodzenia (Tdi)
  • Układ chłodzenia (V8i)
  • Układ chłodzenia (MPi)
  • Układ wydechowy
  • Transmisja
  • Sprzęgło
  • Skrzynia biegów manualna R380
  • Skrzynia biegów manualna LT 77
  • Skrzynia rozdzielcza LT230T
  • Automatyczna skrzynia biegów
  • Wał kardana
  • Oś tylna
  • Oś przednia
  • Podwozie
  • Układ kierowniczy
  • Zawieszenie przednie
  • Zawieszenie tylne
  • Układ hamulcowy
  • Koła i opony
  • Nadwozie i wnętrze
  • Bezpieczeństwo bierne
  • Drzwi, zamki i okna
  • Zewnętrzne części nadwozia
  • Szczegóły wykończenia wnętrza
  • Siedzenia
  • Sprzęt elektryczny
  • Ogrzewanie i wentylacja
  • Klimatyzacja
  • Wycieraczki i spryskiwacze szyb
  • Układ rozruchowy i ładowania
  • Sprzęt i urządzenia
  • Oświetlenie i reflektory


LRman.ru © 2013-2026 | Wersja mobilna | Free Lander | Discovery | Range Rover | Defender | Łączność | | Mapa strony |
Instrukcje naprawy i obsługi samochodu Land Rover: Freelander, Discovery, Range Rover, Defender
Używamy plików cookie, aby strony ładowały się szybciej i zapewniały bardziej przyjazne użytkownikowi środowisko 🍪