Inspection and verification
1. Make sure the customer's complaint is valid.
2. Perform a visual inspection for obvious mechanical or electrical damage.
3. If a clear cause for an observed or customer-reported issue is identified, resolve the issue before proceeding to the next steps (if possible).
4. If the cause is not visually obvious, check the symptom and refer to the Symptom Chart.
Leak test procedure
Introduction
This procedure is designed to facilitate the diagnosis and repair of leaks on Defender vehicles in order to ensure a quality repair the first time.
This procedure identifies suspected water intrusion points and provides guidance on recommended remediation.
Prerequisites
It is assumed that the technician working on the vehicle is at least level 3 and uses standard vehicle protective equipment when necessary, i.e. protective seat covers, fender covers, etc.
Leak test
To effectively detect water leaks, certain basic tools are required. Below are some recommendations.
Basic tools
- Hose
- Water supply source
- Pressurized water supply
- Watering can Lantern
- Mirror (with telescopic rod)
- Air source
- Mandrel (shaped nylon trim strip)
Modified tools can be used, such as attaching a watering can sprinkler to a hose to make a sprayer; attach the nozzle of a new bottle of sealant to the hose, which will greatly facilitate the supply of water to hard-to-reach places; hardware stores also sell ready-made hose nozzles with the ability to change the shape of the jet and, finally, we should not forget about using a regular car wash. With the exception of the car wash method, the initial diagnosis is more accurate when performed by two technicians, one inside the car and the other outside. An outside technician can direct water to areas where leak points are likely to be, and a technician inside the vehicle can look inside the car with a 12V portable lamp to confirm the location of the leak point.
It is worth remembering that the place where water appears inside the car may not be a source of leakage, for example, water in the footwell on the passenger side may enter from the driver's side, flowing behind the trim panel. You may need to remove trim or components to find the water entry point.
Spots
Often, after prolonged water flow, the entry point can be visually identified by stains or streaks.
Sealing leaks
To seal leaks, there are various substances, sealing putty, sealing solution or paste. For example, aggregate produced by Bostik «303 glasticon» And «betafill 10210», which is a white paste, as well as a transparent sealant «terostat 33».
NOTE: Do not use silicone sealants as they may cause problems if further refinishing work is required.
Careful consideration needs to be given to which compound will be used for sealing, for example an exterior seam on a white car will require a white or clear sealant, aggregate is best for use on hidden surfaces to fill large gaps. The sealant must be applied so that after processing it looks neat. When used on a box profile or under carpet, application and smoothing should not be a problem, however, on exterior panels or visible areas, a sealant should be applied «rub» into the gap and remove the excess with a suitable solvent that is harmless to the paintwork.
Once a water leak has been identified, the suspicious area must be thoroughly dried before any sealing compound is applied. The task will be facilitated by the use of compressed air.
Symptom table
Water penetration paths and recommended repair procedure.
NOTE: Perform a leak test and visual inspection of any suspicious or wet area. After finding the water leak point, refer to the symptoms table below.
| Symptom: water accumulation | Possible water seepage points | Action - performed after the location of water infiltration is detected |
| In the footwell (leak point - front) | ||
| In the footwell (seepage point - front door area) | ||
| In the footwell (seepage point - tailgate area) | ||
| In the footwell (seepage point - A-pillar area) | ||
| In the rear storage/seat area (Leak Point - Lower Side/Rear Body Panel) | ||
| In the rear storage/seat area (Leak Point - Upper Side/Rear Body Panel) | ||
| In the rear storage/seat area (leak point - tailgate) | ||
| In the rear storage/seat area (seepage point - roof) |
PINPOINT TEST A: HEATER CABLE BUSHING
A1: HEATER CABLE BUSHING
2. Materials needed: sealant (transparent/body color), gloves, alcohol wipe.
3. Remove excess sealant from the body.
4. Wait for the sealant to harden and re-check the tightness of the suspicious area.
Is water still getting into the car?
Yes - Perform a leak test and visual inspection of any suspicious or wet area. After finding the water seep point, refer to «Water intrusion paths and recommended repair procedure» higher.
None - Replace previously removed trim/panels or component. Apply sealant around the circumference of the outer edge of the bushing and on the part of the bushing that connects to the cable.
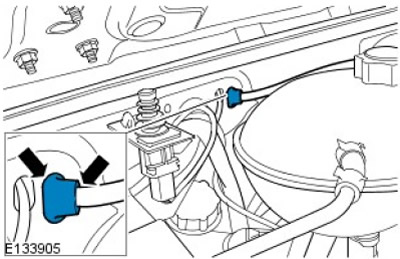
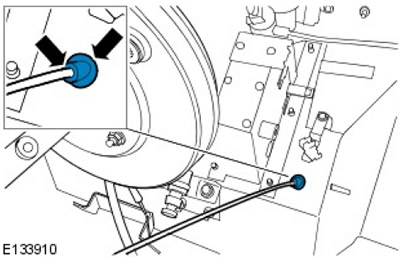
PINPOINT TEST B: WINDSHIELD WIPER BUSHING
B1: WINDSHIELD WIPER BUSHING
1. Remove bushings, check bushing and bores for defects/deformation. Apply sealant around the outer edge of the bushing and install it in place.
2. Remove excess sealant from the body.
3. Materials needed: sealant (transparent or black), gloves, alcohol wipe, cloth.
4. Wait for the sealant to harden and re-check the tightness of the suspicious area.
Is water still getting into the car?
Yes - Perform a leak test and visual inspection of any suspicious or wet area. After finding the water seep point, refer to «Water intrusion paths and recommended repair procedure» higher.
No - Reinstall the previously removed trim/panels or component.
PINPOINT TEST C: WINDSHIELD SEAL
C1: WINDSHIELD SEAL
1. Using a drift, lift the edge of the windshield seal and insert the tip of the caulk gun. Apply a bead of sealant between the seal and the outer frame.
2. Remove excess sealant from the body.
3. Materials needed: sealant (transparent/body color), gloves, alcohol wipe, cloth, mandrel.
4. Wait for the sealant to harden and re-check the tightness of the suspicious area.
Is water still getting into the car?
Yes - Perform a leak test and visual inspection of any suspicious or wet area. After finding the water seep point, refer to «Water intrusion paths and recommended repair procedure» higher.
None - Replace previously removed trim/panels or component.
PINPOINT TEST D: SEAMS IN THE LEGS
D1: STITCHES IN THE LEGS
NOTE: Leakage will be easier to trace by placing a powered 12V hand lamp under the underbody and inspecting inside the vehicle.
1. Raise or remove the mats. Carefully open the hood and direct the flow of water from the roof over the fascia and under the vehicle. There are several seams in the footwell, any of which can allow water to enter. Also check and, if necessary, seal the bushings and openings in the front of the tunnel.
2. Apply sealant along the seams and rub it into the joint while wearing a glove. You can remove the bushings and apply sealant around the circumference of the outer edge before reinstalling.
3. Materials needed: sealant (transparent/body color), gloves, alcohol wipe, cloth.
4. Wait for the sealant to harden and re-check the tightness of the suspicious area.
Is water still getting into the car?
Yes - Perform a leak test and visual inspection of any suspicious or wet area. After finding the water seep point, refer to «Water intrusion paths and recommended repair procedure» higher.
None - Replace previously removed trim/panels or component.
PINPOINT TEST E: SEAMS IN THE BOTTOM
E1: SEAMS IN THE BOTTOM
NOTE: The floor panel is secured with screws and foam.
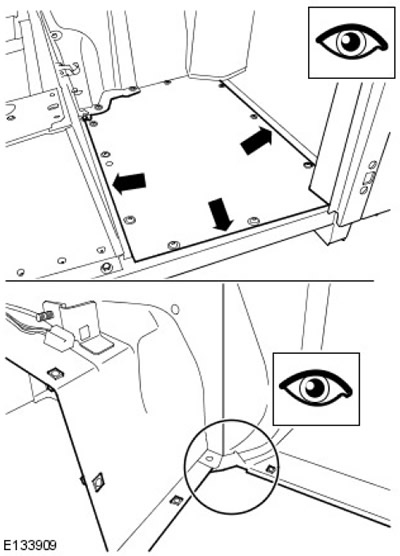
1. Raise or remove the mats. Carefully open the hood and direct the flow of water from the roof over the fascia and under the vehicle.
2. Pay special attention to the corners of the floor panel. In the case of overlapping joining of several panels, apply sealant and rub it into the edges and corners of the overlapped panel. This is to prevent further water penetration. If necessary, you can add sealant to the gasket of the removable floor panel.
3. Materials needed: sealant (transparent/body color), gloves, alcohol wipe, cloth.
4. Wait for the sealant to harden and re-check the tightness of the suspicious area
Is water still getting into the car?
Yes - Perform a leak test and visual inspection of any suspicious or wet area. After finding the water seep point, refer to «Water intrusion paths and recommended repair procedure» higher.
No - Reinstall the previously removed trim/panels or component.
PINPOINT TEST F: HOOD LOCK BUSHING
F1: HOOD LOCK BUSHING
1. Apply sealant around the outer edge of the bushing and on the part of the bushing that connects to the cable.
2. Remove excess sealant from the body.
3. Materials needed: sealant (transparent/body color), gloves, alcohol wipe, cloth.
4. Wait for the sealant to harden and re-check the tightness of the suspicious area.
Is water still getting into the car?
Yes - Perform a leak test and visual inspection of any suspicious or wet area. After finding the water seep point, refer to «Water intrusion paths and recommended repair procedure» higher.
None - Replace previously removed trim/panels or component.
PINPOINT TEST G: PEDAL UNIT BUSHING
G1: PEDAL UNIT BUSHING
1. Remove the bushing and check the bushing and bore for defects/deformation. Apply sealant around the outer edge of the bushing and install it in place.
2. Remove excess sealant from the body.
3. Materials needed: sealant (transparent/body color), gloves, alcohol wipe, cloth.
4. Wait for the sealant to harden and re-check the tightness of the suspicious area.
Is water still getting into the car?
Yes - Perform a leak test and visual inspection of any suspicious or wet area. After finding the water seep point, refer to «Water intrusion paths and recommended repair procedure» higher.
None - Replace previously removed trim/panels or component.
PINPOINT TEST H: SUCTION DUCT TO FAN
H1: SUCTION DUCT TO FAN
NOTE: To install the fender, it must be lowered into place along the faceplate surface. This will move the foam seal attached to the fan assembly.

1. Check the condition and position of the foam pad connection between the intake duct and the fan assembly installed in the fascia.
2. If possible, apply sealant to the opening with the wing installed.
3. If the opening cannot be sealed with the wing installed, remove the wing to make repairs.
4. Required materials: sealant (transparent/body color), gloves, alcohol wipe, cloth
5. Wait for the sealant to harden and retest the suspect area for leaks.
Is water still getting into the car?
Yes - Perform a leak test and visual inspection of any suspicious or wet area. After finding the water seep point, refer to «Water intrusion paths and recommended repair procedure» higher.
None - Replace previously removed trim/panels or component.
PINPOINT TEST I: FAN UNIT
I1: FAN UNIT
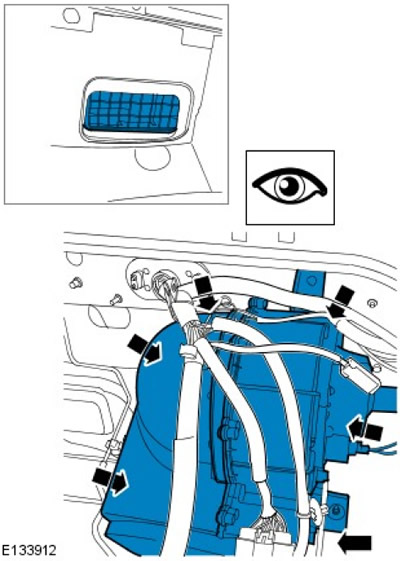
1. Direct water to the area of the fan unit. If a leak is found and it is possible to determine the specific area of the leak, sealant can be applied to the seam where the fan assembly is installed on the baffle and, if possible, wipe off excess sealant.
2. If a specific leak cannot be found, remove the fan assembly and check the integrity of the foam gasket, replace the gasket if necessary, add a thin bead of sealant to the gasket, and gently install it to ensure a tight seal.
3. On some 2007 MY models, water may seep through the grille of the fan assembly into the footwell on the passenger side. This is caused by a seal failure between the two halves of the fan assembly. It is recommended to replace the fan assembly.
4. Required materials: sealant (transparent/body color), gloves, alcohol wipe, cloth, new gasket, fan assembly.
5. Wait for the sealant to harden and re-check the tightness of the suspicious area.
Is water still getting into the car?
Yes - Perform a leak test and visual inspection of any suspicious or wet area. After finding the water seep point, refer to «Water intrusion paths and recommended repair procedure» higher.
None - Replace previously removed trim/panels or component.
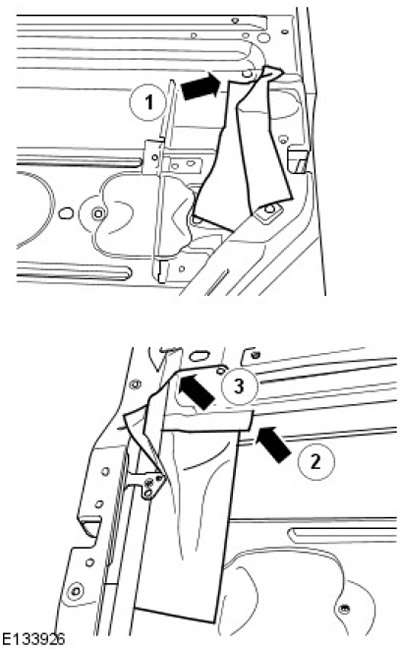
PINPOINT TEST J: INTAKE DUCT
J1: INLET DUCT
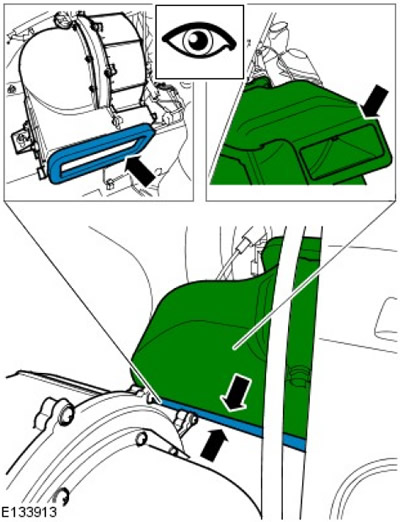
1. Properly prepare the mating surfaces shown in fig. 1 and fig. 2. They must not have waves or damage. On fig. 3 shows 2 surfaces after installation.
2. To repair minor water leaks, a bead of caulk can be applied to the damaged area and smoothed out.
3. Removal and installation of the air duct of the wing is shown in fig. 1. This operation must be done carefully to ensure a tight mating surface between the duct and the foam pad.
4. Required materials: sealant (transparent/body color), gloves, alcohol wipe, cloth.
5. Wait for the sealant to harden and re-check the tightness of the suspicious area.
Is water still getting into the car?
Yes - Perform a leak test and visual inspection of any suspicious or wet area. After finding the water seep point, refer to «Water intrusion paths and recommended repair procedure» higher.
No - Reinstall the previously removed trim/panels or component.
PINPOINT TEST K: CLUTCH/BRAKE PEDAL UNIT
K1: CLUTCH/BRAKE PEDAL UNIT
1. Apply sealant to the seams of the pedal block, rub the sealant into the seams.
2. Remove excess sealant from the body.
3. Materials needed: sealant (transparent or black), gloves, alcohol wipe, cloth.
4. Wait for the sealant to harden and re-check the tightness of the suspicious area.
Is water still getting into the car?
Yes - Perform a leak test and visual inspection of any suspicious or wet area. After finding the water seep point, refer to «Water intrusion paths and recommended repair procedure» higher.
No - Reinstall the previously removed trim/panels or component.
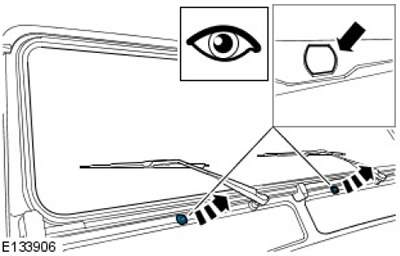
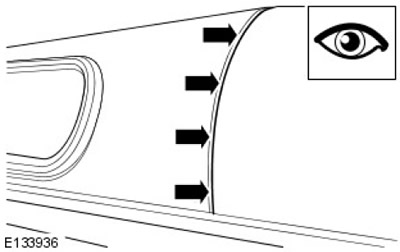
PINPOINT TEST L: WINDSHIELD EDGE FRAME
L1: WINDSHIELD CURTAIN FRAME
1. Visually check the condition of the connection between the side molding and the extruded profile in the middle for pores and cracks at the top and bottom on both sides.
2. If pores or cracks are found, apply sealant to the joint.
3. Materials needed: sealant (transparent/body color), gloves, alcohol wipe, cloth.
4. Remove excess sealant from the body.
5. Wait for the sealant to harden and re-check the tightness of the suspicious area.
Is water still getting into the car?
Yes - Perform a leak test and visual inspection of any suspicious or wet area. After finding the water seep point, refer to «Water intrusion paths and recommended repair procedure» higher.
None - Replace previously removed trim/panels or component.
PINPOINT TEST M: DOOR SEAL (PATCH)
M1: DOOR SEAL (PATCH)
1. Install the L-shaped patch on the door joint so that the top of the patch is flush with the top of the roof/A-pillar connection (A). After installation, the patch should not be deformed and there should be no bubbles on it. Apply a thin bead of sealant approximately 30-50 mm long between the roof and A-pillar flange. Smooth out the sealant on the flange.
2. Install the patch on the door joint so that it is flush with the flange. The patch should not be deformed and should not have bubbles. Apply a thin bead of sealant approximately 20-40 mm long between the windshield edge and the fascia panel connecting flange. Apply sealant to the joint between the trim panel and the edge of the windshield to ensure a tight seal. Smooth out the sealant on the flange.
3. Attach the patch to the door joint so that it is flush with the flange. The patch should not be deformed and should not have bubbles. Apply a thin bead of sealant approximately 20-40mm long to the side and bottom body panels. Smooth out the sealant on the flange. Check if there is any gap left between the belt seal and the freshly applied sealant.
4. Remove excess sealant from the body.
5. Materials needed: sealant (transparent/body color), patches on the joint of the door.
6. Wait for the sealant to harden and re-check the tightness of the suspicious area.
Is water still getting into the car?
Yes - Perform a leak test and visual inspection of any suspicious or wet area. After finding the water seep point, refer to «Water intrusion paths and recommended repair procedure» higher.
None - Replace previously removed trim/panels or component.
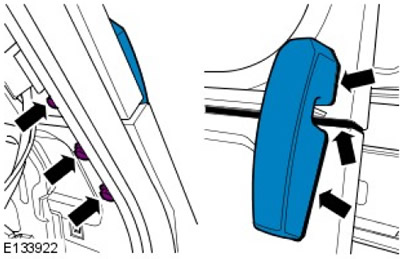
PINPOINT TEST N: WATERPROOF INSERT
N1: WATERPROOF INSERT
NOTE: Recommendation: Check if the drain holes at the bottom of the door are blocked by sealant/dirt or debris (if the car was driving off-road).
1. Visually inspect the entire edge of the insert for areas of weak butyl bonding between the insert and the door panel. Due to the complexity of corrugated pipe connection (circular) this area is subject to close inspection as a typical water seepage zone. Repairs can be made by rolling or pressing the butyl sealant to improve adhesion or by applying additional sealant/filler to a limited area.
2. Check the condition of the seal under the bottom of the door. If it is damaged or shifted, water can seep through it.
3. Materials needed: paint roller, sealant, filler
4. Wait for the sealant to harden and re-check the tightness of the suspicious area.
Is water still getting into the car?
Yes - Perform a leak test and visual inspection of any suspicious or wet area. After finding the water seep point, refer to «Water intrusion paths and recommended repair procedure» higher.
No - Reinstall the previously removed trim/panels or component.
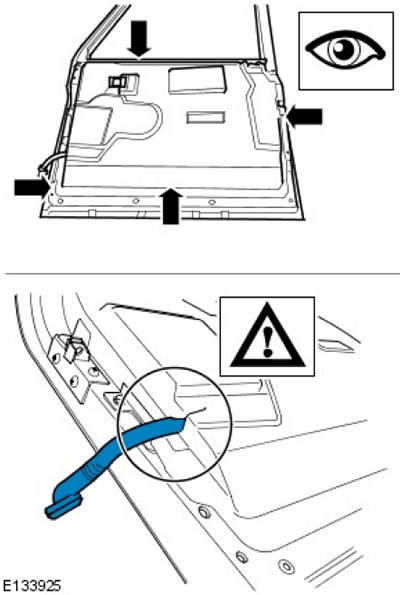
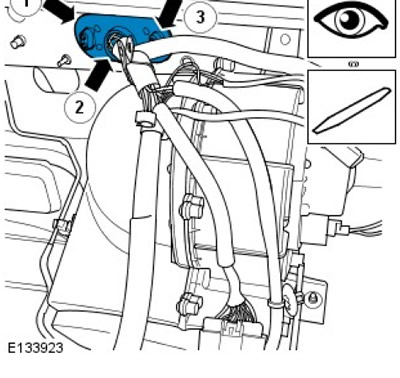
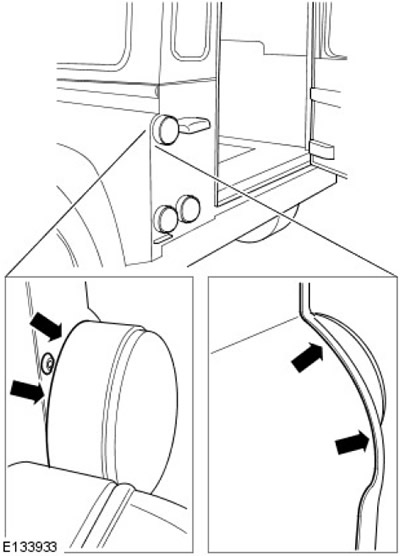
PINPOINT TEST O: LOCK/DOOR EDGE
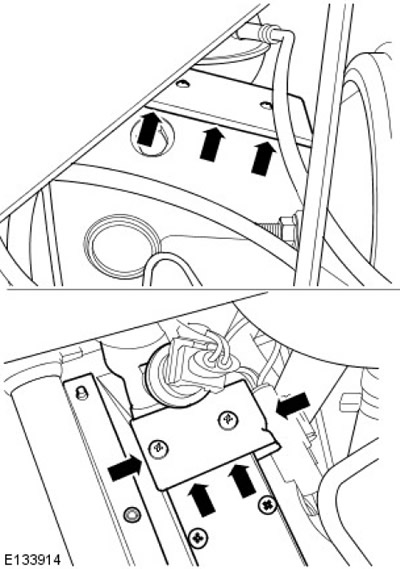
O1: LOCK/DOOR EDGE
NOTE: Water seepage is noticeable down from the edge of the door into the A-pillar/footwell/sill area of the vehicle.
NOTE: Use a mirror and flashlight.
1. Remove the door frame. Remove the waterproof insert to expose the latch mechanism. Check the surface of the waterproof latch insert for damage/weak adhesion (pic. 1).
2. Apply sealant/filler to the top of the waterproof latch insert (pic. 2).
3. Apply sealant to the mating surfaces of the panel above the watertight lock insert under the door glass guide (pic. 3).
4. Materials needed: sealant, filler, tools (to remove the door frame), the waterproof insert must be replaced.
5. Wait for the sealant to harden and retest the suspect area for leaks.
Is water still getting into the car?
Yes - Perform a leak test and visual inspection of any suspicious or wet area. After finding the water seep point, refer to «Water intrusion paths and recommended repair procedure» higher.
No - Reinstall the previously removed trim/panels or component.
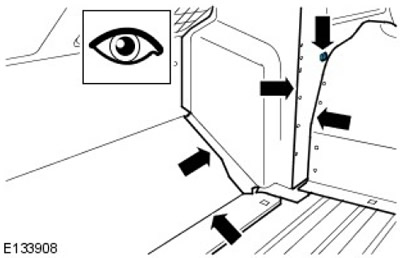
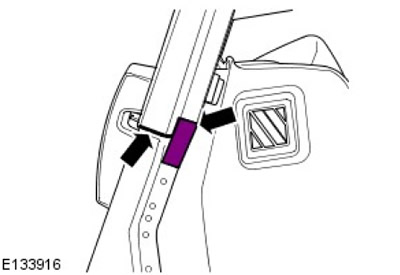
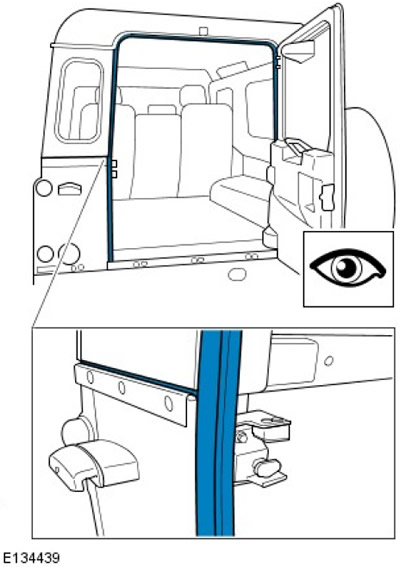
PINPOINT TEST P: LOAD COMPARTMENT SEAL
P1: LOAD COMPARTMENT SEAL
NOTE: While it is not necessary to remove the door seal to complete the repair, this operation must be done carefully to ensure all gaps are sealed, including the seam seal.
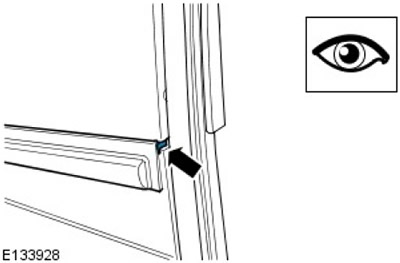
1. Apply a small bead of sealant or filler to the side panel joint seal strip (as shown by the arrow).
2. Critical Visible Area = High quality sealant finish required.
3. Required materials: sealant, filler.
4. Wait for the sealant to harden and re-check the tightness of the suspicious area.
Is water still getting into the car?
Yes - Perform a leak test and visual inspection of any suspicious or wet area. After finding the water seep point, refer to «Water intrusion paths and recommended repair procedure» higher.
None - Replace previously removed trim/panels or component.
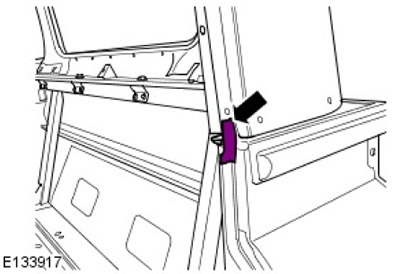
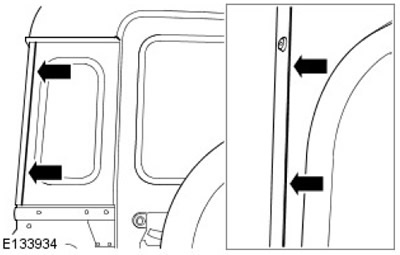
PINPOINT TEST Q: CONNECTION OF UPPER AND LOWER BODY PANELS (LATERAL BODY LINE)
Q1: CONNECTION OF UPPER AND LOWER BODY PANELS (LATERAL BODY LINE)
NOTE: Seal between upper and lower body panels (side waist line) made of memory foam, the last layer of seal consists of three sections connected to each other, the seal is glued to the top panel of the body, but not glued to the cargo compartment.
NOTE: The main area to be inspected is the weld on the lower body seal. Sometimes the seal may extend slightly to the inside of the seam, leaving a small cavity. After slightly loosening all the fasteners of the body side panel, using a plastic tool, you can move the seal outward to close the cavity. If it is a small cavity, it can be sealed with a small amount of caulk by rubbing it into the cavity and removing the excess. If the repair is carried out on a car where the trim is done from the inside, the cavity can also be sealed from the inside; more sealant can be applied if the seal is hidden under the inner lining during normal use.
NOTE: If the seal itself needs to be replaced, the upper body side panel can be removed without removing the roof panel. To do this, remove the top and bottom fasteners and loosen the front and rear fasteners. A temporary support can then be placed under the roof panel while the side panel is removed to facilitate seal replacement.
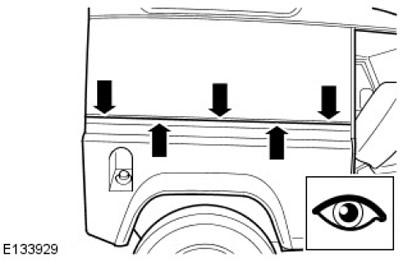
1. When performing this operation, be careful not to damage the seal between the roof and body side panel, and make sure that the seal at the front between the windshield frame and the roof does not move during installation.
2. Materials needed: sealant (transparent or black), gloves, alcohol wipe, cloth, tools, seals (if it is needed)
3. Wait for the sealant to harden and re-check the tightness of the suspicious area.
Is water still getting into the car?
Yes - Perform a leak test and visual inspection of any suspicious or wet area. After finding the water seep point, refer to «Water intrusion paths and recommended repair procedure» higher.
None - Replace previously removed trim/panels or component.
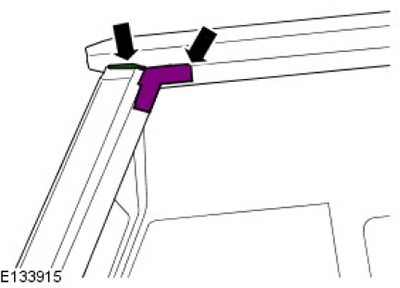
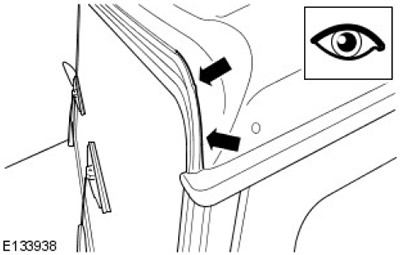
PINPOINT TEST R: ROOF-PILLAR CONNECTION (A)
R1: FRONT PILLAR ROOF CONNECTION (A)
NOTE: On some vehicles, the gap at the top of the roof is filled with filler. On later models, black filler was used. Replace with original material.
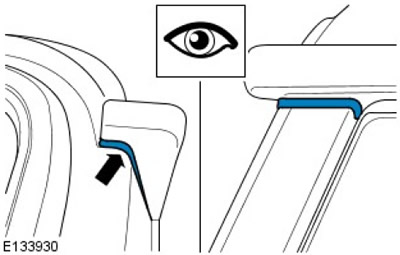
1. Fill gaps with sealant or filler and wipe off excess.
2. In case of leaks above this area - see (front corner seams) Go to AD PINPOINT TEST. or (Gutter seal) Go to PINPOINT TEST AE.
3. Materials needed: sealant (black or white depending on the situation) or placeholder (black) gloves.
4. Wait for the sealant to harden and re-check the tightness of the suspicious area.
Is water still getting into the car?
Yes - Perform a leak test and visual inspection of any suspicious or wet area. After finding the water seep point, refer to «Water intrusion paths and recommended repair procedure» higher.
No - Reinstall the previously removed trim/panels or component.
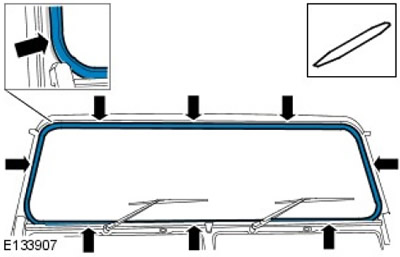
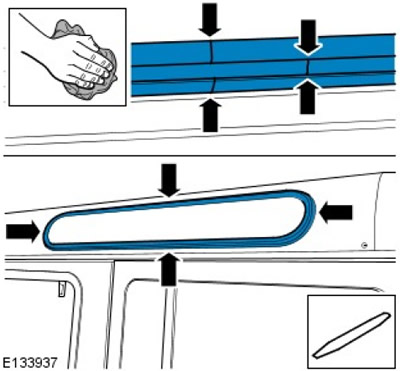
PINPOINT TEST S: GASKET BETWEEN ROOF AND TOP PANEL
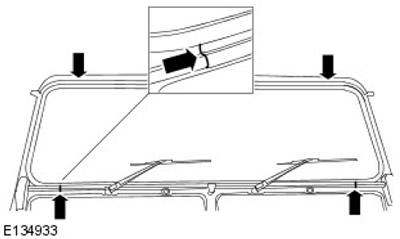
S1: GASKET BETWEEN ROOF AND TOP BODY PANEL
NOTE: Inspect the roof area to verify that the gasket is installed/seated correctly. Check for bumps/waves or pinching as these are likely causes of water intrusion.
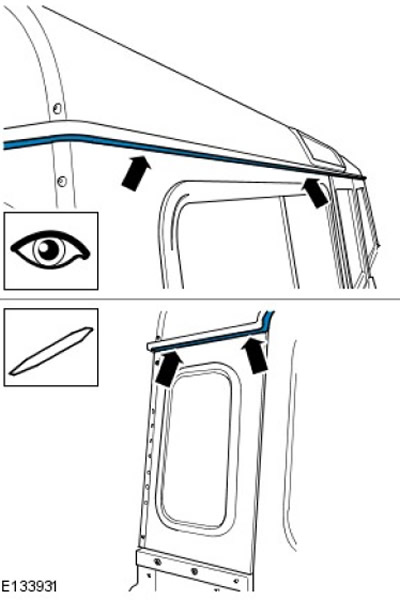
1. Remove/loosen the mounting bolts on the inside of the roof (lower the upholstery if necessary to access the fasteners on some versions). Use a non-metallic tool when working outside (mandrel) lift the gasket to ensure correct installation. Tighten the roof fasteners.
2. This procedure does not always require the use of sealant, but if the gasket needs to be further sealed with sealant, a small amount of sealant may be used. When applying the sealant, care must be taken not to deform the gasket.
3. Required materials: mandrel, tools, sealant.
4. Wait for the sealant to harden and re-check the tightness of the suspicious area.
Is water still getting into the car?
Yes - Perform a leak test and visual inspection of any suspicious or wet area. After finding the water seep point, refer to «Water intrusion paths and recommended repair procedure» higher.
No - Reinstall the previously removed trim/panels or component.
PINPOINT TEST T: WINDSHIELD HINGE
T1: WINDSHIELD HINGE
NOTE: On vehicles prior to model year 2009, or if there is significant leakage around this area, it may be appropriate to apply sealant along the fascia panel to windshield edge joint before installing the hinge in place.
NOTE: Critical visible area = high quality sealant finish required.
1. From inside the vehicle, remove the 3 fasteners holding the windshield hinge. Remove the loop. Remove the existing gasket and remove any remaining adhesive or sealant. Install the hinge gasket in place. Apply a small amount of sealant around each mounting hole.
2. Materials needed: sealant, windshield hinge gasket.
3. Wait for the sealant to harden and re-check the tightness of the suspicious area.
Is water still getting into the car?
Yes - Perform a leak test and visual inspection of any suspicious or wet area. After finding the water seep point, refer to «Water intrusion paths and recommended repair procedure» higher.
No - Reinstall the previously removed trim/panels or component.
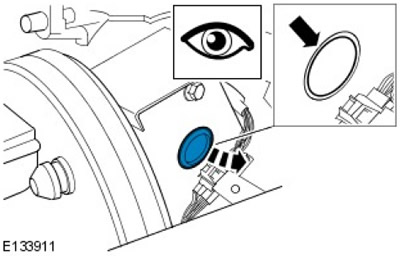
PINPOINT TEST U: MAIN HARNESS BUSHING
U1: MAIN HARNESS BUSHING
NOTE: Inspect the bushing for areas of poor fit.
NOTE: Check the U-channel to the cladding panel for deformation between the weld points through which water seeps into the sleeve.
1. Use a drift to properly install the bushing. Additional sealant should be applied around the outer edges of the bushing and body panel.
2. In some cases, together with the outer part of the sleeve, it may be necessary to seal the clamp of the main harness. This is determined during the re-verification.
3. Required materials: sealant, mandrel.
4. Wait for the sealant to harden and re-check the tightness of the suspicious area.
Is water still getting into the car?
Yes - Perform a leak test and visual inspection of any suspicious or wet area. After finding the water seep point, refer to «Water intrusion paths and recommended repair procedure» higher.
None - Replace previously removed trim/panels or component.
PINPOINT TEST V: A/C PIPE BUSHING
V1: A/C PIPE BUSHING
NOTE: Inspect the bushing for areas of poor fit.
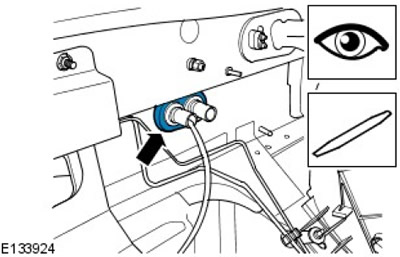
1. Use a drift to properly install the bushing. Additional sealant should be applied around the outer edges of the bushing and body panel.
2. Required materials: sealant, mandrel.
3. Wait for the sealant to harden and re-check the tightness of the suspicious area.
Is water still getting into the car?
Yes - Perform a leak test and visual inspection of any suspicious or wet area. After finding the water seep point, refer to «Water intrusion paths and recommended repair procedure» higher.
None - Replace previously removed trim/panels or component.
PINPOINT TEST W: RIVETS IN THE SIDE PANEL
W1: RIVETS IN BODY SIDE PANEL
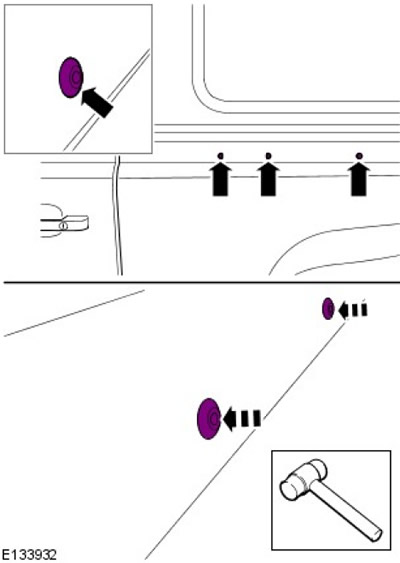
1. Apply sealant around the rivet and wipe off excess with an alcohol wipe; The rivet can also be installed by lightly hitting it with a mallet through a nylon block.
2. If the leak persists, the rivet must be drilled out and replaced, then painted with paint for minor paint repairs.
3. Materials needed: sealant (transparent/body color), gloves, alcohol wipe, cloth, hammer, nylon stick, rivet, riveting gun, paint for minor repairs to paintwork.
4. Wait for the sealant to harden and re-check the tightness of the suspicious area.
Is water still getting into the car?
Yes - Perform a leak test and visual inspection of any suspicious or wet area. After finding the water seep point, refer to «Water intrusion paths and recommended repair procedure» higher.
None - Replace previously removed trim/panels or component.
PINPOINT TEST X: REAR LIGHTS/REAR BODY SEAL
X1: REAR LIGHTS/REAR BODY SEAL
1. To seal the back seam, press the sealant into the seam and then smooth it into the gap, rub the sealant into the joint and remove the excess with a cloth dampened with alcohol.
2. To seal the tail light, remove the tail light and apply sealant to the circumference of the base of the light, reinstall the light and wipe off excess sealant.
3. Materials needed: sealant (transparent/body color), gloves, cloth moistened with alcohol.
4. Wait for the sealant to harden and re-check the tightness of the suspicious area.
Is water still getting into the car?
Yes - Perform a leak test and visual inspection of any suspicious or wet area. After finding the water seep point, refer to «Water intrusion paths and recommended repair procedure» higher.
None - Replace previously removed trim/panels or component.
PINPOINT TEST Y: TOP CORNERS OF REAR SIDE BODY PANELS
Y1: TOP CORNERS OF REAR SIDE BODY PANELS
1. Press the sealant into the joint, smooth into the gap, remove the excess.
2. Materials needed: sealant (transparent/body color), gloves, an alcohol wipe, and a cloth.
3. Wait for the sealant to harden and re-check the tightness of the suspicious area.
Is water still getting into the car?
Yes - Perform a leak test and visual inspection of any suspicious or wet area. After finding the water seep point, refer to «Water intrusion paths and recommended repair procedure» higher.
No - Reinstall the previously removed trim/panels or component.
PINPOINT TEST Z: CONNECTION OF UPPER AND LOWER BODY PANELS (REAR BODY LINE)
Z1: CONNECTION OF UPPER AND LOWER BODY PANELS (REAR BODY LINE)
NOTE: Seal between upper and lower body panels (side waist line) made of memory foam, the last layer of seal consists of three sections connected to each other, the seal is glued to the top panel of the body, but not glued to the cargo compartment.
NOTE: Sometimes the seal may extend slightly on the inside of the seam, leaving a small cavity. After slightly loosening all the fasteners of the body side panel, using a plastic tool, you can move the seal outward to close the cavity. If it is a small cavity, it can be sealed with a small amount of caulk by rubbing it into the cavity and removing the excess. If the repair is carried out on a car where the trim is done from the inside, the cavity can also be sealed from the inside; more sealant can be applied if the seal is hidden under the inner lining during normal use.
NOTE: If the seal itself needs to be replaced, the upper body side panel can be removed without removing the roof panel. To do this, remove the top and bottom fasteners and loosen the front and rear fasteners. A temporary support can then be placed under the roof panel while the side panel is removed to facilitate seal replacement.
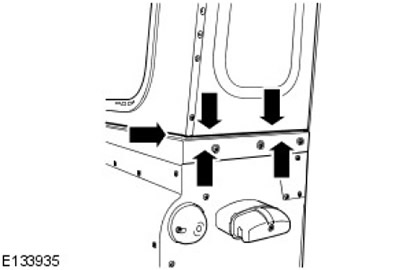
1. When performing this operation, be careful not to damage the seal between the roof and body side panel, and make sure that the seal at the front between the windshield frame and the roof does not move during installation.
2. Materials needed: sealant (transparent or black), gloves, alcohol-soaked cloth, removal tools (if needed), seals (if needed).
3. Wait for the sealant to harden and re-check the tightness of the suspicious area.
Is water still getting into the car?
Yes - Perform a leak test and visual inspection of any suspicious or wet area. After finding the water seep point, refer to «Water intrusion paths and recommended repair procedure» higher.
No - Reinstall the previously removed trim/panels or component.
PINPOINT TEST AA: REAR DOOR
AA1: REAR DOOR
NOTE: Due to the location of the spare wheel, the rear door may move relative to the body as a result of loose fasteners. Check/adjust tightening torque to 22 Nm (plus or minus 3 Nm).
1. Check the profile and adjustment/installation position of the tailgate. Adjust if necessary.
2. Check the bubble seal area of the opening for cracks due to door movement.
3. Check the condition, correct installation and secure fastening of the aperture seal. Replace if necessary.
4. Check the quality of the patches and sealant in the waist seam area (see instructions for repairing the belt line seal).
5. Materials needed: opening seal (replace if necessary), sealant (transparent/body color), gloves, a cloth moistened with alcohol, paint for minor repairs to the paintwork.
6. Wait for the sealant to harden and re-check the tightness of the suspicious area.
Is water still getting into the car?
Yes - Perform a leak test and visual inspection of any suspicious or wet area. After finding the water seep point, refer to «Water intrusion paths and recommended repair procedure» higher.
None - Replace previously removed trim/panels or component.
PINPOINT TEST AB: ROOF SEAM
AB1: ROOF JOINT
NOTE: Excess sealant must be completely removed from easily visible areas, leaving no signs of repair.
1. Visually inspect the entire roof seam for flange edge defects. Check for gaps between panels and the condition of panel joints. Apply sealant if necessary.
2. Materials needed: sealant (preferably in body color or transparent), cloth, alcohol wipe, gloves.
3. Wait for the sealant to harden and re-check the tightness of the suspicious area.
Is water still getting into the car?
Yes - Perform a leak test and visual inspection of any suspicious or wet area. After finding the water seep point, refer to «Water intrusion paths and recommended repair procedure» higher.
None - Replace previously removed trim/panels or component.
PINPOINT-TEST AC: ALPINE HEADLIGHTS
AC1: ALPINE HEADLIGHTS
NOTE: Excess sealant must be completely removed from easily visible areas, leaving no signs of repair.
1. Gasket joint leaking - apply black sealant between the edges of the gasket joint.
2. Leakage between gasket and roof - Due to the design of the gasket, leakage in this area is unlikely. Leakage may be caused by deformation of the gasket, which should be noticeable by visual inspection. The gasket must be reinstalled and rechecked before the repair is completed. Using a drift, carefully pry up the outer edge of the gasket seal. When working in the Alpine headlight area, lift the edge and apply sealant between the gasket and the roof panel. This operation must be done carefully so as not to damage or scratch the roof during the Alpine headlight sealing process.
3. In case of leakage through the center (in the stitching area) Apply sealant between joint and wipe off excess.
4. Required materials: sealant (transparent / black), mandrel, cloth, alcohol wipe, gloves.
5. Wait for the sealant to harden and re-check the tightness of the suspicious area.
Is water still getting into the car?
Yes - Perform a leak test and visual inspection of any suspicious or wet area. After finding the water seep point, refer to «Water intrusion paths and recommended repair procedure» higher.
No - Reinstall the previously removed trim/panels or component.
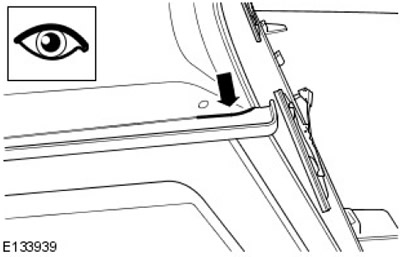
PINPOINT TEST AD: FRONT FILLETSEAM
AD1: FRONT FILLETSEAM
NOTE: The arrow indicates the area where cracks usually appear in the front of the roof (small cracks).
NOTE: Recommendation: Minor repair paint may be required.
1. Apply sealant to cracked area and wipe off excess.
2. Materials needed: sealant (transparent/body color), cloth, alcohol wipe, gloves, paint.
3. Wait for the sealant to harden and re-check the tightness of the suspicious area.
Is water still getting into the car?
Yes - Perform a leak test and visual inspection of any suspicious or wet area. After finding the water seep point, refer to «Water intrusion paths and recommended repair procedure» higher.
None - Replace previously removed trim/panels or component.
PINPOINT TEST AE: GATE SEAL
AE1: GATE SEAL
NOTE: Before repairing, check that the problem is not caused by improper installation or use of a non-recommended roof rack.
1. If the crack is small, it can be repaired with a transparent sealant (or sealant in body color). To do this, you need to apply sealant and rub it into the crack with your hand, after putting on a glove. If the crack is significant, the vehicle may need to be repaired by a body shop, which will require the body sealant to be removed from the channel, replaced with new, and repainted.
2. Materials needed: sealant (transparent/body color), cloth, alcohol wipe, gloves.
3. Wait for the sealant to harden and re-check the tightness of the suspicious area.
Is water still getting into the car?
Yes - Perform a leak test and visual inspection of any suspicious or wet area. After finding the water seep point, refer to «Water intrusion paths and recommended repair procedure» higher.
None - Replace previously removed trim/panels or component.
Comments on this article