Contents: Dismantling ⇩ Assembly ⇩
Dismantling
1. Remove the upper trim of the "A" pillar of the body.
D CAR INTERIOR PARTS, REPAIR WORK, Trim - pillar "A" - upper.
2. Remove the end panel of the control panel.
CAR INTERIOR PARTS, REPAIR WORK, End panel - control panel.
3. Remove the deflector that supplies air at face level.
HEATING AND VENTILATION, REPAIR WORKS, Control panel ventilation grille - face level.
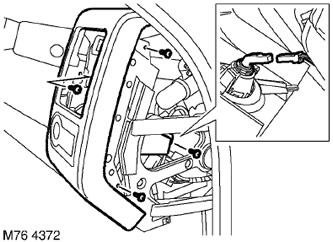
4. Remove the 3 Torx screws securing the top cover to the control panel.
5. Remove the screw securing the rear part of the cup holder to the inner bracket.
6. Release the upper trim from the support and disconnect the footwell light connector block.
[The original source of the article is the website: www.LRman.ru]
7. Remove the top control panel cover.
NOTE: If disassembly was performed only to provide access to other system components, no further disassembly operations should be performed.
8. Press the 3 latches and remove the passenger cup holder from the upper trim.
9. Squeeze the clips and remove the floor light from the top trim.
Assembly
1. Install the lamp into the upper control panel trim.
2. Install the cup holder into the top trim and snap the clips into place.
3. Position the top trim on the control panel and connect the ceiling light connector block.
4. Install the top cover onto the control panel and secure it with screws.
5. Install and tighten the screw securing the cup holder to the bracket.
6. Install a deflector that supplies air at the passenger's face level.
HEATING AND VENTILATION, REPAIR WORKS, Control panel ventilation grille - face level.
7. Install the control panel end panel.
CAR INTERIOR PARTS, REPAIR WORK, End panel - control panel.
8. Install the "A" pillar trim.
CAR INTERIOR PARTS, REPAIR WORK, Trim - pillar "A" - upper.
Comments on this article