


Emptying the air conditioner
1. Remove the refrigerant from the system using a filling station.
WARNING: Air conditioning service should only be performed by technicians experienced in both vehicle systems and air conditioning testing and refilling equipment. All work should be performed in a well-ventilated area, away from open flames and heat sources.
NOTE: The receiver/dryer separator should be replaced if the following occurs: There is dirt in the air conditioning system (the compressor jammed). The system is leaking and refrigerant is leaking into the atmosphere. As a result of the repair, the air conditioning system remained open for more than 24 hours.
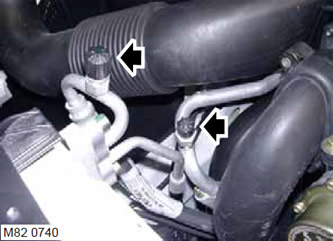
2. Remove the protective caps from the high and low pressure fittings.
(Information obtained from the website: LRman.ru)
3. Connect the high and low pressure hoses to the corresponding fittings.
4. Open the taps on the fittings.
5. Set the filling station taps to the required position.
6. Turn the filling station switch to the required position.
7. Move the main switch to the "ON" position.
8. Perform the process of collecting refrigerant from the air conditioner using a filling station.
CAUTION: Always recover the refrigerant by recycling before reusing it. This ensures that the refrigerant is sufficiently purified to ensure safe operation of the air conditioner. Refrigerant recycling and recovery must be performed using equipment certified by Underwriter Laboratory Inc. to SAE J1991. Use of other equipment may not provide the required level of refrigerant purification. A charging station designed for R134a refrigerant must not be used with other types of refrigerant. Domestic R134u refrigerant obtained from the regular commercial network must not be used in automotive air conditioning systems.
9. Close the filling station taps.
10. Move the main switch to the "OFF" position.
11. Close the taps on the fittings.
12. Disconnect the high and low pressure hoses from the filling station air conditioning system.
13. Install protective caps on the fittings.
14. Open the refrigerant drain valve located at the rear of the station.
15. Measure and record the amount of refrigerant drained from the system.
16. Close the tap at the rear of the station.
Emptying the system
1. Remove the protective caps from the high and low pressure fittings.
2. Connect the high and low pressure hoses to the corresponding fittings.
3. Open the taps on the fittings.
4. Set the filling station taps to the required position.
5. Turn the filling station switch to the required position.
6. Move the main switch to the "ON" position.
7. Empty the air conditioner using a filling station.
Air conditioning refill
1. Fill the air conditioning system.
ATTENTION: The system should be emptied immediately before refilling. No pauses between emptying and refilling are allowed.
2. Close the filling station taps.
3. Close the valve of the oil filling system of the station.
4. Disconnect the yellow hose from the filling station.
5. Remove the cover from the oil filling unit.
6. Add additional special oil to the oil filling unit. The amount of oil depends on the amount of refrigerant collected during the system evacuation. If the following units have been removed, the specified amount of oil should be added additionally:
- Capacitor = 30 cm³
- Water separator tank = 30 cm³
- Evaporator = 30 cm³
- Pipe/hose = 10 cm³
7. Install the cover on the oil filling unit system.
8. Connect the yellow hose to the filling station.
9. Open the filling valve of the station.
10. Move the pointer on the refrigerant quantity gauge to measure the level to which the refrigerant quantity will decrease during charging.
11. Slowly open the appropriate filling station valve and fill the air conditioning system under vacuum.
12. After the required amount of refrigerant has been charged into the air conditioning system, close the filling station valve.
13. Move the main switch to the "OFF" position.
14. Close the taps on the fittings.
15. Disconnect the high and low pressure hoses from the filling station air conditioning system.
Comments on this article