Contents: Dismantling ⇩ Assembly ⇩
Dismantling
1. Raise the rear of the vehicle on one side.
CAUTION: Do not work under a vehicle supported solely by a jack or lift. Always support the vehicle with safety stands.
2. Remove the rear wheel.
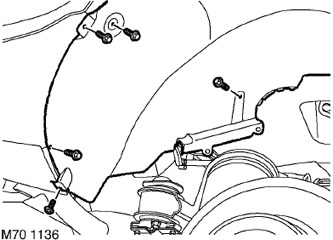
3. Remove the 5 wheel arch liner mounting screws and remove the wheel arch liner to access the wear sensor cable connector.
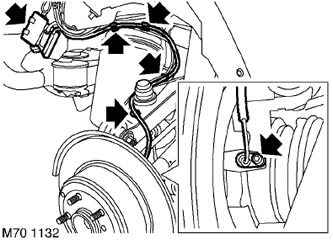
4. Open the connector cover, release the lock and remove the connector, then release the wheel speed sensor cable from the suspension strut and trailing arm.
5. Release the cable from the retainer on the shock absorber, remove the Allen screw and remove the wheel speed sensor from the wheel bearing support.
Assembly
1. Clean the surface of the wheel speed sensor, apply anti-seize lubricant to the sensor, and install it on the wheel bearing support.
FILLING CAPACITIES, USED OPERATING LIQUIDS, OILS AND SEALANTS, Lubrication system.
2. Install the Allen type screw for mounting the wheel speed sensor and tighten the screw to a torque of 8 N·m.
3. Fix the sensor cable to the trailing arm, to the suspension strut, and then connect the connector block. Close the connector cover.
4. Install the wheel arch liner in place and tighten the screws that secure it.
5. Replace the wheel and tighten the nuts to a torque of 140 Nm.
6. Remove the supports and lower the vehicle.
7. To ensure that the ABS is working properly, you should run diagnostics using the Testbook/T4 diagnostic tool.
Comments on this article