Contents: Examination ⇩ Adjustment ⇩
Examination
1. Grinding in the rear parking brake pads
CAUTION: Whenever possible, road tests should be carried out on dry, hard road surfaces. Always obey speed limits and local traffic regulations.
2. Make sure the parking brake is properly adjusted according to the procedure below.
3. On the dynamometer: Apply the parking brake for approximately 40 seconds. The braking torque should be at least 800 Nm.
4. On the road test: At a speed of about 40 km/h, apply the parking brake until you feel the braking force. Apply the parking brake until you hear the next click and continue driving for another 400 m.
Adjustment
1. Raise the rear of the vehicle.
CAUTION: Do not work under a vehicle supported solely by a jack or lift. Always support the vehicle with safety stands.
2. Remove the rear wheels.
3. On each rear brake mechanism:
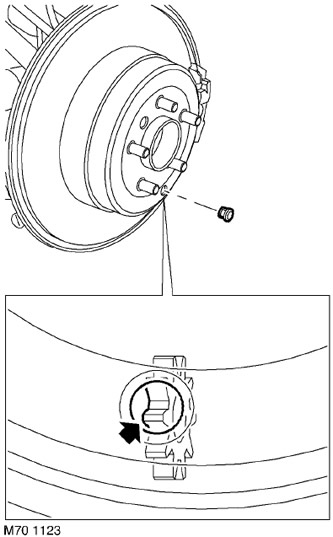
4. Remove the plug covering the adjustment hole in the brake disc.
5. Turn the brake disc so that the adjustment hole is at the lowest point.
6. Using a screwdriver or similar tool, turn the brake shoe adjusting ring until you feel a noticeable resistance. Apply the parking brake several times to center the brake shoes. Repeat the adjustment if necessary.
7. Release the parking brake and make sure that the brake disc does not turn.
8. Turn the adjusting ring back 8 clicks. Check that the brake disc rotates without resistance.
9. Replace the plug covering the adjustment hole.
10. Reinstall the rear wheels and tighten the nuts to a torque of 140 Nm.
11. The parking brake lever assembly is self-adjusting and ensures that the parking brake cables are properly tensioned. However, after completing the adjustment, tighten and release the parking brake several times, then check that the wheels rotate without resistance.
12. Lower the vehicle.
Comments on this article