car logo Ford
car logo Volkswagen
car logo BMW
car logo Opel
car logo Audi
car logo Toyota
car logo Peugeot
English Русский
Български
Беларускі
Український
Српски
Hrvatski
Română
Polski
Slovenský
Magyar


Main
Freelander
Discovery
Range Rover
Defender
Contacts
Articles

Bleeding the brake system (Range Rover 3)

 
  • Main
  • Range Rover
  • Range Rover 3
  • Chassis
  • Brake system
  • Bleeding the brake system
 
        0  
Contents: Examination ⇩ Adjustment ⇩
Bleeding the brake system can be performed according to the procedure using the Testbook/r4 diagnostic tool or manually as described below.

Examination


1. The procedure in question refers to bleeding the entire system, but if the seal is broken in only one of the brake system circuits, then only that circuit should be bled. Such partial bleeding of the brake system is permitted only if a minor leak of brake fluid occurred when removing the brake pipe or hose.

CAUTION: If the brake pressure regulator or any component upstream of the pressure regulator is replaced, the brake system must be bled in accordance with the procedure using the Testbook/r4 diagnostic tool to ensure that air is removed from the newly installed components.


Adjustment


1. Raise the front and rear of the vehicle.

CAUTION: Do not work under a vehicle supported solely by a jack or lift. Always support the vehicle with safety stands.


2. Check the tightness of the connections of the pipes and hoses of the system and make sure there are no signs of fluid leakage.
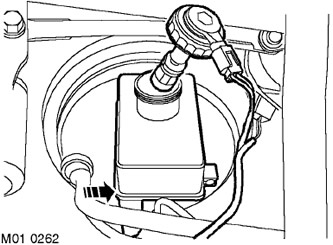
3. Add brake fluid to the reservoir up to the «MAX» mark.


3. Add brake fluid to the reservoir up to the "MAX" mark.


MAINTENANCE, MAINTENANCE OPERATIONS, Working fluid tanks.


CAUTION: Do not allow dirt or foreign fluids to enter the brake fluid reservoir. Add only DOT4 brake fluid stored in tightly sealed containers. Do not mix brake fluids from different manufacturers; they may be incompatible.
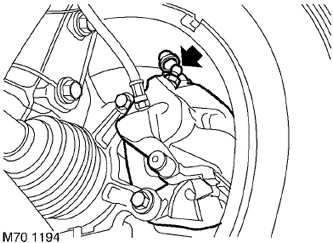

4. Attach the bleed hose to the bleed nipple on the front passenger side of the brake caliper and…


4. Attach the bleed hose to the bleed nipple on the front passenger side of the brake caliper and place the end of the hose in a clean container of brake fluid.

5. Press the brake pedal several times, then hold the pedal down.

The article was copied from this resource (www.lrman.ru)

6. Loosen the bleed screw to release brake fluid and air from the system. Release the brake pedal, allowing it to return to its original position.

7. Smoothly press the brake pedal to its full stroke and let it return to its initial position. Repeat the operation until a stream of clean brake fluid, free of air bubbles, flows into the container. Keeping the brake pedal in the extreme lower position, tighten the bleeder nipple to a torque of 14 N·m.

CAUTION: During the bleeding procedure, maintain the brake fluid level in the brake system reservoir between the minimum and maximum level marks by adding fresh brake fluid.


8. Add brake fluid to the reservoir to the upper level.
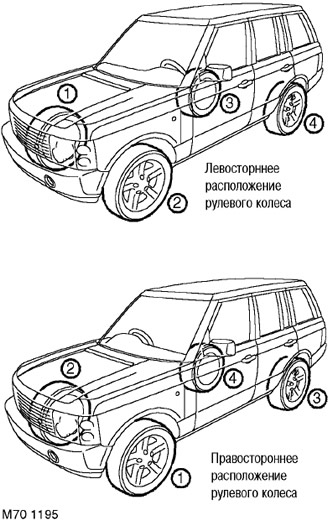
9. Repeat the procedure for each wheel in the sequence shown.


9. Repeat the procedure for each wheel in the sequence shown.

CAUTION: Failure to follow the sequence specified may significantly reduce braking performance.


10. Remove the bleed hose from the fitting and put the protective cap on the fitting.

11. Press the brake pedal and check for any fluid leaks from the system.

12. Remove the supports and lower the vehicle.

13. Test the brake system on the road. When you press the brake pedal, it should be hard and have a short stroke.


This article is available at russian, bulgarian, belarusian, ukrainian, serbian, croatian, romanian, polish, slovak, hungarian
Article review: Platon Fedorov


Previous articles
Checking the wear and runout of the front brake disc
Checking the wear and runout of the rear brake disc

Current article
Bleeding the brake system

Next articles
Adjusting the parking brake
Front brake disc
Rear brake disc
Pre-pressure pump
Brake system reservoir
Master brake cylinder — tandem
Brake pedal assembly
Parking brake lever assembly


Similar articles from Land Rover repair manuals:
• Bleeding the brake system Freelander 2 (2006-2014)
• Bleeding the brake system Freelander 1 (1997-2006)
• Bleeding air from the brake system under pressure Discovery 3 (2004-2009)
• Bleeding the brake system Discovery 1 (1989-1998)
• Bleeding the brake system Defender 2007+ (2007-2016)

Comments on this article


No comments yet


How much will 16 + 17 =


Range Rover 3 
  • General information
  • Using the manual
  • Precautionary measures
  • Repair techniques
  • Identification codes
  • Specifications
  • Tightening torques
  • Materials
  • Maintenance
  • Power unit
  • Diesel engine TD6
  • Petrol engine V8
  • Emission reduction TD6
  • Emission reduction V8
  • Engine management TD6
  • Engine management V8
  • Fuel supply TD6 engine
  • Fuel supply V8 engine
  • Engine cooling TD6
  • Engine cooling V8
  • Exhaust system TD6
  • Exhaust system V8
  • Transfer case
  • Automatic gearbox GM-5L40-E
  • Automatic gearbox ZF 5HP24
  • Chassis
  • Drive shafts
  • Main gear
  • Front axle gear
  • Steering
  • Front suspension
  • Rear suspension
  • Brake system
  • Body and coating
  • Passenger safety
  • Doors and windows
  • Exterior details
  • Interior details
  • Glasses
  • Seats
  • Sunroof
  • Body geometry
  • Body repair
  • Corrosion protection
  • Electrical equipment
  • Heating and ventilation
  • Conditioning
  • Windshield wipers and washers
  • Starting and charging system
  • Lighting and headlights
  • Electronic blocks
  • Entertainment system
  • Wiring harnesses


LRman.ru © 2013-2026 | Mobile version | Free Lander | Discovery | Range Rover | Defender | Contacts | | Sitemap |
Car repair and service instructions Land Rover: Freelander, Discovery, Range Rover, Defender
We use cookies to make pages load faster and provide a more user-friendly experience 🍪