Contents: Removal ⇩ Installation ⇩
Removal
1. Disconnect the ground cable from the battery.
2.
CAUTION: Avoid spilling brake fluid on the paintwork as this may damage the paintwork. If spilled, wipe off any traces of fluid and rinse the area with clean, warm water.
Place a suitable container under the master cylinder to collect any leaking brake fluid.
3. Clean the area around the master cylinder ports.
4. Loosen the two brake line nipple connections at the master cylinder ports.
5. Disconnect both brake lines from the master cylinder. Cap, but do not plug, the ends of the lines to prevent dirt from entering.
6. Release the two connectors on the tank lid.
7. Unscrew the two nuts securing the master cylinder to the brake booster.
8. Disconnect the master cylinder from the vacuum booster and remove it.
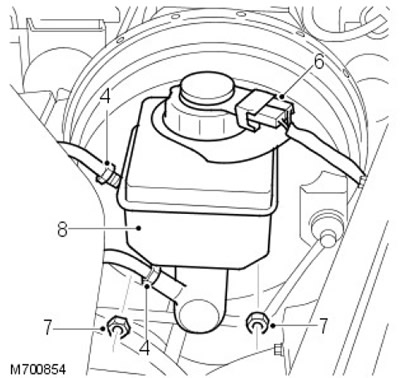
9. Carefully remove the reservoir from the master cylinder by "unscrewing" it from the seals.
10.
NOTE: The seals between the master cylinder and reservoir are different sizes.
Remove the seals from the master cylinder.
Installation
1. Install NEW seals on the master cylinder, making sure the seals are installed in the correct ports.
2. Install the reservoir onto the master cylinder.
3. Make sure the water seal is in place and install the master cylinder onto the booster.
4. Screw on the nuts securing the master cylinder to the booster and tighten to 26 Nm.
5. Connect the brake lines to the master cylinder and tighten to 15 Nm.
6. Install the two connectors on the tank lid.
7. Fill the reservoir with the recommended brake fluid.
For more information, please refer to the chapter: Specifications (206-00 Brake System - General Information, Specifications).
8. Remove air from the brake system.
For more information, refer to the chapter: Bleeding the Brake System (206-00 Brake System - General Information, General Procedures).
Comments on this article