Contents: Removal ⇩ Installation ⇩
Removal
1.
WARNING: Never work on a vehicle supported only by a jack. Always support the vehicle with special stands.
Raise and support the vehicle.
For more information, refer to the chapter: Lifting the vehicle (100-02 Jacking and lifting a car on a lift, Description and operating principle).
2. Drain the engine oil.
For more information, refer to the chapter: Draining and filling engine oil (303-01 Engine - ID4 2.4L Diesel Engine, General Procedures).
3. Remove 16 oil pan mounting bolts.
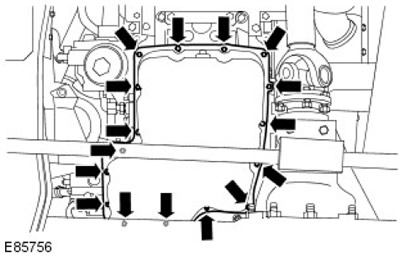
4.
CAUTION: Be careful not to damage the crankcase mating surface. Failure to follow this instruction may result in damage to the vehicle.
NOTE: Lubricate the appropriate tool with clean engine oil.
Using a suitable tool, remove and discard the oil pan.
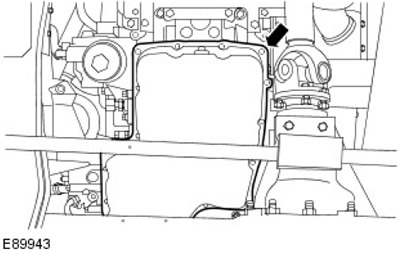
Installation
1.
Warnings:
- Be careful not to damage the surface of the cylinder head that mates with the oil pan. Failure to follow this instruction may result in damage to the vehicle.
- A new oil pan must be installed. Failure to follow this instruction may result in vehicle malfunction.
- Install the oil pan within 5 minutes after applying the sealant. Failure to follow this instruction may result in vehicle malfunction.
NOTE: Clean the mating surfaces of the cylinder block.
Apply a 3mm wide bead of WSE-M4G323-A4 sealant to the oil pan.
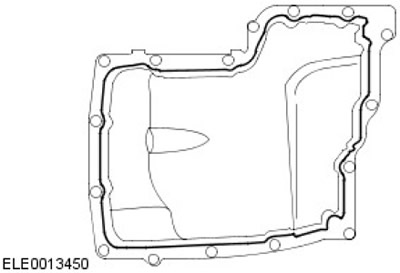
2.
NOTE: Do not fully tighten the crankcase bolts at this stage.
Remove the oil pan.
3. Tighten the oil pan bolts.
- Tighten the bolts in two steps in the sequence shown.
- Stage 1: Tighten bolts 1-16 to 7 Nm.
- Step 2: Tighten bolts 1-16 to 14 Nm.
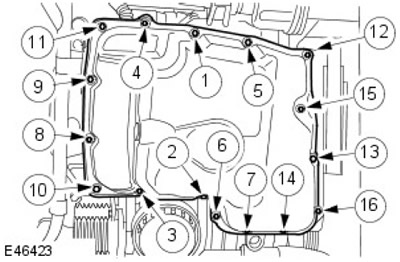
Comments on this article