Contents: Dismantling ⇩ Assembly ⇩
Dismantling
1. Raise the front of the vehicle.
CAUTION: Do not work under a vehicle supported solely by a jack or lift. Always support the vehicle with safety stands.
2. Remove the wheel.
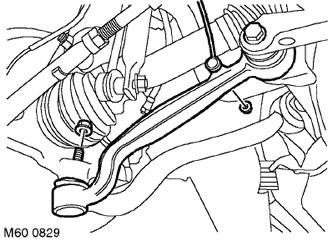
3. Loosen the nut securing the body height sensor rod to the lower arm and disconnect the rod.
4. Loosen the bolt securing the lower arm to the subframe by turning it a quarter of a turn.
5. Unscrew the nut securing the ball joint of the lower arm to the hub.
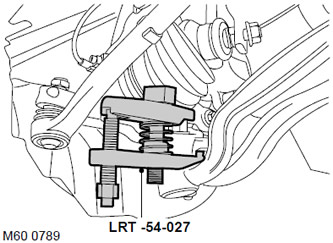
6. Using the LRT-54-027 tool, release the lower arm ball joint and disconnect the lower arm from the hub.
7. Unscrew the bolt securing the lower arm to the subframe. Discard the bolt.
8. Remove the lower arm.
Assembly
1. Install the lower control arm, aligning it with the subframe. Install the new bolt, but do not tighten it completely yet.
[The material was taken from the specified website lrman.ru]
CAUTION: Nuts and bolts must be tightened after the vehicle is installed on the wheels.
2. Clean any dirt from the conical surfaces of the ball pin and the steering knuckle socket.
3. Connect the lower arm ball joint to the hub and tighten the nut to 80 N·m (59 lb ft).
CAUTION: Make sure that the ball joint protective boot is not damaged. A damaged boot will cause the joint to fail.
4. Connect the height sensor link to the lower arm and tighten the nut to 8 N·m (6 lb ft).
CAUTION: Make sure the sensor lever is facing outward.
5. Reinstall the wheel and tighten the nuts to 140 N·m (103 lb ft).
6. Remove the support(s) and lower the vehicle.
7. Tighten the lower arm-to-subframe bolt to 165 N·m (121 lb ft) and turn it through 90°.
8. Check the front wheel alignment angles.
Comments on this article