Contents: Removal ⇩ Installation ⇩
Removal
1. Remove the rear wheels.
2. Using a suitable brake hose clamp, clamp the flexible brake hose over the rear axle.
3. Remove the brake line from the rear brake caliper.
4. To prevent dirt from entering, plug the ends of the line.
5. Remove the mounting pins and springs and take out the pads. If the same pads need to be reinstalled, mark them to ensure they are in their original position.
6. Unscrew 2 bolts and remove the caliper from the rear axle.
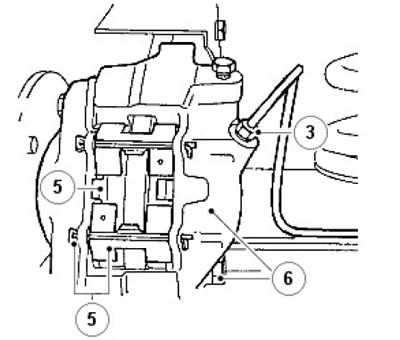
WARNING: Do not separate the caliper halves.
7. Clean the outer surfaces of the caliper with an aerosol brake cleaner.
8. CAREFULLY force the pistons out of their bores by applying compressed air to the brake fluid inlet port. It is unlikely that both pistons will be forced out at the same time, adjust the degree of force by inserting a suitable piece of wood between the two pistons.
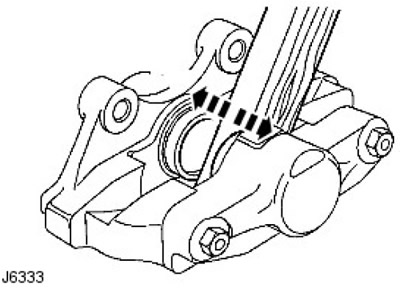
9. Finally, remove the pistons, marking them according to their holes.
10. Remove the wiper seal retainer by inserting a blunt-tipped screwdriver between the retainer and the seal. Carefully lift the retainer off the entry end of the hole.
11. Taking care not to damage the sealing recesses, remove the wiper seal and liquid seal.
Installation
1. Using only clean brake fluid, clean the bores, pistons and especially the sealing recesses. If the caliper or pistons are rusty or in less than perfect condition, new parts must be installed.
2. Apply brake fluid to the new seals. Install the seals into the recesses in the holes. After installing the seal, it will protrude slightly beyond the edge of the entry end of the hole.
3. Apply brake fluid to the pistons. Insert them into the holes without tilting. While inserting, do not tilt the pistons and leave them protruding from the holes by approximately 8 mm.
4. Apply brake fluid to the new wiper seals and install them into the holders. Slide the seals together with the holders (first the cuff) above the protruding piston into the recesses of the holes.
5. Use the special tool LRT-70-500 - piston clamp to press the cup holder and piston into place. Follow the same procedure to install the outer pistons and seals.
6. Install the calipers and pads on the vehicle.
7. Install the caliper on the bridge, tighten the bolts evenly (tightening torque 82 Nm).
The article was copied from this resource www.lrman.ru
8. Connect the brake line to the caliper. Tighten (tightening torque 15 Nm).
9. Remove the clamp from the flexible brake hose.
10. On vehicles prior to 2002 model year, install the shoes and retaining springs, locking them in place with new retaining pins and flared ends or install new cotter pins, depending on vehicle model.
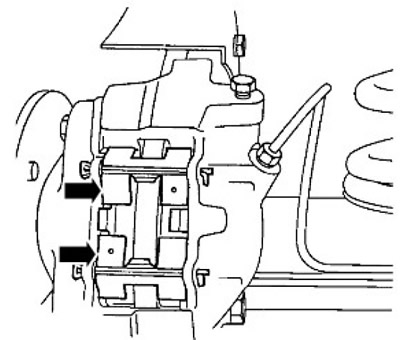
11.
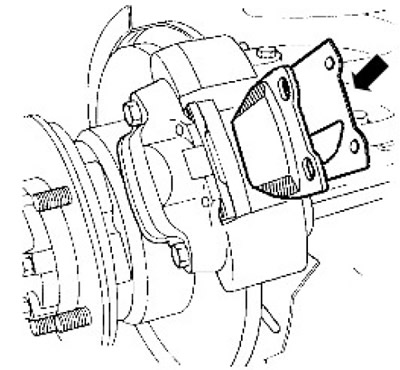
NOTE: Vehicles manufactured since the 2002 model year have chamfers on the leading and trailing edges of the rear pads.
On 2002 and later vehicles, make sure the shims are installed correctly. See illustration.
12. Remove air from the brake system.
For more information, refer to the chapter: Bleeding the Brake System (206-00 Brake System - General Information, General Procedures).
13. Press the brake pedal fully several times to engage the pads.
14. Install the wheels, remove the axle supports. Finally, tighten the wheel nuts to the correct torque:
- 1. Alloy wheels - tightening torque 130 Nm.
- 2. Steel wheels - tightening torque 100 Nm.
- 3. Heavy-duty wheels - tightening torque 170 Nm.
15. Perform a road test. Note: New brake pads require several hundred kilometers of "break-in" before the brakes begin to operate at maximum efficiency.
Comments on this article