Contents: Removal ⇩ Installation ⇩
Removal
1. Disconnect both cables from the battery. For more information, refer to Specification.
2. Remove the rear door assembly.
- Disconnect the electrical connector.
- Remove the wiring harness grommet.
- Release the wiring harness clamp.
- Remove 2 bolts.
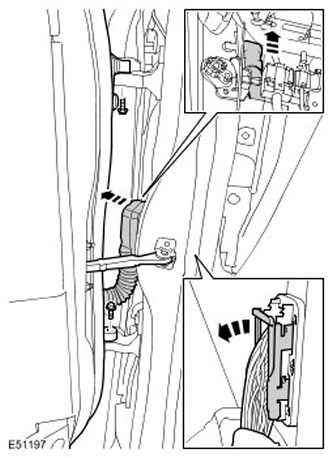
3. Remove the front door retainer.
4. Remove the front seat. For more information, refer to Front Seat (78.10.44/99)
5. Remove the rear seat. For more information, refer to Rear Seat - Vehicle Includes: 60/40 Split Seat (78.10.70/78.10.71)
6. Remove the side impact sensor from the B-pillar. For more information, refer to Pillar Side Impact Sensor (76.74.23)
7. Remove the curtain air bag module. For more information, refer to Side Air Bag Module (76.74.30)
8. Disconnect the wiring harness from the B-pillar.
9. Disconnect the wiring harness from the sill panel.
10. Remove the front seat belt pretensioner. For more information, refer to Front Seat Belt Retractor (76.73.13)
11. Remove the outer door sill panel trim.
12. Remove the carpet.
13.
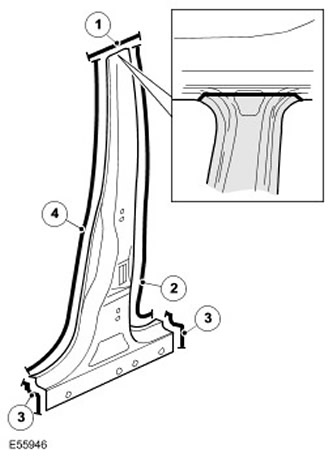
| Item name | Description |
| 1 | Cutting line and butt welding. |
| 2,4 | 81 spot welds. |
| 3 | Butt welds. |
14.
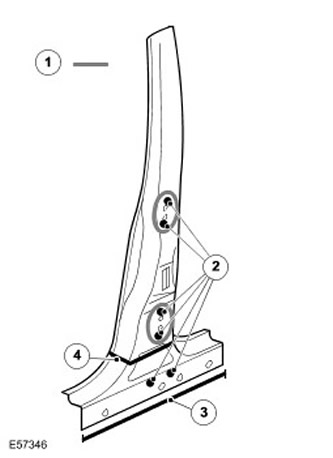
| Item name | Description |
| 1 | Sealant. |
| 2 | 6 plug welds. |
| 3 | 19 plug welds. |
| 4 | Soundproofing. |
15. Additional information:
- Weld. For more information, see Body Repairs.
- Anti-corrosion protection. For more information, see Anti-corrosion protection.
- Tolerances: For more information, see Body and Frame.
The original article can be found here: LRMAN.RU
Installation
1. Installation should be carried out in the reverse order of dismantling.
Comments on this article