Contents: Dismantling ⇩ Installation ⇩
Always place trim pieces on a soft, covered, clean work surface.
If necessary, transfer the marks from the old cover to the auxiliary kit. The new cover kit includes the top rail.
When gluing a vinyl awning to a fabric backing, please follow the guidelines below. If adhesive is required on the fabric backing, use Dunlop 758 or equivalent.
If it is necessary to apply adhesive directly to the vinyl surface, use Dunlop S1588 or equivalent. Apply a thin layer of adhesive to the surfaces to be bonded and allow to dry to prevent your hands from sticking.
This takes approximately 5-10 minutes, after which the surfaces to be glued should be connected.
Dismantling
1. Remove the rear cover assembly from the vehicle.
ROOF, REPAIR WORK, Hard roof - removal for access to repair area and installation in place.
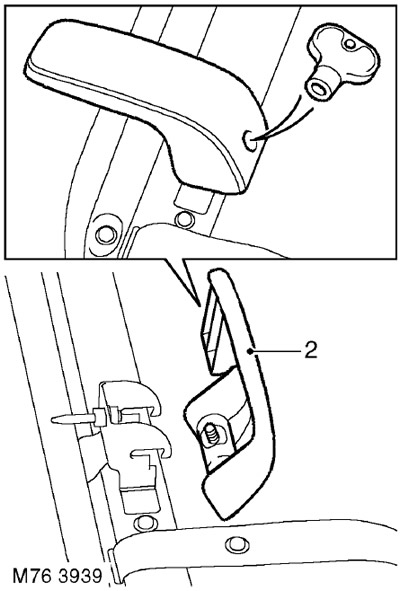
2. Using a special key, loosen the latches screws, release the latches from the awning frame and remove the latches.
[The article was taken from this resource: lrman.ru]
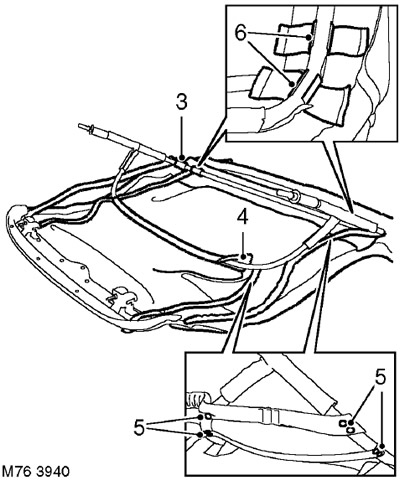
3. Release the fabric fasteners from the back of the frame.
4. Release the fabric fastener from its attachment to the front of the frame.
5. Unscrew the 14 screws securing the tension belts.
6. Release the frame from the awning clamps.
7. Remove the frame from the awning.
Installation
1. Using a suitable solvent, clean the frame from excess glue.
2. Place the frame on the awning and align it with the fasteners.
3. Install the tension belts and secure them with screws.
4. Apply glue to the fabric fastener and attach it to the front of the frame.
5. Apply glue to the fabric fasteners and attach them to the back of the frame.
Be careful not to get any glue on the frame.
The fabric fasteners must move freely along the frame.
6. Install the latches and secure them with the special key.
7. Install the rear awning assembly of the vehicle.
ROOF, REPAIR WORK, Hard roof - removal for access to repair area and installation in place.
Comments on this article