


Car trim parts Land Rover Freelander 1

Sun visor — removal and installation
Dismantling 1. Release the sun visor from the retainer. 2. Remove the 2 screws securing the sun visor to the roof. 3. Disconnect the electrical connector from the sun visor. 4. Remove the sun visor....
Dismantling 1. Release the sun visor from the retainer. 2. Remove the 2 screws securing the sun visor to the roof. 3. Disconnect the electrical connector from the sun visor. 4. Remove the sun visor....

Lower decorative panel of the luggage compartment of a 3-door car
Dismantling 1. 2003 model year vehicles: Remove the rear side trim panel. INTERIOR TRIM PARTS, REPAIR WORK, Rear side decorative panel for a 3-door car. 2. Release the rear seat backrest and tilt the...
Dismantling 1. 2003 model year vehicles: Remove the rear side trim panel. INTERIOR TRIM PARTS, REPAIR WORK, Rear side decorative panel for a 3-door car. 2. Release the rear seat backrest and tilt the...

Lower decorative panel of the luggage compartment of a 5-door car
Dismantling 1. Release the rear seat backrest and tilt the seat forward. 2. Remove the Torx bolt from the lower rear seat belt mounting point to the body and move the belt to the side. 3. Remove the...
Dismantling 1. Release the rear seat backrest and tilt the seat forward. 2. Remove the Torx bolt from the lower rear seat belt mounting point to the body and move the belt to the side. 3. Remove the...

Upper decorative panel of the luggage compartment of a 3-door car
Dismantling 1. Remove the lower decorative trim from the rear of the side panel. INTERIOR TRIM PARTS, REPAIR WORK, Lower decorative panel of the luggage compartment of a 3-door car. 2. Remove the...
Dismantling 1. Remove the lower decorative trim from the rear of the side panel. INTERIOR TRIM PARTS, REPAIR WORK, Lower decorative panel of the luggage compartment of a 3-door car. 2. Remove the...

Upper decorative panel of the luggage compartment of a 5-door car
Dismantling 1. Remove the lower decorative trim from the rear of the side panel. INTERIOR TRIM PARTS, REPAIR WORK, Lower decorative panel of the luggage compartment of a 5-door car. 2. Unscrew the 3...
Dismantling 1. Remove the lower decorative trim from the rear of the side panel. INTERIOR TRIM PARTS, REPAIR WORK, Lower decorative panel of the luggage compartment of a 5-door car. 2. Unscrew the 3...

Replacing the upper decorative panel of the front A-pillar
Dismantling 1. Remove the door frame seal. 2. Release the 4 clips and remove the front A-pillar trim panel. 3. Remove the clips from the decorative panel. Installation 1. Insert the clips into the...
Dismantling 1. Remove the door frame seal. 2. Release the 4 clips and remove the front A-pillar trim panel. 3. Remove the clips from the decorative panel. Installation 1. Insert the clips into the...

Replacing the upper decorative panel of the B/C pillar
Dismantling 1. Remove the seat base cover. SEATS, REPAIR WORK, Front seat base pads. 2. Remove the Torx bolt from the lower rear seat belt mounting point to the body and move the belt to the side. 3....
Dismantling 1. Remove the seat base cover. SEATS, REPAIR WORK, Front seat base pads. 2. Remove the Torx bolt from the lower rear seat belt mounting point to the body and move the belt to the side. 3....

Lower decorative panel of the middle B-pillar of a 5-door car
Dismantling 1. Remove the front seat cushion side trim. SEATS, REPAIR WORK, Side pad of the front seat cushion. 2. Remove the screw and 5 Torx screws from the carpet mounting strip and remove the...
Dismantling 1. Remove the front seat cushion side trim. SEATS, REPAIR WORK, Side pad of the front seat cushion. 2. Remove the screw and 5 Torx screws from the carpet mounting strip and remove the...

Rear side decorative panel 3-door car
Dismantling 1. Remove the rear seat. SEATS, REPAIR WORK, Rear left seat. SEATS, REPAIR WORK, Rear right seat. 2. Remove the Torx bolt from the lower rear seat belt mounting point to the body and move...
Dismantling 1. Remove the rear seat. SEATS, REPAIR WORK, Rear left seat. SEATS, REPAIR WORK, Rear right seat. 2. Remove the Torx bolt from the lower rear seat belt mounting point to the body and move...

Center console — for cars up to 2004
Dismantling 1. Remove the rear console. INTERIOR TRIM DETAILS, REPAIR WORK, Rear console. 2. Remove the audio system. ENTERTAINMENT SYSTEMS, REPAIR WORK, Radio receiver - models up to 04MY. 3. Remove...
Dismantling 1. Remove the rear console. INTERIOR TRIM DETAILS, REPAIR WORK, Rear console. 2. Remove the audio system. ENTERTAINMENT SYSTEMS, REPAIR WORK, Radio receiver - models up to 04MY. 3. Remove...

Front console assembly — for cars after 2004
Dismantling 1. Remove the rear console. INTERIOR TRIM DETAILS, REPAIR WORK, Rear console. 2. Remove the automatic transmission selector lever position indicator. AUTOMATIC TRANSMISSION: JATCO, REPAIR...
Dismantling 1. Remove the rear console. INTERIOR TRIM DETAILS, REPAIR WORK, Rear console. 2. Remove the automatic transmission selector lever position indicator. AUTOMATIC TRANSMISSION: JATCO, REPAIR...

Rear console — removal and installation
Dismantling 1. Remove the rear ashtray from the rear console, disconnect the electrical connector from the electrical outlet, and remove the ashtray. 2. Remove the mat from the niche, lift the lid...
Dismantling 1. Remove the rear ashtray from the rear console, disconnect the electrical connector from the electrical outlet, and remove the ashtray. 2. Remove the mat from the niche, lift the lid...

Cup holder on the dashboard — after 2004
Dismantling 1. Loosen the screw securing the cup holder to the control panel, release the 5 fasteners and remove the cup holder. Installation 1. Install the cup holder on the control panel and secure...
Dismantling 1. Loosen the screw securing the cup holder to the control panel, release the 5 fasteners and remove the cup holder. Installation 1. Install the cup holder on the control panel and secure...

Control Panel — for vehicles up to model year 2004
Dismantling 1. Remove the front console. INTERIOR TRIM PARTS, REPAIR WORK, Center console - for vehicles up to model year 2004. 2. Remove the rotary contactor. PASSIVE SAFETY SYSTEMS, REPAIR WORK,...
Dismantling 1. Remove the front console. INTERIOR TRIM PARTS, REPAIR WORK, Center console - for vehicles up to model year 2004. 2. Remove the rotary contactor. PASSIVE SAFETY SYSTEMS, REPAIR WORK,...

Control panel — for cars after 2004
Dismantling 1. Remove the instrument panel. INSTRUMENTS, REPAIR WORK, Instrument panel - models from 04MY. 2. Remove the audio system, which includes the radio and CD player. ENTERTAINMENT SYSTEMS,...
Dismantling 1. Remove the instrument panel. INSTRUMENTS, REPAIR WORK, Instrument panel - models from 04MY. 2. Remove the audio system, which includes the radio and CD player. ENTERTAINMENT SYSTEMS,...

Dashboard Cup Holder for Pre-2004 Cars
Dismantling 1. Open the cup holder and remove both rubber mats. 2. Loosen the 2 screws securing the cup holder and remove it from the control panel. Installation 1. Install the cup holder assembly...
Dismantling 1. Open the cup holder and remove both rubber mats. 2. Loosen the 2 screws securing the cup holder and remove it from the control panel. Installation 1. Install the cup holder assembly...

Control panel compartment
Dismantling 1. Remove the mat from the control panel compartment to access the screws. 2. Unscrew 2 screws. 3. Remove the control panel compartment. Installation 1. Install the control panel...
Dismantling 1. Remove the mat from the control panel compartment to access the screws. 2. Unscrew 2 screws. 3. Remove the control panel compartment. Installation 1. Install the control panel...

Luggage compartment floor covering
Dismantling 1. Remove both lower luggage compartment trim panels. INTERIOR TRIM PARTS, REPAIR WORK, Lower decorative panel of the luggage compartment of a 3-door car. INTERIOR TRIM PARTS, REPAIR...
Dismantling 1. Remove both lower luggage compartment trim panels. INTERIOR TRIM PARTS, REPAIR WORK, Lower decorative panel of the luggage compartment of a 3-door car. INTERIOR TRIM PARTS, REPAIR...

Glove box — removal and installation
Dismantling 1. Open the glove compartment and remove the mat. 2. Remove the glove box light bulb. 3. Unscrew the 4 glove box mounting screws and remove it. Installation 1. Install the glove box and...
Dismantling 1. Open the glove compartment and remove the mat. 2. Remove the glove box light bulb. 3. Unscrew the 4 glove box mounting screws and remove it. Installation 1. Install the glove box and...

3-door car roof panel
Dismantling 1. Tilt the front seat backs forward. 2. Remove both sun visors. INTERIOR TRIM DETAILS, REPAIR WORK, Sun visor. 3. Remove the upper trim panels from both front 'A' pillars. INTERIOR TRIM...
Dismantling 1. Tilt the front seat backs forward. 2. Remove both sun visors. INTERIOR TRIM DETAILS, REPAIR WORK, Sun visor. 3. Remove the upper trim panels from both front 'A' pillars. INTERIOR TRIM...

5-door car roof panel
Dismantling 1. Remove the upper trim panels from both front 'A' pillars. INTERIOR TRIM PARTS, REPAIR WORK, Replacement of the upper decorative panel of the front 'A' pillar. 2. Remove both upper...
Dismantling 1. Remove the upper trim panels from both front 'A' pillars. INTERIOR TRIM PARTS, REPAIR WORK, Replacement of the upper decorative panel of the front 'A' pillar. 2. Remove both upper...
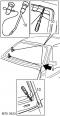
Windshield — Removal and Installation
The following equipment is required: Cutting wire with handles, windshield repair kit, sealant gun and suction cups. Wear protective gloves when working with glass, solvents and primers. Before...
The following equipment is required: Cutting wire with handles, windshield repair kit, sealant gun and suction cups. Wear protective gloves when working with glass, solvents and primers. Before...

Rear side glass — removal and installation
The following equipment is required: Cutting wire with handles, windshield repair kit, sealant gun and suction cups. Wear protective gloves when working with glass, solvents and primers. Before...
The following equipment is required: Cutting wire with handles, windshield repair kit, sealant gun and suction cups. Wear protective gloves when working with glass, solvents and primers. Before...
This section is available on russian, bulgarian, belarusian, ukrainian, serbian, croatian, romanian, polish, slovak, hungarian
Similar sections from Land Rover repair manuals:
• Body and interior: Interior trim details Land Rover Discovery 1 (1989-1998)
• Body and coating: Interior details Land Rover Range Rover 3 (2001-2012)
• Body and interior: Interior trim details Land Rover Discovery 1 (1989-1998)
• Body and coating: Interior details Land Rover Range Rover 3 (2001-2012)