


Repair of car body parts Land Rover Freelander 1

General information about body parts repair
General information The car body has a monocoque structure. The front, side and rear parts of the body have programmable energy-absorbing deformation zones. This means that they are able to absorb...
General information The car body has a monocoque structure. The front, side and rear parts of the body have programmable energy-absorbing deformation zones. This means that they are able to absorb...

Replaceable body parts
Front body parts 1. Hood lock panel 2. Headlight bracket, left 3. Front cross member assembly 4. Crossbar panel, left 5. Crossbar panel, right 6. Front panel assembly 7. Headlight bracket, right 8....
Front body parts 1. Hood lock panel 2. Headlight bracket, left 3. Front cross member assembly 4. Crossbar panel, left 5. Crossbar panel, right 6. Front panel assembly 7. Headlight bracket, right 8....

General safety rules for welding
General information For simplicity, the weld type is only indicated in the drawings on the following pages where it differs from that used in vehicle production. Welding seams used in repair work are...
General information For simplicity, the weld type is only indicated in the drawings on the following pages where it differs from that used in vehicle production. Welding seams used in repair work are...

Panel replacement procedure
These materials are intended to familiarize you with the basic methods of removing and replacing damaged panels. The standard method may vary slightly depending on the vehicle being repaired. The...
These materials are intended to familiarize you with the basic methods of removing and replacing damaged panels. The standard method may vary slightly depending on the vehicle being repaired. The...

Front panel assembly
When performing this operation, the side panels of the crossmember are replaced together with the front panel assembly. Dismantling 1. Disconnect the negative battery terminal. 2. Disconnect the...
When performing this operation, the side panels of the crossmember are replaced together with the front panel assembly. Dismantling 1. Disconnect the negative battery terminal. 2. Disconnect the...

Hood Lock Panel
When performing this operation, the hood lock panel reinforcement is replaced together with the hood lock panel. Dismantling 1. Disconnect the negative battery terminal. 2. Disconnect the generator....
When performing this operation, the hood lock panel reinforcement is replaced together with the hood lock panel. Dismantling 1. Disconnect the negative battery terminal. 2. Disconnect the generator....

Headlight mounting bracket
Dismantling 1. Disconnect the negative battery terminal. 2. Disconnect the generator. 3. Disconnect all electronic units. 4. Remove the front bumper. EXTERIOR PARTS, REPAIR WORK, Front bumper...
Dismantling 1. Disconnect the negative battery terminal. 2. Disconnect the generator. 3. Disconnect all electronic units. 4. Remove the front bumper. EXTERIOR PARTS, REPAIR WORK, Front bumper...

Front crossmember, lower
When performing this operation, the side crossmember panels are replaced together with the lower front crossmember. Dismantling 1. Disconnect the negative battery terminal. 2. Disconnect the...
When performing this operation, the side crossmember panels are replaced together with the lower front crossmember. Dismantling 1. Disconnect the negative battery terminal. 2. Disconnect the...

Front side member assembly
To perform this operation, the inner panel and the corresponding brackets for connecting the front side member to the cross member are replaced together with the front side member. Dismantling 1....
To perform this operation, the inner panel and the corresponding brackets for connecting the front side member to the cross member are replaced together with the front side member. Dismantling 1....

Front spar (front part)
To perform this operation, the inner panel and the corresponding brackets for connecting the front side member to the cross member are replaced together with the front side member. Dismantling 1....
To perform this operation, the inner panel and the corresponding brackets for connecting the front side member to the cross member are replaced together with the front side member. Dismantling 1....

Engine bay side panel assembly
Dismantling 1. Disconnect the negative battery terminal. 2. Disconnect all electronic units. 3. Remove the wheel(s). 4. Remove the lower engine protection shield. EXTERIOR PARTS, REPAIR WORK, Lower...
Dismantling 1. Disconnect the negative battery terminal. 2. Disconnect all electronic units. 3. Remove the wheel(s). 4. Remove the lower engine protection shield. EXTERIOR PARTS, REPAIR WORK, Lower...

Upper side of the engine compartment
Dismantling 1. Disconnect the negative battery terminal. 2. Disconnect the generator. 3. Disconnect all electronic units. 4. Remove the wheel(s). 5. Remove the front wheel arch liner. EXTERIOR PARTS,...
Dismantling 1. Disconnect the negative battery terminal. 2. Disconnect the generator. 3. Disconnect all electronic units. 4. Remove the wheel(s). 5. Remove the front wheel arch liner. EXTERIOR PARTS,...

Front side panel of the engine compartment
Dismantling 1. Disconnect the negative battery terminal. 2. Disconnect the generator. 3. Disconnect all electronic units. 4. Remove the wheel(s). 5. Remove the front wheel arch liner. EXTERIOR PARTS,...
Dismantling 1. Disconnect the negative battery terminal. 2. Disconnect the generator. 3. Disconnect all electronic units. 4. Remove the wheel(s). 5. Remove the front wheel arch liner. EXTERIOR PARTS,...

Reinforcement of the outer panel of the wheel arch
Dismantling 1. Disconnect the negative battery terminal. 2. Disconnect the generator. 3. Disconnect all electronic units. 4. Remove the wheel(s). 5. Remove the front wheel arch liner. EXTERIOR PARTS,...
Dismantling 1. Disconnect the negative battery terminal. 2. Disconnect the generator. 3. Disconnect all electronic units. 4. Remove the wheel(s). 5. Remove the front wheel arch liner. EXTERIOR PARTS,...

A-pillar body — 3-door version
In this operation, the front outer body side panel is replaced together with the inner A-pillar panel and the A-pillar reinforcement panels. Dismantling 1. Disconnect the negative battery terminal....
In this operation, the front outer body side panel is replaced together with the inner A-pillar panel and the A-pillar reinforcement panels. Dismantling 1. Disconnect the negative battery terminal....

A-pillar body — 5-door version
In this operation, the front outer body side panel is replaced together with the inner A-pillar panel and the A-pillar reinforcement panels. Dismantling 1. Disconnect the negative battery terminal....
In this operation, the front outer body side panel is replaced together with the inner A-pillar panel and the A-pillar reinforcement panels. Dismantling 1. Disconnect the negative battery terminal....

Threshold reinforcement — 3-door version
In this operation, the lower outer side panel is replaced together with the threshold reinforcement. Dismantling 1. Disconnect the negative battery terminal. 2. Disconnect the generator. 3....
In this operation, the lower outer side panel is replaced together with the threshold reinforcement. Dismantling 1. Disconnect the negative battery terminal. 2. Disconnect the generator. 3....

Threshold reinforcement — 5-door version
In this operation, the lower outer side panel is replaced together with the threshold reinforcement. Dismantling 1. Disconnect the negative battery terminal. 2. Disconnect the generator. 3....
In this operation, the lower outer side panel is replaced together with the threshold reinforcement. Dismantling 1. Disconnect the negative battery terminal. 2. Disconnect the generator. 3....

B/C pillar reinforcement panel — 3-door version
In this operation, the rear part of the side body panel and the front lower reinforcement of the rear panel are replaced together with the "B/C" pillar reinforcement panel. Dismantling 1. Disconnect...
In this operation, the rear part of the side body panel and the front lower reinforcement of the rear panel are replaced together with the "B/C" pillar reinforcement panel. Dismantling 1. Disconnect...

Central pillar reinforcement panel B/C — 5-door version
In this operation, the rear part of the side body panel and the front lower reinforcement of the rear panel are replaced together with the "B/C" pillar reinforcement panel. Dismantling 1. Disconnect...
In this operation, the rear part of the side body panel and the front lower reinforcement of the rear panel are replaced together with the "B/C" pillar reinforcement panel. Dismantling 1. Disconnect...
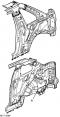
Rear side panel assembly — 3-door version
This procedure covers the replacement of the rear outer quarter panel along with the rear quarter panel assembly. Dismantling 1. Disconnect the negative battery terminal. 2. Disconnect the generator....
This procedure covers the replacement of the rear outer quarter panel along with the rear quarter panel assembly. Dismantling 1. Disconnect the negative battery terminal. 2. Disconnect the generator....
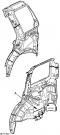
Rear side panel assembly — 5-door version
This procedure covers the replacement of the rear outer quarter panel along with the rear quarter panel assembly. Dismantling 1. Disconnect the negative battery terminal. 2. Disconnect the generator....
This procedure covers the replacement of the rear outer quarter panel along with the rear quarter panel assembly. Dismantling 1. Disconnect the negative battery terminal. 2. Disconnect the generator....

Rear wheel arch outer panel — 3-door version
This procedure covers replacing the rear seat back support reinforcement assembly with the rear wheel arch outer panel. Dismantling 1. Disconnect the negative battery terminal. 2. Disconnect the...
This procedure covers replacing the rear seat back support reinforcement assembly with the rear wheel arch outer panel. Dismantling 1. Disconnect the negative battery terminal. 2. Disconnect the...

Rear wheel arch outer panel — 5-door version
Dismantling 1. Disconnect the negative battery terminal. 2. Disconnect the generator. 3. Disconnect all electronic units. 4. Remove the wheel(s). 5. Remove the rear bumper. EXTERIOR PARTS, REPAIR...
Dismantling 1. Disconnect the negative battery terminal. 2. Disconnect the generator. 3. Disconnect all electronic units. 4. Remove the wheel(s). 5. Remove the rear bumper. EXTERIOR PARTS, REPAIR...

E-pillar interior panel — 3-door version
In this operation, the rear outer side panel and the rear side body reinforcement assembly are replaced together with the E-pillar inner panel assembly. Dismantling 1. Disconnect the negative battery...
In this operation, the rear outer side panel and the rear side body reinforcement assembly are replaced together with the E-pillar inner panel assembly. Dismantling 1. Disconnect the negative battery...

E-pillar interior panel — 5-door version
In this operation, the rear outer side panel and the rear side body reinforcement assembly are replaced together with the E-pillar inner panel assembly. Dismantling 1. Disconnect the negative battery...
In this operation, the rear outer side panel and the rear side body reinforcement assembly are replaced together with the E-pillar inner panel assembly. Dismantling 1. Disconnect the negative battery...

Rear floor cross member assembly
Dismantling 1. Disconnect the negative battery terminal. 2. Disconnect the generator. 3. Disconnect all electronic units. 4. Remove the trunk door. DOORS, Removing the front door assembly to provide...
Dismantling 1. Disconnect the negative battery terminal. 2. Disconnect the generator. 3. Disconnect all electronic units. 4. Remove the trunk door. DOORS, Removing the front door assembly to provide...

Rear bottom of the body
In this operation, the corners of the rear side panel are replaced together with the rear body bottom. If necessary, the panel with the recess in the luggage compartment can be replaced separately....
In this operation, the corners of the rear side panel are replaced together with the rear body bottom. If necessary, the panel with the recess in the luggage compartment can be replaced separately....

Rear bottom spar
Dismantling 1. Disconnect the negative battery terminal. 2. Disconnect the generator. 3. Disconnect all electronic units. 4. Remove the rear section of the exhaust pipe. COLLECTORS AND EXHAUST SYSTEM...
Dismantling 1. Disconnect the negative battery terminal. 2. Disconnect the generator. 3. Disconnect all electronic units. 4. Remove the rear section of the exhaust pipe. COLLECTORS AND EXHAUST SYSTEM...
Front roof section complete — 3-door version
Dismantling 1. Disconnect the negative battery terminal. 2. Disconnect the generator. 3. Disconnect all electronic units. 4. Remove the left and right front decorative trim panels from the ceiling....
Dismantling 1. Disconnect the negative battery terminal. 2. Disconnect the generator. 3. Disconnect all electronic units. 4. Remove the left and right front decorative trim panels from the ceiling....
Rear roof section complete — 3-door version
Dismantling 1. Disconnect the negative battery terminal. 2. Disconnect the generator. 3. Disconnect all electronic units. 4. Remove the awning/hard removable roof. 5. Remove the left and right rear...
Dismantling 1. Disconnect the negative battery terminal. 2. Disconnect the generator. 3. Disconnect all electronic units. 4. Remove the awning/hard removable roof. 5. Remove the left and right rear...

Roof assembly — 5-door version
Dismantling 1. Disconnect the negative battery terminal. 2. Disconnect the generator. 3. Disconnect all electronic units. 4. Remove the upper trim of the tailgate glass. 5. Remove the left and right...
Dismantling 1. Disconnect the negative battery terminal. 2. Disconnect the generator. 3. Disconnect all electronic units. 4. Remove the upper trim of the tailgate glass. 5. Remove the left and right...
Standards for time spent on replacing panels and assemblies
The following are standard times for replacing individual panels and assemblies. Standard times include removal of mechanical, electrical and decorative elements, plus painting time calculated on the...
The following are standard times for replacing individual panels and assemblies. Standard times include removal of mechanical, electrical and decorative elements, plus painting time calculated on the...
This section is available on russian, bulgarian, belarusian, ukrainian, serbian, croatian, romanian, polish, slovak, hungarian
Similar sections from Land Rover repair manuals:
• Body and coating: Body repairs Land Rover Discovery 3 (2004-2009)
• Body and coating: Body repair Land Rover Range Rover 3 (2001-2012)
• Body and coating: Body repairs Land Rover Discovery 3 (2004-2009)
• Body and coating: Body repair Land Rover Range Rover 3 (2001-2012)