This procedure covers the replacement of the rear outer quarter panel along with the rear quarter panel assembly.
Dismantling
1. Disconnect the negative battery terminal.
2. Disconnect the generator.
3. Disconnect all electronic units.
4. Remove the wheel(s).
5. Remove the decorative threshold trim.
EXTERIOR PARTS, REPAIR WORK, Threshold trim.
6. Remove the rear bumper.
EXTERIOR PARTS, REPAIR WORK, Rear bumper assembly - for cars up to model year 2004.
7. Remove the rear wheel arch liner.
8. Remove the rear door lock bracket from the "D" pillar.
9. Remove the rear side door threshold trims.
10. Remove the rear door opening seal.
11. Release the floor mat from the inner sill panel and move it to the side.
12. Remove the upper trim of the tailgate glass.
13. Remove the side trim of the luggage compartment glass.
DOORS, Removing the front door assembly to provide access to other components, installing the front door, Side trim of the rear window of a 5-door car.
14. Remove the luggage compartment door opening seal.
15. Remove the rear roof panel trim.
EXTERIOR PARTS, REPAIR WORK, Roof moldings for 5-door vehicles.
16. Remove the rear light.
LIGHTING, Headlight assembly - models up to 2004 model year, Rear combination light.
17. Remove the lower panel of the rear part of the body side.
INTERIOR TRIM PARTS, REPAIR WORK, Lower decorative panel of the luggage compartment of a 5-door car.
18. Remove the upper panel of the rear part of the body side.
INTERIOR TRIM PARTS, REPAIR WORK, Upper decorative panel of the luggage compartment of a 5-door car.
19. Remove the rear seat side belt.
PASSIVE SAFETY SYSTEMS, REPAIR WORK, Left rear seat seat belt.
20. Remove the luggage compartment mat.
INTERIOR TRIM DETAILS, REPAIR WORK, Luggage compartment floor covering.
21. Remove the rear seat.
SEATS, REPAIR WORK, Rear left seat.
SEATS, REPAIR WORK, Rear right seat.
22. Remove the interior headliner.
INTERIOR TRIM DETAILS, REPAIR WORK, Ceiling panel for a 5-door car.
23. Remove the rear side window.
GLASS, REPAIR WORK, Rear side window.
24. Remove the rear shock absorber.
REAR SUSPENSION, REPAIR WORK, Shock absorber.
25. Release the cable harness from the rear side panel and move it to the side.
26. Left side: Remove the tailgate lock bracket from the "E" pillar.
27. Right side: Remove the luggage compartment door.
DOORS, Removing the front door assembly to provide access to other components, installing the front door, Removing the tailgate assembly to provide access to other components, installing the tailgate.
28. Right side: Remove the fuel tank filler neck.
FUEL SUPPLY SYSTEM OF GASOLINE ENGINE, ADJUSTMENTS, Filler pipe.
29. Right side: Remove the fuel tank from the vehicle.
FUEL SUPPLY SYSTEM OF GASOLINE ENGINE, ADJUSTMENTS, Fuel tank: except for North American market countries.
Repair works
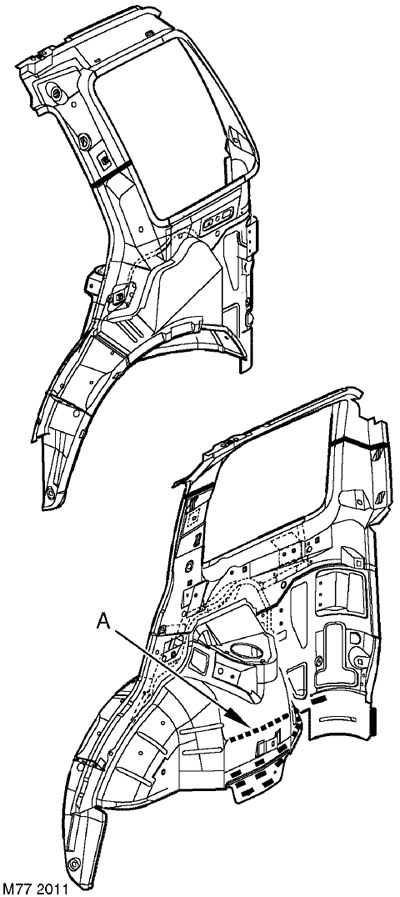
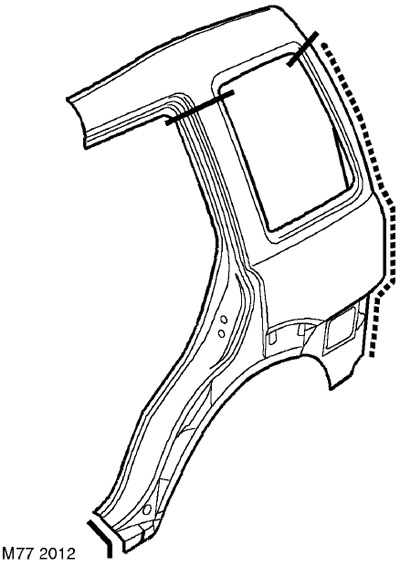
1. Remove damaged panels, prepare joint edges and install new panels in accordance with the Body Panel Repair Rules. Punch or drill holes in the panel to be installed for the plug weld, as shown in the figure.
2. The arrow A shown indicates that there are also plug welds on the other side of the inner wheel arch panel. They connect the rear side member to the inner wheel arch panel.
Installation
1. Left side: Install the tailgate lock bracket to the E-pillar.
2. Right side: Install the fuel tank on the vehicle.
FUEL SUPPLY SYSTEM OF GASOLINE ENGINE, ADJUSTMENTS, Fuel tank: except for North American market countries.
3. Right side: Install the fuel tank filler neck.
FUEL SUPPLY SYSTEM OF GASOLINE ENGINE, ADJUSTMENTS, Filler pipe.
4. Right side: Install the tailgate.
DOORS, Removing the front door assembly to provide access to other components, installing the front door, Removing the tailgate assembly to provide access to other components, installing the tailgate.
5. Secure the wiring harness to the rear side panel.
6. Install the rear shock absorber.
REAR SUSPENSION, REPAIR WORK, Shock absorber.
7. Install the rear side glass.
GLASS, REPAIR WORK, Rear side window.
8. Install the headliner.
INTERIOR TRIM DETAILS, REPAIR WORK, Ceiling panel for a 5-door car.
9. Replace the rear seat.
SEATS, REPAIR WORK, Rear left seat.
SEATS, REPAIR WORK, Rear right seat.
10. Place and secure the luggage compartment mat.
INTERIOR TRIM DETAILS, REPAIR WORK, Luggage compartment floor covering.
11. Install the rear outboard seat belt.
PASSIVE SAFETY SYSTEMS, REPAIR WORK, Left rear seat seat belt.
12. Install the upper panel of the rear part of the body side.
INTERIOR TRIM PARTS, REPAIR WORK, Upper decorative panel of the luggage compartment of a 5-door car.
13. Install the lower panel of the rear part of the body side.
INTERIOR TRIM PARTS, REPAIR WORK, Lower decorative panel of the luggage compartment of a 5-door car.
14. Install the rear light assembly.
LIGHTING, Headlight assembly - models up to 2004 model year, Rear combination light.
15. Install the rear roof panel trim.
EXTERIOR PARTS, REPAIR WORK, Roof moldings for 5-door vehicles.
16. Install the luggage compartment door opening seal.
17. Install the side trim of the luggage compartment glass.
DOORS, Removing the front door assembly to provide access to other components, installing the front door, Side trim of the rear window of a 5-door car.
18. Install the upper trim of the tailgate glass.
19. Secure the floor mat to the inner sill panel and rear crossmember.
20. Install the rear door opening seal.
21. Install the side door sill trims.
22. Install the rear door lock bracket to the "D" pillar.
23. Install the rear wheel arch liner.
24. Reinstall the rear bumper.
EXTERIOR PARTS, REPAIR WORK, Rear bumper assembly - for cars up to model year 2004.
25. Install the lower decorative door sill trim.
EXTERIOR PARTS, REPAIR WORK, Threshold trim.
26. Reinstall the wheel(s) and tighten the nuts to 115 Nm.
27. Connect all electronic units.
28. Connect the generator.
29. Connect the negative battery terminal.
Comments on this article