Dismantling
1. Disconnect the negative battery terminal.
2. Disconnect all electronic units.
3. Remove the wheel(s).
4. Remove the lower engine protection shield.
EXTERIOR PARTS, REPAIR WORK, Lower engine protection shield.
5. Remove the front bumper.
EXTERIOR PARTS, REPAIR WORK, Front bumper assembly - for cars up to model year 2004.
6. Remove the front bumper beam.
7. Remove the radiator.
COOLING SYSTEM: MOD. K, KV6 engine, REPAIR WORK, Radiator assembly.
8. Remove the power steering fluid cooler.
STEERING, Steering gear, Power steering fluid cooler (for models with Td4 or K1.8 engine).
9. Remove the headlight.
LIGHTING, Headlight Assembly - Models Before 2004 Model Year, Headlight Assembly - Models Before 2004 Model Year.
10. Release the headlight wiring harness and move it to the side.
11. Remove the engine compartment splash guard.
12. Remove the front wheel arch liner.
EXTERIOR PARTS, REPAIR WORK, Front mudguard.
13. Remove the front wing.
EXTERIOR PARTS, REPAIR WORK, Front wing.
14. Remove the rear beam of the front suspension.
15. Remove the engine and gearbox.
ENGINE KV6 - MODIFICATION K, Left cylinder head camshafts, Engine and automatic transmission: up to May 2003.
16. Remove the front suspension strut.
FRONT SUSPENSION, REPAIR WORK, Shock absorber.
17. Remove the rack and pinion mechanism with the power steering.
STEERING, Steering gear, Steering gear.
18. Remove the control panel.
INTERIOR TRIM PARTS, REPAIR WORK, Control Panel - for vehicles up to model year 2004.
19. Left side: Remove the left bumper bracket.
20. Left side: Remove the air cleaner.
21. Left side: Remove the air duct.
22. Left side: Remove the engine control module (ECM).
23. Left side: Remove the engine compartment fuse and relay box.
24. Left side: Remove the battery tray.
ENGINE STARTING AND BATTERY CHARGING SYSTEM, REPAIR WORK, Support tray - battery.
25. Left side: Remove the engine compartment fuse/relay box with its associated wiring harnesses.
26. Left side: Remove the left engine mount from the body.
27. Left side: On diesel models, remove the fuel filter.
DIESEL ENGINE FUEL SUPPLY SYSTEM, REPAIR WORK, Fine fuel filter: up to May 2003.
28. Left side: Remove the left front brake pipe.
29. Right side: Remove the right bumper bracket.
30. Right side: Remove the windshield washer reservoir.
WINDSHIELD WIPERS AND WASHERS, REPAIR WORK, Reservoir - washer.
31. Right side: Remove the coolant expansion tank.
32. Right side: Remove the right engine mount from the body.
33. Right side: Remove the power steering fluid reservoir.
34. Right side: Remove the right front brake pipe.
35. Driver's side: Remove the passenger compartment fuse/relay box.
36. Remove the brake pedal assembly and brake servo.
37. Remove the clutch pedal assembly.
38. Release the cable harness from the side and move it to the side.
39. Remove the front door sill trim. Release the front floor mat and move it to the side.
40. Remove the insulating pads from the engine compartment bulkhead.
Repair works
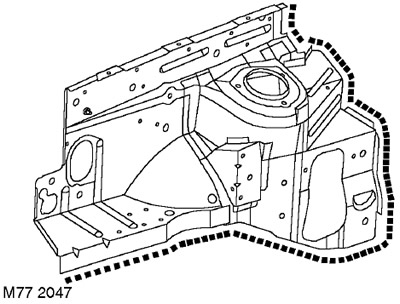
1. Remove damaged panels, prepare joint edges and install new panels in accordance with the Body Panel Repair Rules. Punch or drill holes in the panel to be installed for the plug weld, as shown in the figure.
Assembly
1. Install the insulation pads on the front and rear sides of the engine compartment bulkhead.
2. Replace the front carpet and install the front door sill trim.
3. Secure the wiring harness to the side of the engine compartment.
4. Driver's side: Install the clutch pedal assembly.
5. Install the brake pedal assembly and brake servo.
6. Install the passenger compartment fuse and relay box.
7. Left side: Install the left front brake pipe. Bleed the brake system.
BRAKE SYSTEM, ADJUSTMENTS, Bleeding the brake system.
8. Left side: On diesel models, install the fuel filter.
DIESEL ENGINE FUEL SUPPLY SYSTEM, REPAIR WORK, Fine fuel filter: up to May 2003.
9. Left side: Install the left engine mount.
10. Left side: Install the engine compartment fuse/relay box with its associated wiring harnesses
11. Left side: Reinstall the battery tray. Do not connect the negative battery terminal.
ENGINE STARTING AND BATTERY CHARGING SYSTEM, REPAIR WORK, Support tray - battery.
12. Left side: Install the engine compartment fuse and relay box.
13. Left side: Install the Engine Control Module (ECM).
14. Left side: Install the air duct.
15. Left side: Install the air filter.
16. Left side: Install the left bumper bracket.
17. Right side: Install the right front brake pipe. Bleed the brake system.
BRAKE SYSTEM, ADJUSTMENTS, Bleeding the brake system.
18. Right side: Install the power steering fluid reservoir.
19. Right side: Install the right engine mount.
20. Right side: Install the radiator expansion tank into place.
21. Right side: Install the windshield washer reservoir.
WINDSHIELD WIPERS AND WASHERS, REPAIR WORK, Reservoir - washer.
22. Right side: Install the right bumper bracket.
23. Replace the control panel.
INTERIOR TRIM PARTS, REPAIR WORK, Control Panel - for vehicles up to model year 2004.
24. Install the rack and pinion mechanism with power steering.
STEERING, Steering gear, Steering gear.
25. Install the front suspension strut.
FRONT SUSPENSION, REPAIR WORK, Shock absorber.
26. Install the engine and gearbox.
ENGINE KV6 - MODIFICATION K, Left cylinder head camshafts, Engine and automatic transmission: up to May 2003.
27. Install the rear beam of the front suspension.
28. Install the front fender in place.
EXTERIOR PARTS, REPAIR WORK, Front wing.
29. Install the front wheel arch liner.
EXTERIOR PARTS, REPAIR WORK, Front mudguard.
30. Install the engine compartment splash guard.
31. Install the headlight.
LIGHTING, Headlight Assembly - Models Before 2004 Model Year, Headlight Assembly - Models Before 2004 Model Year.
32. Secure the headlight wiring harness. Install the power steering fluid cooler.
STEERING, Steering gear, Power steering fluid cooler (for models with Td4 or K1.8 engine).
33. Install the radiator.
COOLING SYSTEM: MOD. K, KV6 engine, REPAIR WORK, Radiator assembly.
34. Install the front bumper beam.
35. Reinstall the front bumper.
EXTERIOR PARTS, REPAIR WORK, Front bumper assembly - for cars up to model year 2004.
36. Reinstall the lower engine protection shield.
EXTERIOR PARTS, REPAIR WORK, Lower engine protection shield.
37. Reinstall the wheel(s) and tighten the nuts to 115 Nm.
38. Connect all electronic units.
39. Connect the negative battery terminal.
Comments on this article