car logo Ford
car logo Volkswagen
car logo BMW
car logo Opel
car logo Audi
car logo Toyota
car logo Peugeot
English Русский
Български
Беларускі
Український
Српски
Hrvatski
Română
Polski
Slovenský
Magyar


Main
Freelander
Discovery
Range Rover
Defender
Contacts
Articles

«Front of engine» — the side where the water pump is installed (Discovery 1)

 
  • Main
  • Discovery
  • Discovery 1
  • General information
  • Introduction to manual
  • «Front of engine» — the side where the water pump is installed
 
        0  
Contents: Safety precautions and…⇩ Jacking ⇩ Raising the front of the car ⇩ Raising the rear of the car ⇩ Towing ⇩

Safety precautions and recommendations


1. Always disconnect the battery when working on the fuel system.

2. Work on the fuel system must only be carried out by qualified personnel.

3. Most seals, tubes, etc. are made of plastic. In its normal state, this material is neutral and does not pose a health hazard. However, with significant thermal damage (contact with the exhaust manifold or in case of fire) may release active acid, causing skin burns. In this case, work only with special gloves.

4. Avoid contact of skin with motor oil. This may cause dry skin or dermatitis.

5. It is not recommended to fit tyres that are not specified by Land Rover: fitting unsuitable tyres will result in suspension problems and poor vehicle handling.

6. To prevent rust formation after steam washing the engine compartment, carefully apply a new layer of wax mastic to metal parts such as the steering column, water pipes, clamps, etc.

7. All fuel hoses are made of reinforced vinyl. If after disconnecting the hose you find that the inner part has separated from the outer fittings, replace the hose.
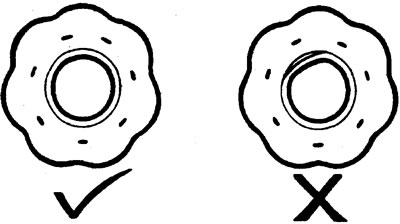
7. All fuel hoses are made of reinforced vinyl. If after disconnecting the hose you find that the…


8. After connecting any hose, align the relative position marks.


Otherwise, harmful contact of the hose with vehicle parts is possible.
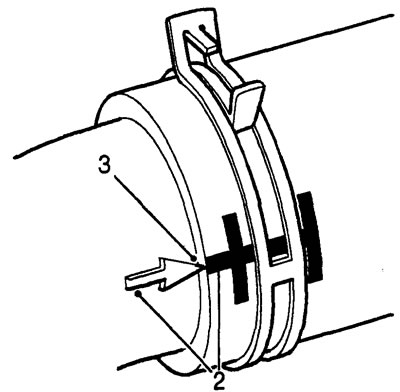
Otherwise, harmful contact of the hose with vehicle parts is possible.


9. Put the hoses on up to the mark on the branch pipe (usually a weld).

10. Install the clamp immediately behind the protrusion of the pipe.

11. Orient the clamp so that the stamping is on the hose side.
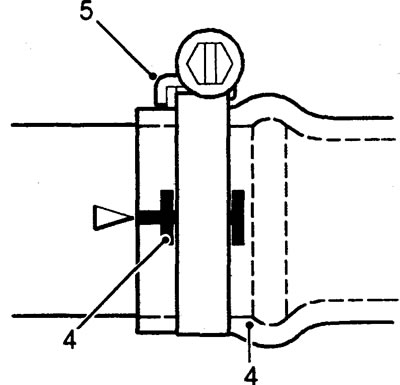
11. Orient the clamp so that the stamping is on the hose side.


Tighten the clamp screw to a torque of 3 Nm.

12. The strength class of the fasteners is stamped on them (tensile strength), for example 8.8, 10.9, 14.9. As a rule, fasteners have a bronze-colored coating and can only be replaced with ones of the same strength class.
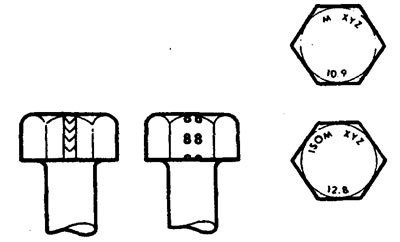
12. The strength class of the fasteners is stamped on them (tensile strength), for example 8.8,…


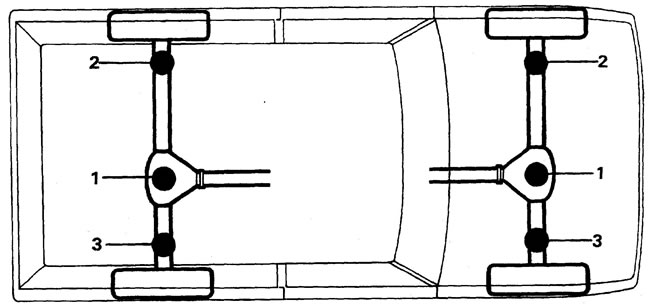
Jacking points.

Jacking points.


Jacking


1. Jacking must be carried out on a solid and level surface.

2. Apply the parking brake.

3. In the main gearbox: engage first gear or move the selector to position "P".

4. In the transfer case: engage the lower range.

DO NOT jack under:
  • body panels
  • bumpers
  • fuel lines
  • brake pipes
  • steering levers
  • panhard rod
  • rear suspension guide rods
  • fuel tank
  • engine sump
  • gearbox

The jack attachment points are shown in the figure.

Use a hydraulic jack with a lifting capacity of at least 1500 kg and only for the purpose of changing wheels; in other cases, place supports under the axles.

Raising the front of the car


1. Place a jack under the differential housing.

Please note: the differential housing is mounted in the center of the axle: when the front wheels are lifted off the ground, the rear axle will tilt slightly.


2. Raise the front axle until you can place stands under the axle tubes.

3. Carefully lower the jack and make sure the car is securely supported on the stands.

Raising the rear of the car


This operation is carried out in the same way as described previously. For operations requiring all wheels to be raised, raise both axles.

Caution: When using the lift, do not use a device with two posts, only with four posts.


Please note: Due to the presence of a viscous coupling in the transmission, the front and rear axle wheels cannot rotate independently of each other. Never rotate the wheels unless they are all off the ground.


Towing


Since your vehicle is in full-time four-wheel drive, follow these steps when towing:


1. Turn the ignition switch to position "I" to release the steering.

2. Set the levers of both boxes to neutral position.

3. Attach the towing rope to the towing eye.
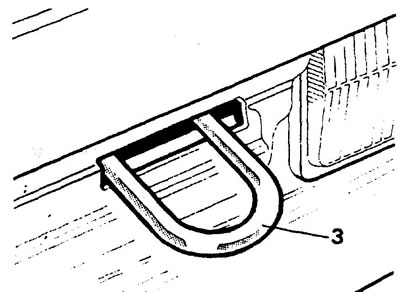
3. Attach the towing rope to the towing eye.


4. Release the parking brake.

Caution: When the engine is not running, the power steering and brakes will not turn the steering wheel and more effort will be required for effective braking.


5.
Caution: Disconnect the driveshaft from the axle you are towing, otherwise the vehicle may be damaged.


6. When towing by the rear axle, the steered wheels must be secured in a straight-ahead position. Do not use the steering column lock for these purposes.


This article is available at russian, bulgarian, belarusian, ukrainian, serbian, croatian, romanian, polish, slovak, hungarian
Article review: Konstantin Nazarov


Previous article
Introduction to the manual

Current article
«Front of engine» — the side where the water pump is installed

Next articles
Vehicle Identification Number (VIN)
Car maintenance
In-salon service
Out-of-car service
Under-the-hood maintenance
Under-vehicle maintenance
Emission Control System Service Indicator Reset — US Models
Conducting road tests


Similar articles from Land Rover repair manuals:
• Front side panel of the engine compartment Freelander 1 (1997-2006)
• Front side member and upper suspension support assembly Freelander 2 (2006-2014)
• Front side member assembly Range Rover 3 (2001-2012)
• Front and rear axles Defender 2007+ (2007-2016)

Comments on this article


No comments yet


How much will 34 + 50 =


Discovery 3 
  • General information
  • Using the manual
  • Precautionary measures
  • Service Information
  • Technique
  • Health protection
  • Road test
  • Identification codes
  • Jacking and lifting
  • Maintenance - diesel
  • Maintenance - petrol
  • Chassis
  • Suspension
  • Front suspension
  • Rear suspension
  • Wheels and tires
  • Dynamic suspension
  • Cardan shaft
  • Rear drive axle
  • Front drive axle
  • Front axle axles
  • Rear axle axles
  • Brake system
  • Parking brake
  • Hydraulic brake
  • Vacuum brake booster
  • Anti-lock braking system
  • Steering
  • Steering column
  • Power unit
  • Petrol engine 4.0L
  • Petrol engine 4.4L
  • Diesel engine 2.7L
  • Engine cooling
  • Fuel supply
  • Drive units
  • Launch system
  • Ignition system
  • Emission reduction
  • Air filtration
  • Fuel vapor control
  • Electronic control part
  • Car gearbox
  • Clutch
  • All-wheel drive systems
  • Transfer case
  • Exhaust system
  • Fuel tank and lines
  • Acceleration control
  • Electrical equipment
  • Climate control
  • Instruments and control lamps
  • Battery and charging system
  • Information system
  • Lighting and headlights
  • Power distribution
  • Electronic Function Group
  • Body and coating
  • Body elements
  • Interior and body trim
  • Mirrors and glasses
  • Seats
  • Instrument panel and console
  • Handles and locks
  • Windshield wipers and washers
  • Sunroof and bumpers
  • Safety system
  • Body repairs
  • Repair of front end elements
  • Repair of back elements
  • Side panel repair
  • Frame and body mount

Discovery 1 
  • General information
  • Technical specifications
  • Introduction to manual
  • Troubleshooting
  • Power unit
  • Diesel engine Tdi
  • Petrol engine V8i (3.9 l)
  • Petrol engine V8i (4.0 l)
  • Petrol engine Mpi
  • Reducing harmful emissions
  • Fuel system Tdi
  • Fuel system MFi
  • Fuel system SFi
  • Fuel system MPi (MEMS)
  • Cruise control
  • Cooling system (Tdi)
  • Cooling system (V8i)
  • Cooling system (MPi)
  • Exhaust system
  • Transmission
  • Clutch
  • Manual gearbox R380
  • Manual gearbox LT 77
  • Transfer case LT230T
  • Automatic gearbox
  • Cardan shaft
  • Rear axle
  • Front axle
  • Chassis
  • Steering system
  • Front suspension
  • Rear suspension
  • Brake system
  • Wheels and tires
  • Body and interior
  • Passive safety
  • Doors, locks and windows
  • Exterior body parts
  • Interior trim details
  • Seats
  • Electrical equipment
  • Heating and ventilation
  • Air conditioning
  • Windscreen wipers
  • Starting and charging system
  • Equipment and devices
  • Lighting and headlights


LRman.ru © 2013-2026 | Mobile version | Free Lander | Discovery | Range Rover | Defender | Contacts | | Sitemap |
Car repair and service instructions Land Rover: Freelander, Discovery, Range Rover, Defender
We use cookies to make pages load faster and provide a more user-friendly experience 🍪