car logo Ford
car logo Volkswagen
car logo BMW
car logo Opel
car logo Audi
car logo Toyota
car logo Peugeot
English Русский
Български
Беларускі
Український
Српски
Hrvatski
Română
Polski
Slovenský
Magyar


Main
Freelander
Discovery
Range Rover
Defender
Contacts
Articles

Under-vehicle maintenance (Discovery 1)

 
  • Main
  • Discovery
  • Discovery 1
  • General information
  • Introduction to manual
  • Under-vehicle maintenance
 
        0  
Contents: Oil and Oil Filter Change (Engine) -…⇩ Oil and Oil Filter Change (Engine) -…⇩ Checking the manual transmission oil…⇩ Automatic transmission fluid…⇩ Changing the oil in a steering…⇩ Check the condition of the exhaust…⇩ Check for leaks in the power…⇩ Check the ball joint fastenings and…⇩ Maintenance of the filter -…⇩ Replacing the fuel filter (V8i, MPi) ⇩
When frequently using the vehicle in off-road conditions (sand, clay or water), oil changes in units must be carried out more frequently than recommended in the technical specifications.

Oil and Oil Filter Change (Engine) - Tdi


Caution: Continuous engine operation without oil pressure (after his replacement) may cause damage to the turbocharger.

Oil and Oil Filter Change (Engine) - V8i


Caution: Fill the oil filter with oil before installing it. If the oil pump is air-locked, fill it with oil to quickly increase the pressure in the system after starting.


Checking the manual transmission oil level - V8i


1. Place the vehicle on a horizontal surface.

2. Unscrew the level plug. If necessary, add oil until it starts to flow out of the level plug hole. Tighten the plug to a torque of 30 Nm.

Automatic transmission fluid replacement


1. Place the vehicle on a level surface, place a container under the automatic transmission drain plug to collect the fluid, and disconnect the battery.

2. Remove the automatic transmission dipstick, which is located on the right side of the rear part of the engine valve cover. Unscrew the drain plug and drain the liquid.


3. Replace the plug sealing washer and tighten the plug to a torque of 10 Nm.
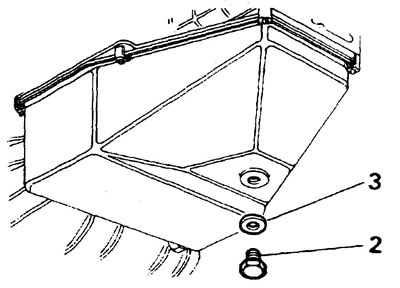
3. Replace the plug sealing washer and tighten the plug to a torque of 10 Nm.


4. Make sure the vehicle is level.

5. Fill with the required grade of fluid in the quantity specified in the specification.

The article is based on information from the website (LRMAN.ru)

6. Start the engine. Press the brake pedal and move the selector to position 1 and then back to position "P." Check the fluid level: it should be between the two marks on the dipstick.
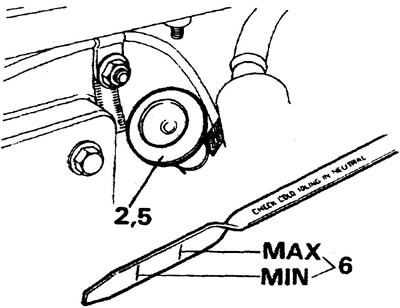
6. Start the engine. Press the brake pedal and move the selector to position 1 and then back to…


Changing the oil in a steering knuckle


1. Place the vehicle on a horizontal surface.

2. Unscrew the drain plug and level plug, drain the oil. Clean the drain plug and replace it.

3. Add the required oil until it starts to flow out of the level plug hole.
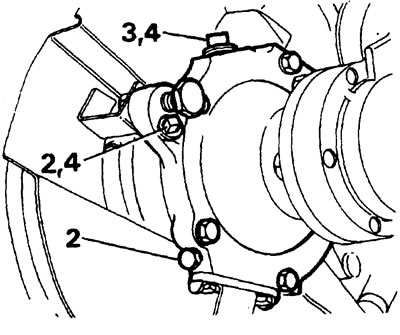
3. Add the required oil until it starts to flow out of the level plug hole.


4. Install the level plug, wipe off any spilled oil.


Check the condition of the exhaust system (tightness, reliability of fastening, damage)


Check for leaks in the power steering and suspension system


Check the ball joint fastenings and steering rod boots


Ball joints are lubricated at the factory; lubrication is not required during operation.

When operating the vehicle primarily in off-road conditions, check the condition of the joints more frequently. If the joint boot is torn or there is increased wear, replace the joint (no gap is allowed when moving the hinge in any direction).

Please note: the hinge has an internal spring. When a force greater than the spring force is applied to the hinge (for example, when turning the steering wheel), there is a feeling of a gap in the hinge.


Maintenance of the filter - sedimentation tank (Tdi)


The sediment filter is installed on the frame on the left near the fuel tank. The filter serves for primary purification of fuel and extends the service life of the fine filter.

1. Open the drain tap and drain the water and dirt. Close the tap immediately after clean fuel starts to flow out.
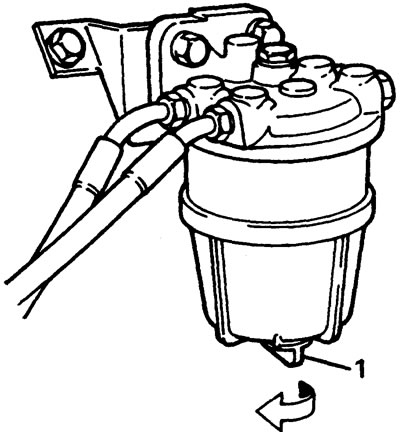
1. Open the drain tap and drain the water and dirt. Close the tap immediately after clean fuel…


Replacing the fuel filter (V8i, MPi)


1. Relieve the fuel pressure in the system, see section "Fuel system".


2. The filter is located on the right side of the frame cross member next to the fuel tank filler neck. Access to the filter is through the right rear wheel arch.

3. Clean any dirt from the places where the fuel hoses are connected to the filter.
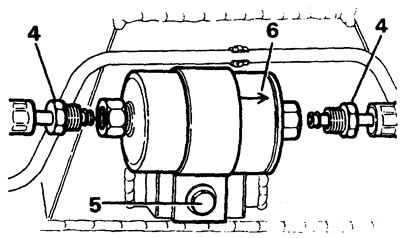
3. Clean any dirt from the places where the fuel hoses are connected to the filter.


4. Disconnect both fuel hoses from the filter.

5. Loosen the clamp bolt and remove the filter.

6. Install the new filter according to the flow direction arrow.

7. Connect the fuel hoses. Tighten the mounting nuts to a torque of 30 Nm.

8. Tighten the clamp clamp bolt.

9. Start the engine and check for fuel leaks.


This article is available at russian, bulgarian, belarusian, ukrainian, serbian, croatian, romanian, polish, slovak, hungarian
Article review: Konstantin Nazarov


Previous articles
Introduction to the manual
«Front of engine» — the side where the water pump is installed
Vehicle Identification Number (VIN)
Car maintenance
In-salon service
Out-of-car service
Under-the-hood maintenance

Current article
Under-vehicle maintenance

Next articles
Emission Control System Service Indicator Reset — US Models
Conducting road tests


Similar articles from Land Rover repair manuals:
• Weight and dimensions of the vehicle Freelander 2 (2006-2014)
• Precautions when performing maintenance Freelander 1 (1997-2006)
• Vehicle Identification Number Range Rover 3 (2001-2012)
• Body and Frame — Vehicle Information and Tolerance Checks Defender 2007+ (2007-2016)

Comments on this article


No comments yet


How much will 14 + 19 =


Discovery 3 
  • General information
  • Using the manual
  • Precautionary measures
  • Service Information
  • Technique
  • Health protection
  • Road test
  • Identification codes
  • Jacking and lifting
  • Maintenance - diesel
  • Maintenance - petrol
  • Chassis
  • Suspension
  • Front suspension
  • Rear suspension
  • Wheels and tires
  • Dynamic suspension
  • Cardan shaft
  • Rear drive axle
  • Front drive axle
  • Front axle axles
  • Rear axle axles
  • Brake system
  • Parking brake
  • Hydraulic brake
  • Vacuum brake booster
  • Anti-lock braking system
  • Steering
  • Steering column
  • Power unit
  • Petrol engine 4.0L
  • Petrol engine 4.4L
  • Diesel engine 2.7L
  • Engine cooling
  • Fuel supply
  • Drive units
  • Launch system
  • Ignition system
  • Emission reduction
  • Air filtration
  • Fuel vapor control
  • Electronic control part
  • Car gearbox
  • Clutch
  • All-wheel drive systems
  • Transfer case
  • Exhaust system
  • Fuel tank and lines
  • Acceleration control
  • Electrical equipment
  • Climate control
  • Instruments and control lamps
  • Battery and charging system
  • Information system
  • Lighting and headlights
  • Power distribution
  • Electronic Function Group
  • Body and coating
  • Body elements
  • Interior and body trim
  • Mirrors and glasses
  • Seats
  • Instrument panel and console
  • Handles and locks
  • Windshield wipers and washers
  • Sunroof and bumpers
  • Safety system
  • Body repairs
  • Repair of front end elements
  • Repair of back elements
  • Side panel repair
  • Frame and body mount

Discovery 1 
  • General information
  • Technical specifications
  • Introduction to manual
  • Troubleshooting
  • Power unit
  • Diesel engine Tdi
  • Petrol engine V8i (3.9 l)
  • Petrol engine V8i (4.0 l)
  • Petrol engine Mpi
  • Reducing harmful emissions
  • Fuel system Tdi
  • Fuel system MFi
  • Fuel system SFi
  • Fuel system MPi (MEMS)
  • Cruise control
  • Cooling system (Tdi)
  • Cooling system (V8i)
  • Cooling system (MPi)
  • Exhaust system
  • Transmission
  • Clutch
  • Manual gearbox R380
  • Manual gearbox LT 77
  • Transfer case LT230T
  • Automatic gearbox
  • Cardan shaft
  • Rear axle
  • Front axle
  • Chassis
  • Steering system
  • Front suspension
  • Rear suspension
  • Brake system
  • Wheels and tires
  • Body and interior
  • Passive safety
  • Doors, locks and windows
  • Exterior body parts
  • Interior trim details
  • Seats
  • Electrical equipment
  • Heating and ventilation
  • Air conditioning
  • Windscreen wipers
  • Starting and charging system
  • Equipment and devices
  • Lighting and headlights


LRman.ru © 2013-2026 | Mobile version | Free Lander | Discovery | Range Rover | Defender | Contacts | | Sitemap |
Car repair and service instructions Land Rover: Freelander, Discovery, Range Rover, Defender
We use cookies to make pages load faster and provide a more user-friendly experience 🍪