Contents: Checking cooling and heating systems ⇩ Checking the engine mount cushions ⇩ Checking the brake booster hose ⇩ Evaporative Emission System Leak…⇩ Checking the Fuel Cap for Leaks -…⇩ Cleaning the Distributor Cap - V8i ⇩ Distributor Rotor Lubrication - V8i ⇩ Cleaning and adjusting spark plugs -…⇩ Replacing Spark Plugs - V8i with…⇩ Replacing spark plugs (V8i) ⇩ Replacing spark plugs (MPi) ⇩ Replacing the fuel filter (Tdi) ⇩ Replacing the filter element ⇩ Cleaning the resonance chamber (V8i) ⇩ Replacing the fuel vapor canister…⇩ Replacing the drive belt for V8i,…⇩ Checking the automatic transmission…⇩ Checking the power steering fluid…⇩ Checking the fluid level in the…⇩ Checking the fluid level in the…⇩ Checking the ignition timing - V8i…⇩ Checking and adjusting idle speed ⇩ Checking and adjusting the steering…⇩ Cleaning the battery terminals ⇩ Replacing the timing belt ⇩ Checking the charge air cooler - Tdi ⇩ Cooler Cleaning - Tdi ⇩
Checking cooling and heating systems
Check for fluid leaks and the condition of the hoses: replace hoses at the first sign of damage.
Checking the engine mount cushions
Checking the brake booster hose
Evaporative Emission System Leak Test - V8i with MPi Catalyst
Checking the Fuel Cap for Leaks - V8i with MPi Catalyst
Checking glow plug wiring (burnout and other damage to the insulation of low- and high-voltage wires).
Cleaning the Distributor Cap - V8i
The electronic ignition system is equipped with a Lucas 35DLM8 distributor.
The distributor is adjusted at the factory and usually no adjustment is required during operation. Only in the case of obvious damage does distributor maintenance consist of:
- 1. Cleaning the outer surface of the distributor cap.
- 2. External examination (cracks, burnouts).
- 3. Wipe the inside surface of the lid (with a dry, lint-free cloth).
- 4. Checking the rotor, cover and protection of the Hall sensor for traces of high-voltage breakdown. DO NOT REMOVE the sensor protection!!!
Distributor Rotor Lubrication - V8i
Remove the rotor and apply a drop of motor oil to the rotor shaft.
Cleaning and adjusting spark plugs - V8i with catalytic converter
Replacing Spark Plugs - V8i with Catalytic Converter
1. When replacing spark plugs, do not damage the threads in the cylinder head.
Replacing spark plugs (V8i)
Caution: Installing spark plugs with an incorrect heat rating may result in serious engine damage.
Removal
1. Disconnect the battery and remove the high-voltage wires from the spark plugs.
2. Remove the spark plugs.
3. Check the tightness of the high-voltage wire cap on the spark plug.
Installation
1. Tighten the spark plugs to the recommended torque.
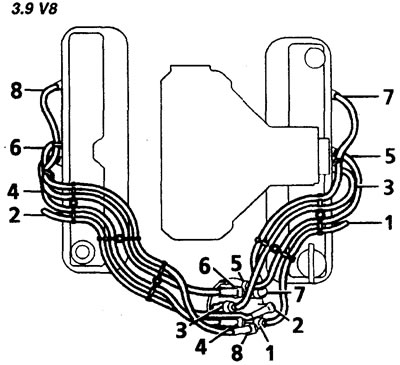
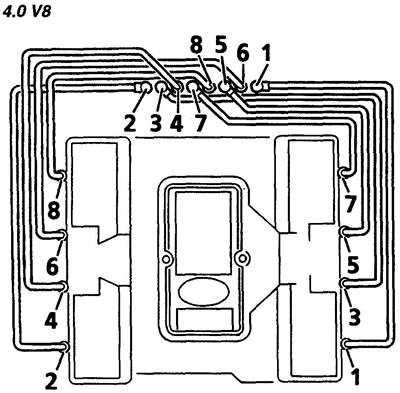
2. Connect the high voltage wires.
The connection diagram is shown in the figures.
Replacing spark plugs (MPi)
Removal
1. Unscrew 4 screws and remove the spark plug cover.
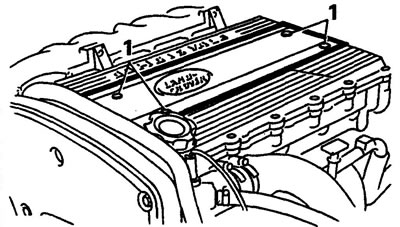
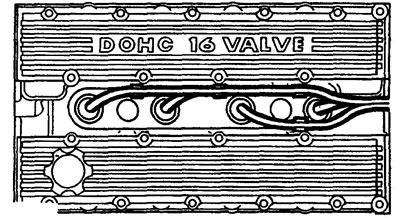
2. Disconnect the high-voltage wires.
3. Remove the spark plugs from the cylinder head.
Installation
1. Inspect the spark plugs and adjust the gap between the electrodes if necessary.
2. Apply anti-seize lubricant to the spark plug threads and screw the spark plugs into the cylinder head.
3. Connect the high voltage wires.
Replacing the fuel filter (Tdi)
Caution: If there is water or dirt in the filter, the fuel pump is very likely to be damaged.
1. Place a container under the filter drain tap to collect water and dirt.
2. Open the tap and drain the water from the filter.
3. As soon as clean fuel starts to flow out, immediately close the tap.
Note: If the fuel drain is too large, the fuel system will need to be bled.
Replacing the filter element
1. Clean the filter from dirt and place a container under it to collect the fuel.
2. Unscrew the filter.
3. Wet the gasket of the new filter with fuel.
4. Wrap the filter.
5. Close the drain tap.
Cleaning the resonance chamber (V8i)
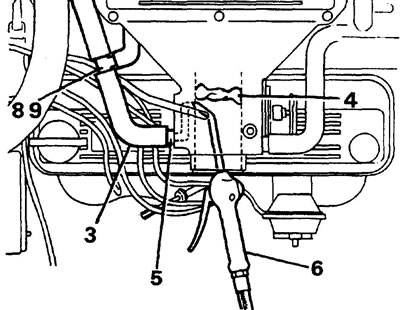
Cleaning of the resonance chamber is carried out without dismantling it from the engine. Be careful not to damage the throttle valve.
1. Disconnect the battery.
2. Loosen the inlet hose clamp and remove the hose.
3. Disconnect the crankcase ventilation hose from the resonance chamber.
4. Insert a clean cloth wad into the throttle body.
5. Attach a crankcase ventilation hose and a suitable outlet hose to the fitting to prevent dirt from the channels from entering the atmosphere.
6. Use compressed air to clean the channels of the resonance chamber (from the throttle body).
7. If the channels are very tightly clogged with deposits, clean them with a soft wire and blow them out with air again.
8. Disconnect the crankcase ventilation hoses from the tee, clean the tee if necessary.
9. Reinstall the removed parts.
Replacing the fuel vapor canister (V8i, MPi)
1. Disconnect the battery.
2. Disconnect the fuel vapor canister valve.
3. Disconnect the hose.
4. Loosen the clamp bolt.
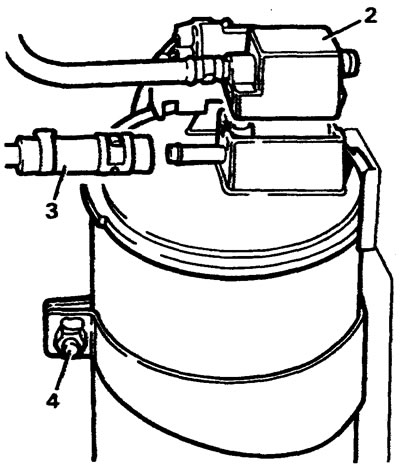
5. Remove the fuel vapor canister.
6. Installation is carried out in reverse order.
Replacing the drive belt for V8i, Tdi accessories - see section "Engine, Belt Replacement". Mpi
1. Replace the belt if it is worn or contaminated with oil.
2. Check the condition of the belt tensioner indicator: replace the belt before the indicator mark reaches the right side of the slot.
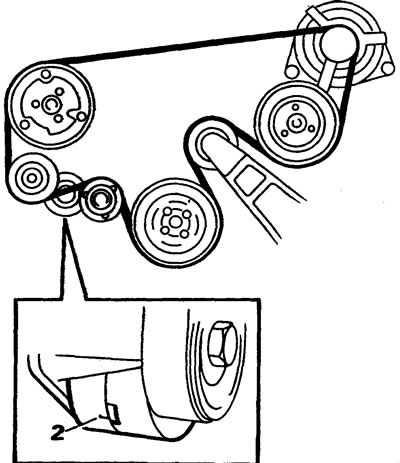
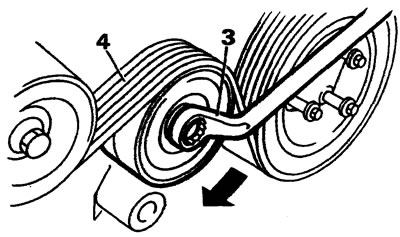
3. Using a 15 mm wrench, turn the tensioner counterclockwise until it stops.
4. Remove the belt from the tensioner roller and release the tensioner.
5. Remove the belt from the remaining rollers and pulleys.
6. Clean the grooves of the pulleys of the attachments, make sure that they are not damaged.
7. Place the belt on all pulleys and rollers except the tensioner roller, check that the belt teeth fit correctly into the pulley grooves.
8. Turn the tensioner roller counterclockwise, put on the belt and release the roller.
Checking the automatic transmission fluid level
Note: check the level with the engine idling, the selector in position N, and the automatic transmission cold.
1. Place the vehicle on a horizontal surface.
2. The fluid level in the automatic transmission should be between the MIN and MAX marks on the dipstick.
Checking the power steering fluid level
Remove the power steering pump reservoir cap - the fluid in the reservoir should be up to the upper mark on the dipstick.
Checking the fluid level in the reservoirs of the master cylinders of the brake and clutch systems
Caution: Brake fluid damages the car body paint. Remove spilled liquid from painted surfaces immediately, rinse with plenty of water.
Checking the fluid level in the washer reservoir
It is recommended to use a special washer fluid. The maximum liquid level is 25 mm below the filler neck.
Lubrication of accelerator drive levers and cruise control system.
The article was taken from this resource: LRman.ru
Checking the ignition timing - V8i with catalytic converter
Cm. "3.9 V8i Engine Tuning Data".
Checking and adjusting idle speed
Cm. "Engine tuning data Tdi, Mpi".
Checking and adjusting the steering mechanism
Check for any play when the steering wheels are in a straight line position, adjust if necessary, see chapter "Steering".
Cleaning the battery terminals
Note: Some models are equipped with a battery disconnection sound signal, see chapter "Electrical equipment".
Disconnect the battery cables, clean the terminals and apply a layer of petroleum jelly to them.
Maintenance-free batteries are installed at the factory. Check the electrolyte level; in variable climates - every 3 years, in hot climates - annually.
Replacing the timing belt
Tdi: belt replacement when operating the vehicle in variable climates - after 120,000 km or after 6 years, whichever comes first.
When operating the vehicle in off-road conditions or in hot climates, replacement is carried out after 60,000 km or after 3 years, whichever comes first.
MPi: replacement is performed after 160,000 km or after 6 years, whichever comes first; in off-road conditions, replacement is performed after 60,000 km or after 3 years, whichever comes first.
Checking the charge air cooler - Tdi
If necessary, wash the cooling grille
Cooler Cleaning - Tdi
1. Remove the cooler.
2. Flush the cooler with ICI "GENK-LENE" or OD-SOLVE fluids according to the fluid manufacturer's instructions.
3. Install the cooler back into place.
Comments on this article