Requires the following equipment: Cutting wire with handles, windshield repair kit, caulking gun and suction cups.
Wear protective gloves when handling glasses, solvents and primers.
Before carrying out work on the removal and installation of glass, put on safety glasses.
Dismantling
1. Remove the upper decorative panel of the luggage compartment.
INTERIOR TRIM DETAILS, REPAIR WORKS, 5-door upper luggage compartment trim panel.
2. Cover the vehicle interior with protective covers.
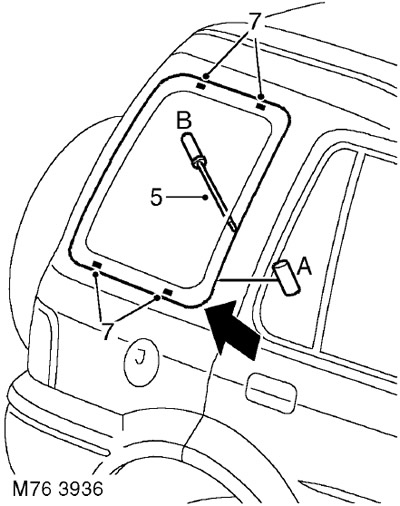
3. Cut through the seal at the base of the C-pillar 'D' with a knife.
4. Pass the cutting wire through the cut made by the knife and secure the wire to the handles as shown. The length of the wire between the handles should be approximately 200 mm.
5. With the help of a partner, slide handle tube B between the glass and body ahead of the cut and carefully cut the seal in one motion by pulling handle A from the outside. Hold the glass during the last step of cutting the seal.
In the case of using stranded wire, sawing movements can be used when cutting the thickenings of the seal located in the corners of the glass.
Using sawing motions when cutting solid wire can cause it to overheat and break.
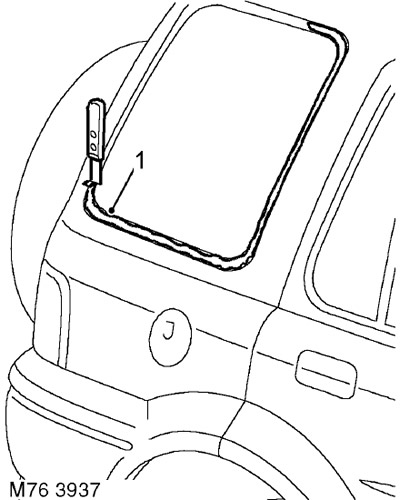
6. Install suction cups on the glass and remove it.
Place the glass on the felt-covered supports. Do not place glass on edge. The appearance of a chip on the edge of the glass can lead to the formation of a crack.
7. Assemble 4 spacers.
Installation
1. Carefully remove any remaining sealant from the windshield frame to obtain a smooth surface.
2. Remove any remaining debris with a vacuum cleaner.
3. If the glass is not being replaced: Thoroughly remove any remaining sealant from the glass to obtain a smooth surface. Do not damage the blackout strip.
4. Install the rubber spacers on the body.
5. With the help of a partner, install the glass on the body.
6. For ease of installation, make marks with adhesive tape.
7. Remove the glass and set it aside.
8. Clean the windshield frame and windshield edges with solvent.
Do not touch cleaned or etched surfaces with your hands.
9. Etch primer on unpainted windshield frame surfaces.
10. Apply glue to the glass and let it dry.
11. Apply primer to the etched surfaces of the windshield frame.
12. Apply an activating agent over the old sealant remaining on the frame.
13. Allow the activating reagent to dry.
14. Install the pre-cut tip onto the sealant cartridge, remove the cap, and remove any hardened residue. Install cartridge on caulk gun.
If necessary, change the shape of the tip to obtain the required section of the sealant layer.
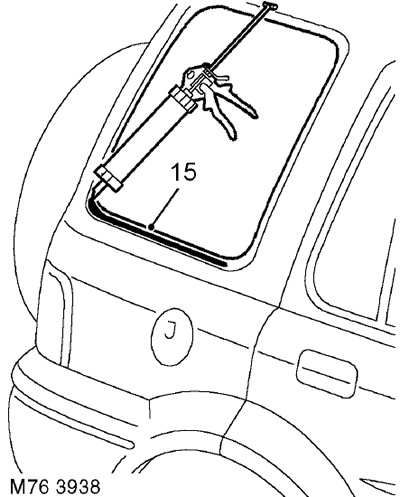
15. Apply the sealant to the frame evenly as shown. In the corners, the sealant layer should be somewhat thicker.
16. Avoid ruptures or air bubbles in the sealant.
17. Install the glass on the body and align its position with the marks.
18. Lightly press the glass to firmly bond with the sealant.
19. Fix the glass with tape until the sealant dries.
20. Remove protective covers and remaining tape.
21. Check the tightness of the seal. Apply additional sealant if necessary. If water is used for the leak test, allow the seal to dry before testing. Pour water over the peripheral surface of the glass and check if water flows into the interior. Mark the leaks. If necessary, after complete drying, apply an additional layer of sealant.
22. Establish the top decorative panel of a luggage space.
INTERIOR TRIM DETAILS, REPAIR WORKS, 5-door upper luggage compartment trim panel.
Comments on this article