Contents: Dismantling ⇩ Installation ⇩
Dismantling
1. Remove the front console.
INTERIOR TRIM PARTS, REPAIR WORK, Center console - for vehicles up to model year 2004.
2. Remove the rotary contactor.
PASSIVE SAFETY SYSTEMS, REPAIR WORK, Rotary contactor of the airbag system.
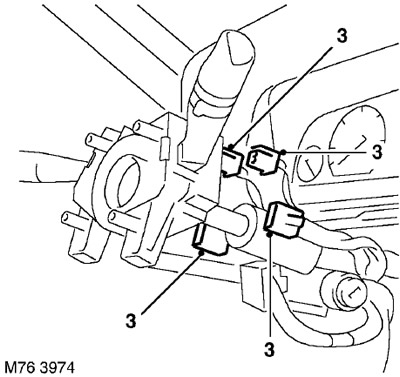
3. Disconnect the 4 electrical connectors from the windshield wiper/turn signal switch.
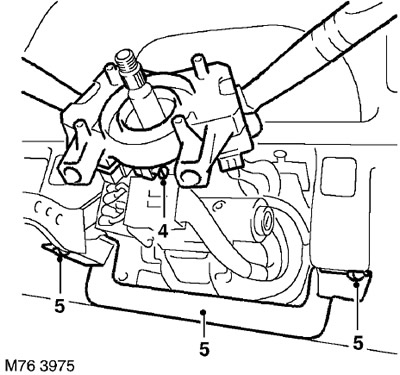
4. Loosen the bolt and remove the windshield wiper/turn signal switch.
5. Unscrew the 2 screws securing the lower steering column cover and remove the cover.
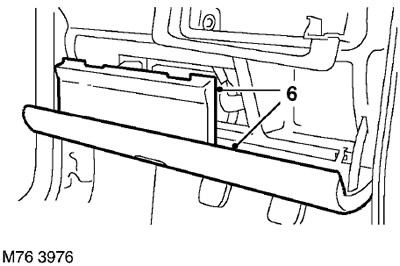
6. Lower the driver's glove box lid and remove the fuse box cover.
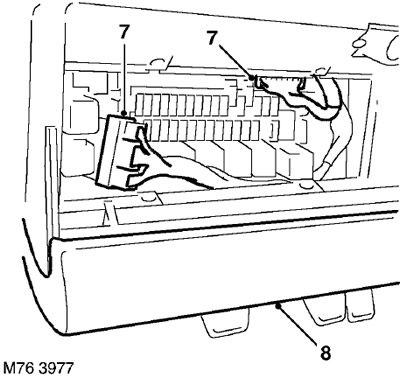
7. Disconnect the 2 electrical connectors from the fuse box.
8. Close the glove compartment.
9. Remove the watch.
DEVICES, REPAIR WORK, Watches.
10. Remove the upper trim panels from both front 'A' pillars.
INTERIOR TRIM PARTS, REPAIR WORK, Replacement of the upper decorative panel of the front 'A' pillar.
11. Models not equipped with front passenger airbag: Remove the instrument panel compartment.
INTERIOR TRIM DETAILS, REPAIR WORK, Control panel compartment.
12. Models equipped with front passenger airbag: Remove the passenger airbag.
PASSIVE SAFETY SYSTEMS, REPAIR WORK, Front passenger airbag - for vehicles up to model year 2004.
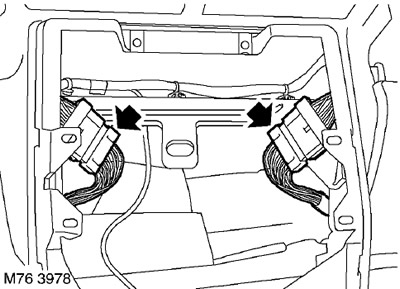
13. Disconnect the 2 control panel cable electrical connectors from the main wiring.
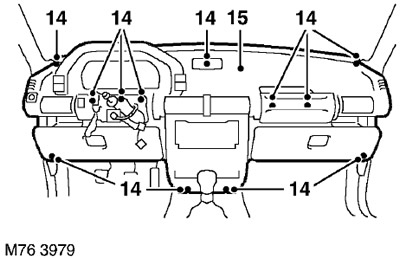
14. Unscrew the 12 control panel mounting bolts.
[The material was taken from the specified website LRMAN.RU]
15. With the help of a partner, remove the control panel.
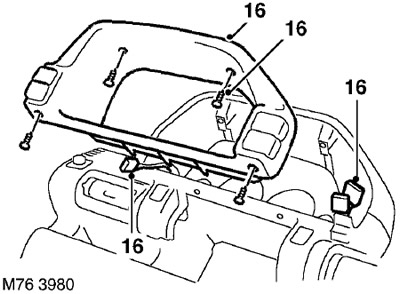
16. Remove 4 screws, disconnect 3 electrical connectors from the switches and remove the instrument panel frame.
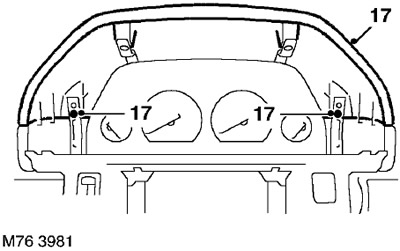
17. Unscrew the 2 screws securing the instrument panel visor and remove the visor.
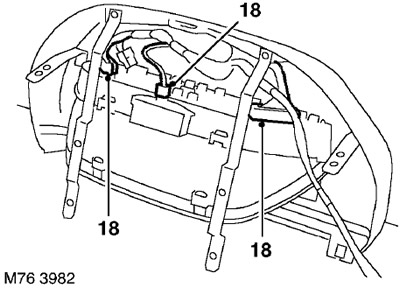
18. Disconnect 3 connectors from the instrument panel.
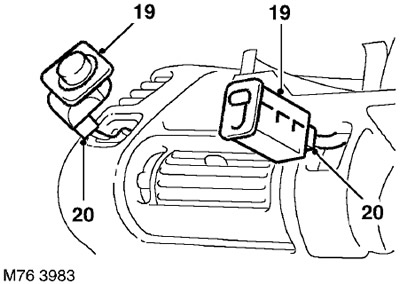
19. Remove the button for adjusting the outside rearview mirrors and the headlight beam direction corrector.
20. Disconnect the electrical connectors from the outside rearview mirror adjustment switch and the headlight beam adjuster.
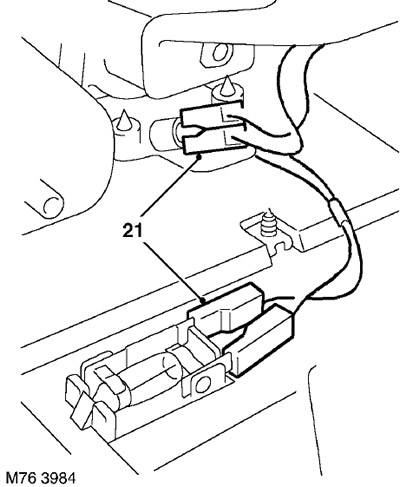
21. Disconnect the 4 Lucar type electrical connectors from the glove box light and switch.
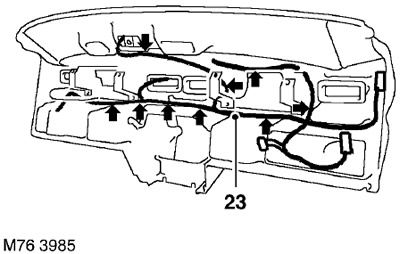
22. Release the 9 electrical wiring clamps.
23. Pull the electrical cable through the control panel and remove it.
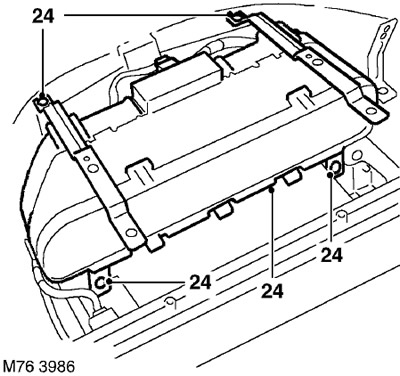
24. Unscrew the 4 screws securing the instrument panel and remove it.
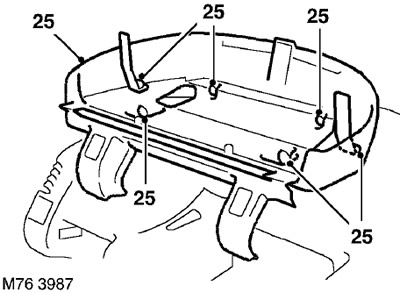
25. Unscrew the 6 screws securing the bottom cover and remove it from the dashboard.
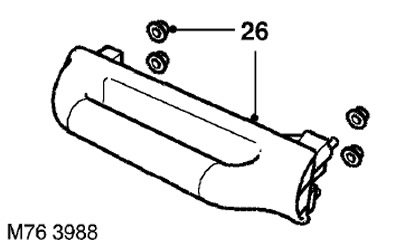
26. Models not equipped with front passenger airbag: Remove the 4 screws securing the handle and remove it.
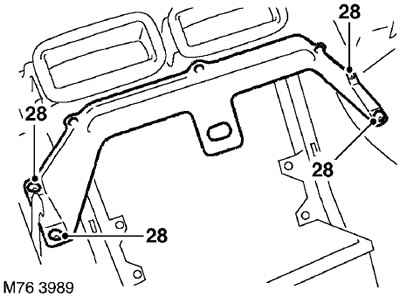
27. Unscrew the 4 screws securing the central bracket and remove it.
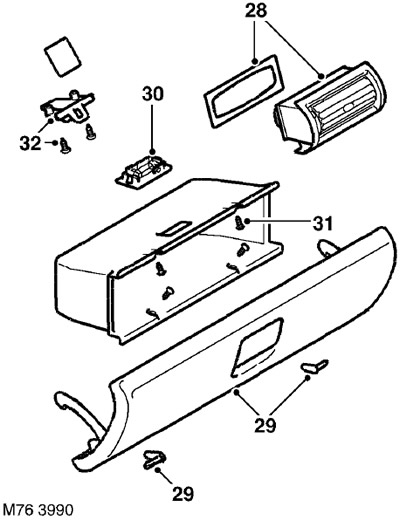
28. Remove the 4 ventilation system deflectors and sealing gaskets from the control panel.
29. Remove the glove box lid hinge pins and remove the lid.
30. Remove the light bulb and glove box mat.
31. Unscrew the 4 glove box mounting screws and remove it.
32. Remove 2 screws from each glove box lock and remove the locks.
33. Remove the switch cover.
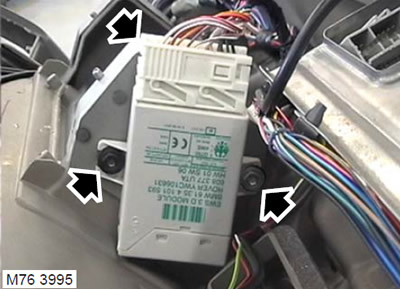
34. Disconnect the electrical connector from the immobilizer control unit.
35. Unscrew the 2 nuts securing the immobilizer control unit to the control panel and remove the control unit.
36. Remove the cover and coin compartments.
Installation
1. Install the cover and coin compartments.
2. Install the immobilizer control unit on the control panel and secure it with nuts.
3. Connect the wiring connector to the immobilizer ECU.
4. Install the switch cover.
5. Install the glove box locks on the control panel and secure them with screws.
6. Install the glove box and secure it with screws.
7. Install the light bulb and glove box mat.
8. Install the glove box lid and its hinge pins.
9. Install the deflectors and sealing gaskets on the control panel.
10. Replace the center console and secure it with screws.
11. Models not equipped with front passenger airbag: Install the handle and secure it with screws.
12. Replace the instrument panel and secure it with screws.
13. Replace the instrument panel and secure it with screws.
14. Reinstall the control panel electrical cable and secure it to the control panel with cable ties.
15. Connect the Lucar type electrical connectors to the glove box light and switch.
16. Connect the electrical connectors to the outside rearview mirror adjustment switch and the headlight beam aiming corrector.
17. Reinstall the outside rearview mirror adjustment button and headlight beam adjuster.
18. Attach the pads to the instrument panel.
19. Replace the instrument panel visor and secure it with screws.
20. Connect the electrical connectors to the instrument panel frame, install the frame and secure it with screws.
21. With the help of a partner, install the control panel into the vehicle and secure it with bolts.
22. Connect the electrical connectors of the control panel cables to the main electrical wiring.
23. Models equipped with front passenger airbag: Install the front passenger airbag.
PASSIVE SAFETY SYSTEMS, REPAIR WORK, Front passenger airbag - for vehicles up to model year 2004.
24. Models not equipped with front passenger airbag: Install the control panel compartment.
INTERIOR TRIM DETAILS, REPAIR WORK, Control panel compartment.
25. Install the front 'A' pillar upper trim panels.
INTERIOR TRIM PARTS, REPAIR WORK, Replacement of the upper decorative panel of the front 'A' pillar.
26. Set the clock.
DEVICES, REPAIR WORK, Watches.
27. Lower the driver's glove box lid and remove the fuse box cover.
28. Connect the connectors to the fuse box.
29. Replace the fuse box cover and close the glove box lid.
30. Install the lower steering column cover and secure it with screws.
31. Install the windshield wiper/turn signal switch and tighten the screw that secures it.
32. Connect the electrical connectors to the windshield wiper/turn signal switch.
33. Install the rotary contactor.
PASSIVE SAFETY SYSTEMS, REPAIR WORK, Rotary contactor of the airbag system.
34. Reinstall the front console.
INTERIOR TRIM PARTS, REPAIR WORK, Center console - for vehicles up to model year 2004.
Comments on this article