Contents: Removal ⇩ Installation ⇩
Removal
1. Loosen the wheel nuts of the front wheels.
2.
WARNING: Support the vehicle securely. Raise the front of the vehicle.
3. Remove the wheel.
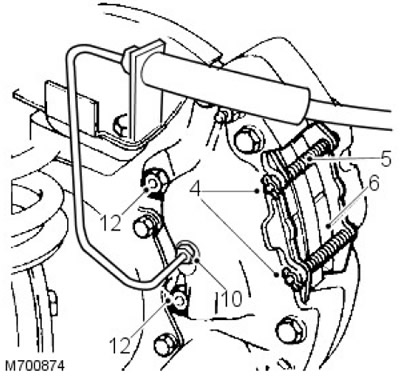
4. Remove the cotter pins from the brake shoe mounting pins.
5. Remove the brake shoe retainers and springs.
6. Remove the brake pads and adjusting washer (if installed).
7. Move aside the brake hose screen.
8. Using a suitable clamp, clamp the brake hose.
9. Place a container under the brake caliper to collect any spilled fluid.
10. Loosen the brake line nipple and disconnect it from the caliper.
11. Close the open connections of the brake line and caliper with plugs.
12. Unscrew the 2 caliper mounting bolts.
[Information obtained from the website: www.lrman.ru]
13. Remove the brake caliper.
WARNING: Do not separate the caliper halves.
14. Clean the outer surfaces of the caliper with an aerosol brake cleaner.
15. Using the special tool LRT-70-500, clamp the pistons into the inner half of the caliper. Carefully, being careful not to get your fingers dirty, and CAREFULLY, apply air pressure into the brake fluid inlet port to force the pistons out. It is unlikely that the pistons will force out at the same time, adjust the force by inserting a suitable piece of wood between the appropriate piston and the caliper.
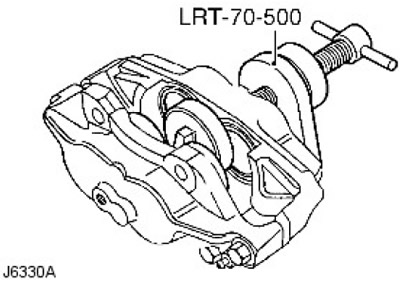
16. Finally, remove the pistons, marking them according to their holes.
17. Remove the wiper seal retainer by inserting a blunt-tipped screwdriver between the retainer and the seal. Carefully lift the retainer off the entry end of the hole.
18. Taking care not to damage the sealing recesses, remove the wiper seal and liquid seal.
19. Using only clean brake fluid, clean the bores, pistons and seal recesses. If the caliper or pistons are rusty or in less than perfect condition, new components must be installed.
20. Apply brake fluid to the new liquid seal. Use your fingers only to release the seal into the recess in the bore. Make sure the seal is seated correctly. The liquid seal and the recess have different cross-sections, so after installing the seal, it will protrude slightly beyond the edge of the inlet end of the bore.
21. Apply brake fluid to the appropriate piston. Manually insert it into the hole without tilting it. While inserting, do not tilt the piston, leave it protruding from the hole by approximately 8 mm.
22. Apply brake fluid to the new wiper seal and install it into the holder. Slide the seal together with the holder (first the cuff) over the protruding piston into the recess of the bore. Use a piston clamp to press the seal retainer and piston into place.
23. Clamp the outer pistons and follow the same procedure to remove and install the outer pistons and seals.
Installation
1. Clean the mating surfaces of the caliper and hub.
2. Install the caliper on the hub, screw in the bolts and tighten them (tightening torque 82 Nm).
3. Remove the plugs from the brake line and caliper connection holes and wipe the connections clean.
4. Connect the line to the caliper, tighten the fitting (tightening torque 15 Nm).
5. Apply a thin film of grease to the back of the brake pads.
6. Install the brake pads onto the calipers. For 2002 and later models, make sure the brake pads are installed correctly. The illustration shows how the leading edge chamfer should be installed.
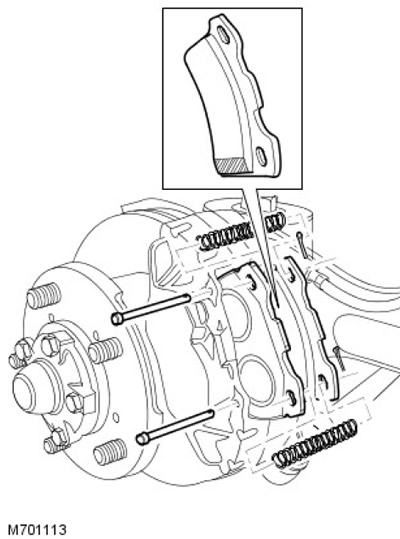
7. Install the brake shoe retainers and springs.
8. Install the cotter pins into the retainers.
9. Remove the brake hose clamp.
10. Remove air from the brake system.
For more information, refer to the chapter: Bleeding the Brake System (206-00 Brake System - General Information, General Procedures).
11. Press the brake pedal to seat the pads on the discs.
12. Install the wheels, remove the axle supports and tighten the wheel nuts (tightening torque 130 Nm).
Comments on this article