Contents: Removal ⇩ Installation ⇩
Removal
1.
WARNING: Never work on a vehicle supported only by a jack. Always support the vehicle with special stands.
Raise and support the vehicle.
2. Disconnect the ground wire from the battery.
For more information, refer to the chapter: Disconnecting and connecting the battery (414-01 Battery, Battery Mounting and Cables, General Procedures).
3. Remove the camshafts.
For more information, refer to the chapter: Camshafts (303-01 Engine - Diesel engine ID4 2.4L, On-car repair).
4. Remove the intake manifold.
For more information, refer to the chapter: Intake Manifold (303-01 Engine - Diesel engine ID4 2.4L, On-car repair).
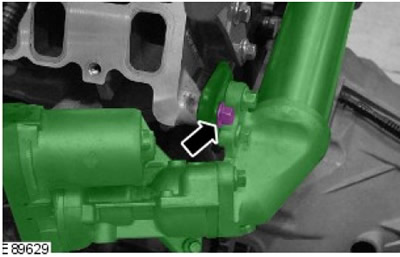
5. NOTE: For clarity, engine shown removed.
Remove the exhaust gas recirculation (EGR) heat exchanger. Remove the bolt.
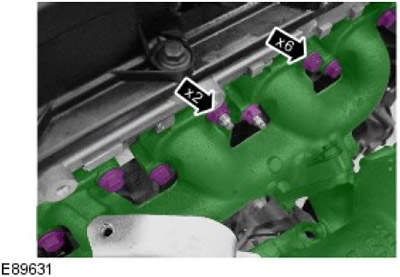
6. Remove the exhaust manifold.
- Remove 6 bolts.
- Unscrew and discard 2 nuts.
- Remove and discard two studs.
- Remove the gasket and dispose of it.
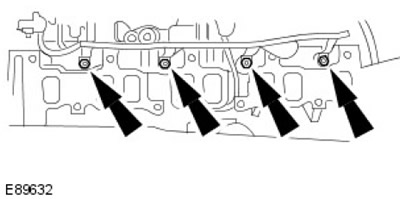
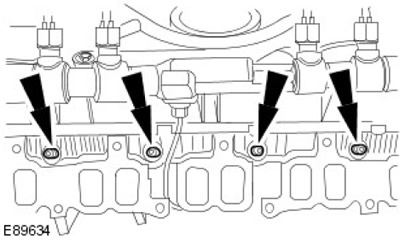
7. Release the glow plug wiring harness. Unscrew the 4 nuts.
8.
CAUTION: Never place the cylinder head face down. Failure to do so may result in damage to the vehicle.
With the help of another mechanic, remove the cylinder head.
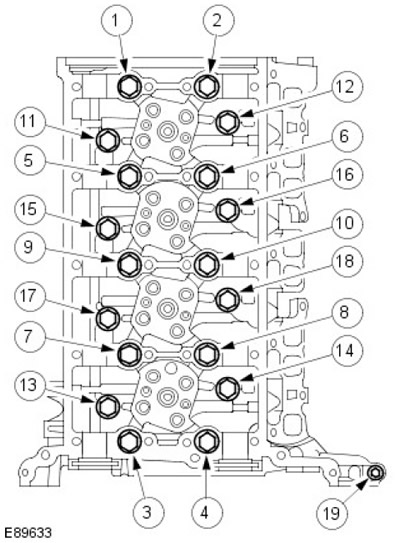
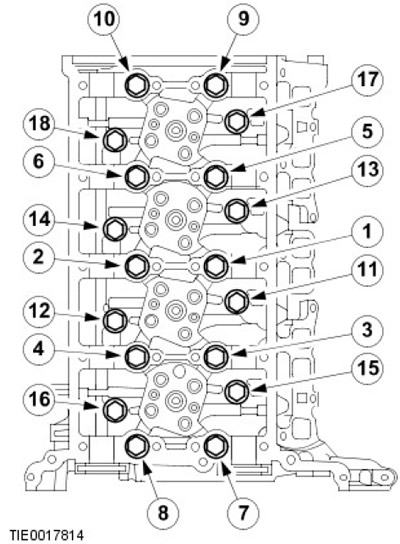
- Remove and discard bolts 1 through 18.
- Remove bolt 19.
- Remove the gasket and dispose of it.
9.
NOTE: Do not perform further disassembly if the component is removed only for access.
Remove 4 glow plugs.
Installation
1. Install the glow plugs. Tighten the glow plugs to 12 Nm.
2.
NOTE: Clean the mating surface of the element.
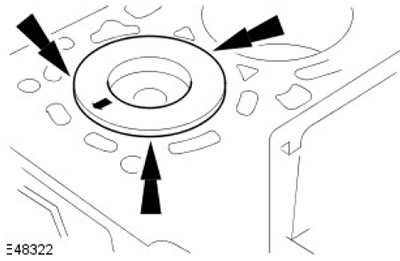
NOTE: Measure the piston protrusion in each cylinder at top dead center (TDC).
Measure the distance between the piston crown and the cylinder block at the indicated points.
3. Determine the thickness of the cylinder head gasket.
For more information, please refer to the chapter: Specifications (303-01 Engine - Diesel Engine ID4 2.4L, Specifications).
4.
CAUTION: The thickness of the new cylinder head gasket depends on the piston protrusion (marked hole/teeth).
Install a new cylinder head gasket.
5.
CAUTION: Install new cylinder head bolts.
NOTE: Clean the mating surface of the element.
Install the cylinder head.
- Tighten the bolts in six steps in the sequence shown.
- Stage 1: Tighten bolts 1 through 10 to 20 Nm.
- Step 2: Tighten bolts 11 through 18 to 10 Nm.
- Step 3: Tighten bolts 1 through 10 to 40 Nm.
- Step 4: Tighten bolts 11 through 18 to 20 Nm.
- Step 5: Tighten bolts 1-10 180 degrees.
- Step 6: Tighten bolts 11 - 18 180 degrees.
- Step 7: Tighten the M6 bolt to 10 Nm.
6. Secure the glow plug wiring harness. Tighten the nuts (tightening torque 3 Nm).
7.
NOTE: Clean the contact surfaces of the elements.
Secure the exhaust manifold.
- Install a new gasket.
- Tighten the new studs to 20 Nm.
- Tighten the new nuts (tightening torque 40 Nm).
- Tighten the bolts (tightening torque 40 Nm).
8. Secure the EGR heat exchanger. Tighten the bolt to 20 Nm.
9. Install the intake manifold.
For more information, refer to the chapter: Intake Manifold (303-01 Engine - Diesel engine ID4 2.4L, On-car repair).
10. Install the camshafts.
For more information, refer to the chapter: Camshafts (303-01 Engine - Diesel engine ID4 2.4L, On-car repair).
11. Connect the ground wire to the battery.
For more information, refer to the chapter: Connecting the Battery (414-01 Battery, Battery Mounting and Cables, General Procedures).
Comments on this article